Weber Genesis Silver A LP Owner Manual
Weber Genesis Silver A LP Manual
 |
View all Weber Genesis Silver A LP manuals
Add to My Manuals
Save this manual to your list of manuals |
Weber Genesis Silver A LP manual content summary:
- Weber Genesis Silver A LP | Owner Manual - Page 1
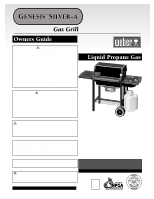
GENESIS® SILVER-A Gas Grill Owners Guide ƽ DANGER If you smell gas: 1. Shut off gas to the appliance. 2. Extinguish any open flames. 3. Open lid 4. If odor continues, keep away from the appliance and immediately call your gas supplier or your fire department. Leaking gas may cause a fire or - Weber Genesis Silver A LP | Owner Manual - Page 2
or disconnected liquid propane cylinder under or near this barbecue. ƽ Improper assembly may be dangerous. Please carefully follow the assembly instructions in this manual. ƽ After a period of storage, and/or nonuse, the Weber Gas Barbecue should be checked for gas leaks and burner obstructions - Weber Genesis Silver A LP | Owner Manual - Page 3
rust through Flavorizer Bars, 1 year no rust through Thermoplastic/Thermoset Parts, 10 years Excluding fading All Remaining Parts, 5 years, when assembled and operated in accordance with the printed instructions accompanying it. Weber may require reasonable proof of your date of purchase. THEREFORE - Weber Genesis Silver A LP | Owner Manual - Page 4
A-3 General Instructions A-5 Exploded View A-6 Parts List A-9 Assembly Instructions B-1 Installing Features C-1 Operating D-1 Lighting D-1 Manual Lighting D-2 Cooking D-3 Storage and/or Nouse D-3 Cleaning D-3 Refilling the LP Cylinder D-4 Safe handling tips for LP Gas D-6 Annual - Weber Genesis Silver A LP | Owner Manual - Page 5
Liquid Propane (LP) gas supply is easy to use and gives you more cooking control than charcoal fuel. • These instructions will give you the minimum requirements for assembling your Weber Gas Barbecue. Please read the instructions carefully before using your Weber Gas Barbecue. Improper assembly can - Weber Genesis Silver A LP | Owner Manual - Page 6
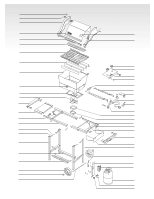
1 2 Genesis Silver-A LP 3 4 25 5 26 6 7 8 27 28 9 29 30 10 31 32 11 33 12 34 13 35 14 36 37 15 38 16 39 30 17 40 18 41 19 42 43 20 44 21 45 46 22 23 24 47 48 A-6 49 - Weber Genesis Silver A LP | Owner Manual - Page 7
, Hose and regulator (assembled) 35. Manifold Support Bracket 36. Spider Stopper Guards 37. Catch Pan 38. Disposable Drip Pan 39. Right Frame 40. Igniter 41. Right Trim Piece 42. Wrap-around Trim Piece 43. Wheel Frame 44. Wing Nuts 45. Cylinder Panel 46. Fuel Guage 47. Liquid Propane Cylinder 48 - Weber Genesis Silver A LP | Owner Manual - Page 8
-Stephen Products Co., Weber, the silhouette, and the kettle configuration are registered trademarks ® of Weber-Stephen Products Co., 200 East Daniels Road, Palatine, IL, 60067-6266, U.S.A. This product is covered by one or more United States patents and patents in other nations globally. Printed - Weber Genesis Silver A LP | Owner Manual - Page 9
You will need: Screwdriver Phillips screwdriver Hammer 7/16 open-end or an adjustable wrench Pliers Block of wood Lid - 1 ® ® Bottom tray - 1 Left Frame - 1 Right Frame -1 Wheel Frame - 1 Leg Frame - 1 Frame Connectors - 1 Cooking Box - 1 Work Surface - 1 Cooking grates - 2 Control panel - 1 - Weber Genesis Silver A LP | Owner Manual - Page 10
Trim Piece - 1 Catch Pan Holder - 1 Catch-Pan - 1 Disposable Drip Pans - 2 Thermometer - 1 Fuel Guage - 1 Wheels - 2 Liquid Propane Cylinder - 1 Manifold Support Bracket - 1 Burner Control Knobs - 2 Hinge Pins (1/4 x 1 1/2 inch clevis pin) - 2 2 inch bolts (1/4 x 20 x 2 inch bolts) - 1 1 3/4 inch - Weber Genesis Silver A LP | Owner Manual - Page 11
Assembly Instructions Assemble wheel frame You will need: axle rod, two wheel hubcaps, rod through the wheel frame. Add the other wheel, WEBER name side facing out. Tap the hubcap onto the axle rod to complete the axle. ER WE B ER WE B Assemble frame You will need: left frame, right frame, two - Weber Genesis Silver A LP | Owner Manual - Page 12
Continue frame assembly You will need: leg frame, wheel frame, four 1/2 inch bolts, the white plugs in the frame as shown Tighten Bolts with wrench. Turn the frame over and continue with assembly. (1) (2) Install tubing plugs You will need: two tubing plugs and a hammer. Insert tubing plugs into - Weber Genesis Silver A LP | Owner Manual - Page 13
so the burner tubes(1) are under the frame brace(2). (1) (2) Your Weber Gas Grill manifold assembly, consisting of gas manifold, valves, hose, regulator and gas burners has been factory assembled, pressure and flame tested. As a safety precaution, we recommend you check the burner alignment - Weber Genesis Silver A LP | Owner Manual - Page 14
in the center. Place your hand underneath the bracket. Lift the manifold, bracket and cooking box slightly, then hook the tab of the bracket onto the frame brace(1). (1) (2) the cylinder glide with the pliers. Repeat procedure with the hole on the bottom left side of the cylinder panel. (1) B-4 - Weber Genesis Silver A LP | Owner Manual - Page 15
. Install igniter Note - The igniter wires are already attached to the Gas Catcher Ignition Chamber and the igniter. This was done to factory test the of the igniter up through the large part of the keyhole in the frame brace. Slide the igniter into the small part of the keyhole. 3) Tighten the - Weber Genesis Silver A LP | Owner Manual - Page 16
Service Representative in your region using the contact information sheet provided with your manual. To fill, take the liquid propane cylinder and filler adapter to an RV center or look up gas-propane propane cylinder in a car on a hot day). For full instructions on safe handling of liquid propane - Weber Genesis Silver A LP | Owner Manual - Page 17
damage a gas fitting. ƽ WARNING: Perform these leak checks even if Checking the fuel level in your tank Check the fuel level by viewing the color indicator level line on the side of the tank scale. 1) Empty 2) Medium 3) Full (1) (2) (3) your barbecue was dealer or store assembled. You will - Weber Genesis Silver A LP | Owner Manual - Page 18
gas. DO NOT OPERATE THE BARBECUE. Contact the Customer Service Representative in your region using the contact information sheet provided with your manual. 3) Valves to manifold . The front of the catch pan holder must be on the same side as the finger grip(1) of the bottom tray. (1) (1) (2) Slide - Weber Genesis Silver A LP | Owner Manual - Page 19
hair pin cotters(1) and two hinge pins(2). Place lid on top of the cooking box. Align the hinges at the rear of the barbecue. Insert hinge pins through the hinges from the outside. Insert - Weber Genesis Silver A LP | Owner Manual - Page 20
left trim piece and the cooking box as shown. Do not use the work surface as a cutting board. (1) (2) (1) Make sure that the tabs on the side table are to the right, next to the cooking box. Install the left end trim piece You will need: End trim piece, two 1/2 inch bolts - Weber Genesis Silver A LP | Owner Manual - Page 21
. Install the thermometer You will need: Thermometer. Insert the thermometer into its holder on the right side of the lid. ® ® Set the cooking grates onto the ledges in the cooking box with the rounded sides up. Install the bottom shelf You will need: Bottom shelf. Set the bottom shelf in place - Weber Genesis Silver A LP | Owner Manual - Page 22
using only Weber authorized replacement hose. Contact the Customer Service Representative in your region using the contact information sheet provided with your manual. 1 2 7 5 3 6 ƽ WARNING: The burner control knobs must be in the OFF position before turning on the liquid propane cylinder tank - Weber Genesis Silver A LP | Owner Manual - Page 23
knobs must be in the OFF position before turning on the liquid propane cylinder valve. If they are not in the OFF position, when you turn on the LP cylinder valve, the "excess gas flow control" feature will activate, limiting the flow of gas from the LP cylinder. If this should occur, turn OFF the - Weber Genesis Silver A LP | Owner Manual - Page 24
gas must be turned off at the liquid propane cylinder when the Weber Gas Barbecue is not in use. s When the Weber Gas Barbecue is stored indoors, the gas supply must be DISCONNECTED and the LP Service Representative in your region using the contact information sheet provided with your manual. - Weber Genesis Silver A LP | Owner Manual - Page 25
statements exactly may result in a fire causing death or serious injury. ƽDANGER ƽNEVER store a spare LP Cylinder under or near this barbecue. ƽNEVER fill the tank beyond 80% full. Your Weber gas grill is equipped with a cylinder supply system designed for vapor withdrawal. ƽWARNING: Only use this - Weber Genesis Silver A LP | Owner Manual - Page 26
, a soap and water solution and a rag or brush to apply it. 1) Turn the LP cylinder so the opening of the valve is either to the front, side or rear of the Weber Gas Barbecue. Lift and hook the cylinder onto the fuel guage. 2) Loosen the cylinder lock wing nut. Swing the cylinder lock down - Weber Genesis Silver A LP | Owner Manual - Page 27
date tested(2) is within five years. Your LP gas supplier can do this for you. If you have questions about spare LP cylinders contact the Customer Service Representative in your region using the contact information sheet provided with your manual. s All LP tank supply systems must include a collar - Weber Genesis Silver A LP | Owner Manual - Page 28
manual. way, do not use the barbecue. Replace using only When leak checks are complete, turn gas supply OFF Weber authorized replacement hose. Contact the at the source and rinse connections with water. Customer Service leaks. Check: 1) Hose-to-manifold connection. 2) Regulator-to-Cylinder - Weber Genesis Silver A LP | Owner Manual - Page 29
tube, follow the burner cleaning procedures. Main Burner Cleaning Procedure Turn off the gas supply. Remove the manifold. Look inside each burner with a flashlight. We recommend that you inspect the Weber Spider Stopper Guards at least once a year. (See Section "Annual Maintenance".) Also inspect - Weber Genesis Silver A LP | Owner Manual - Page 30
Replacing Main Burners 1) Your Weber Gas Barbecue must be OFF and cool. 2) Turn gas OFF at source. 3) To remove control the valve orifices(2). Check proper assembly before fastening manifold in place. (2) (1) (1) 6) Slide the burner assembly out from under the guide screw and washer(1) in the - Weber Genesis Silver A LP | Owner Manual - Page 31
ƽ CAUTION: If the Spider Stopper Guards do not fit tightly, contact the Customer Service Representative in your region using the contact information sheet provided with your manual. ƽ WARNING: After reinstalling the gas lines, they should be leak checked with a soap and water solution before using - Weber Genesis Silver A LP | Owner Manual - Page 32
Troubleshooting Problem Check Burners burn with a yellow or Inspect Weber Spider Stopper orange flame, in conjunction with Guards for possible instructions. the smell of gas. (Blockage of holes.) Cure Clean Weber of lid appears to be "peeling." (Resembles paint peeling.) The lid is
-
 1
1 -
 2
2 -
 3
3 -
 4
4 -
 5
5 -
 6
6 -
 7
7 -
8
-
9
-
10
-
11
-
12
-
13
-
14
-
15
-
16
-
17
-
18
-
19
-
20
-
21
-
22
-
23
-
24
-
25
-
26
-
27
-
28
-
29
-
30
-
31
-
32
 |
 |
W
E
B
E
R
W
E
B
E
R
±
WARNING: Follow all leak-check
procedures carefully in this manual prior
to barbecue operation. Do this even if the
barbecue was dealer-assembled.
NOTICE TO INSTALLER: These
instructions must be left with the owner
and the owner should keep them for future
use.
THIS GAS APPLIANCE IS DESIGNED FOR
OUTDOOR USE ONLY.
±
WARNING: Do not try to light this
appliance without reading the “Lighting”
Instructions section of this manual
±
WARNING
1.
Do not store spare liquid propane
cylinder within 10 feet (3m) of this
appliance.
2.
Do not store or use gasoline or other
flammable liquids or vapors within 25
feet (8m) of this appliance.
®
55007
03/28/00
Liquid Propane Gas
±
DANGER
If you smell gas:
1.
Shut off gas to the appliance.
2.
Extinguish any open flames.
3.
Open lid
4.
If odor continues, keep away from the
appliance and immediately call your gas
supplier or your fire department.
Leaking gas may cause a fire or explosion
which can cause serious bodily injury or
death, or damage to property.
A001.c
B001.c
C001.b
D004.c
S
ILVER–A
G
ENESIS
®
S
ILVER–A
G
ENESIS
®
Gas Grill
Owners Guide
Y
OU
MUST
READ
THIS
O
WNERS
G
UIDE
BEFORE
OPERATING
YOUR
GAS
GRILL