Weber Q 140 Owner Manual
Weber Q 140 Manual
 |
View all Weber Q 140 manuals
Add to My Manuals
Save this manual to your list of manuals |
Weber Q 140 manual content summary:
- Weber Q 140 | Owner Manual - Page 1
electric grill. MANUAL DEL USUARIO - Pg 13 MANUEL UTILISATEUR DU GRILL ELECTRIQUE - Pg 21 PLACE STICKER HERE WARNING! POTENTIAL SHOCK HAZARD This appliance is Rated for 120 volts - 50/60 Hz Output: 1500 W Use only Weber Q140TC temperaturecontrolling plug. m This grill is intended for outdoor - Weber Q 140 | Owner Manual - Page 2
or the like. m Unplug grill when not in use and cover when cool. Properly store the appliance indoors when not in use - out of the reach of children. m Use this grill only as described in this manual. Any other use not recommended in this manual may cause fire, electric shock, or injury to persons - Weber Q 140 | Owner Manual - Page 3
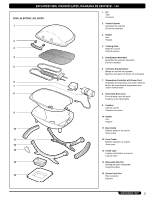
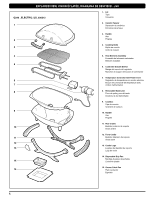
de cocción Grille de cuisson 4 5. Heat Element Assembly Ensamble del elemento calentador Elément chauffant 5 6. Controller Bracket Sleeve Manga del soporte del regulador Manchon de support de bouton de Lèchefrite jetable 15. Grease Catch Pan 15 Plato recolector Egouttoir www.wEbER.cOM® 3 - Weber Q 140 | Owner Manual - Page 4
écLATéE, DIAGRAMA DE DESPIEcE - 240 Q240 _ELECTRIC_US_030212 1 1. Lid Tapa Couvercle 2. Ceramic Spacer Separador de cerámica Entretoise céramique 3. Handle Asa 2 Poignée 4. Cooking Grate 3 Rejilla de cocción Grille de cuisson 4 5. Heat Element Assembly Ensamble del elemento calentador - Weber Q 140 | Owner Manual - Page 5
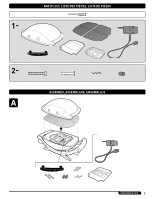
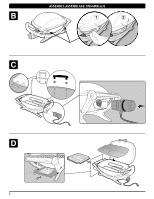
1 - PARTS LIST, LISTE DES PIècES, LISTA DE PIEzAS + 2 - A ASSEMbLy, ASSEMbLAGE, ENSAMbLAjE + www.wEbER.cOM® 5 - Weber Q 140 | Owner Manual - Page 6
ASSEMbLy, ASSEMbLAGE, ENSAMbLAjE B 11 22 C D 6 - Weber Q 140 | Owner Manual - Page 7
to the ORIGINAL PURCHASER of this Weber® electric grill that it will be free of defects in material and workmanship from the date of purchase as follows: Aluminum Castings, Heating Element, Temperature Controller, Thermoplastic/Thermoset Parts, All Remaining Parts, 5 years 2 years 2 years 5 years - Weber Q 140 | Owner Manual - Page 8
cOOKING ON yOUR ELEcTRIc GRILL COOKING To preheat the grill: Turn on the Weber® electric barbecue according to the cooking Instructions in this owners' manual. Close the lid and turn the Temperature Controller to High. Preheat the grill for 15 minutes (Q140) or 20 minutes (Q240); longer preheating - Weber Q 140 | Owner Manual - Page 9
cOOKING ON yOUR ELEcTRIc GRILL You must preheat the grill (15 or 20 minutes) before you cook during this time. Do not exceed 60 minutes total cooking time. For more grilling tips and recipes, visit www.weber.com®. Vegetables Fish & Seafood Poultry Pork Lamb Beef Cut Steak: fillet, rump - Weber Q 140 | Owner Manual - Page 10
TROUbLESHOOTING PROBLEM Electric grill does not turn on. CHECK CURE Is the Temperature Controller properly inserted into housing? Remove and reinstall Temperature Controller. m Always plug Temperature Controller fully into grill before plugging power cord into outlet. Is red power light on and - Weber Q 140 | Owner Manual - Page 11
Weber® electric barbecue OFF and wait for it to cool before cleaning. b m WARNING: Avoid grease build up on the grate and inside a your grill off. 2) Carefully tilt the heating element slightly upwards and slide the removeable bowl liner out and away from grill. Scrape the inside of the bowl - Weber Q 140 | Owner Manual - Page 12
has been safety tested and is only certified for use in a specific country. Refer to country designation located on outer carton. These parts may be gas carrying or gas burning components. Please contact Weber-Stephen Products LLC, Customer Service Department for genuine Weber-Stephen Products LLC - Weber Q 140 | Owner Manual - Page 13
Manual de uso antes instalar o usar el producto Ensamblaje - Pg 5 ¡ADVERTENCIA! PELIGRO POTENCIAL DE DESCARGA ELÉCTRICA PELIGRO Este asador eléctrico está clasificado para 120 V - 50/60 Hz Potencia: 1500 W Use solamente un enchufe con regulación de temperatura Weber o retirarle partes o antes - Weber Q 140 | Owner Manual - Page 14
ctrico o enchufe dañado. Contácte al Centro de Servicio de Weber Stephen, S.A. de C.V. El Regulador de Temperatura está fabricado específicamente de la manera como está descrita en este manual. Cualquier otro uso no recomendado en este manual pudiera causar fuegos, descargas eléctricas o lesiones - Weber Q 140 | Owner Manual - Page 15
de rutina según se indica en este manual del propietario. Esta Garantía Limitada no WEBER-STEPHEN PRODUCTS LLC Customer Service Center 90 West Hillcrest Boulevard, Suite 308 Schaumburg, IL 60195 USA Para partes de repuesto llame a: 1-800-446-1071 www.weber.com® Para compras hechas en México WEBER - Weber Q 140 | Owner Manual - Page 16
ctrico Weber® de acuerdo a las instrucciones de cocción en este manual del parte inferior del asador eléctrico). Hay disponibles bandejas de goteo desechables Weber de 15 minutos (Q140) o 20 minutos (Q240); cuando se está asando a una temperatura 6 B B - BAJO (LOW) 5 + 1 4 16 C C - MEDIO (MED) - Weber Q 140 | Owner Manual - Page 17
durante este lapso. No se sobrepase de un tiempo total de cocción de más de 60 minutos. Para sugerencias y recetas de asados, visite www.weber.com®. Carnes de ave Cerdo Cordero Carne de res Corte Bistec: filete, cadera Pincho Hamburguesa Chuletas de cordero Costillar de cordero Grosor y/o peso - Weber Q 140 | Owner Manual - Page 18
información de contacto en nuestro sitio en la Internet. Conéctese a www.weber.com®. Regulador de Temperatura con cordón eléctrico Utilice una solución de agua de grasa. Tapa interna - Mientras la tapa esté tibia, limpie la parte interna con una toalla de papel para prevenir la acumulación de grasa. - Weber Q 140 | Owner Manual - Page 19
DEL FORRO DE QUITA Y PON DEL TAZÓN m ADVERTENCIA: apague el asador eléctrico Weber® y espere a que se enfríe antes de limpiarlo. b m ADVERTENCIA: Evite la acumulación de grasa sobre a la parrilla y la parte interna de la caja de cocción. Es necesaria la limpieza frecuente de la parrilla y del - Weber Q 140 | Owner Manual - Page 20
gas o lo quemen. Por favor póngase en contacto con el Departamento de Atención al Cliente de Weber-Stephen Products LLC para obtener información sobre las partes de repuesto Weber-Stephen Products LLC genuinas. m ADVERTENCIA: No trate de realizar reparación alguna a los componentes que transporten - Weber Q 140 | Owner Manual - Page 21
les instructions. m ATTENTION: Les brosses du grill devraient cordon, les prises, les appareils portables (ou toute autre pièce service client le plus proche aux coordonnées de contact figurant sur notre site Web. Allez sur www.weber.com®. m L'utilisation d'accessoires non recommandés par Weber - Weber Q 140 | Owner Manual - Page 22
une piscine. m N'utilisez pas le grill si la prise ou le cordon du contrôleur de température est endommagé. Appelez Weber pour demander un contrôleur de rieur hors de portée des enfants. m Utilisez ce grill conformément aux instructions du manuel. Toute autre utilisation non recommandée dans ce - Weber Q 140 | Owner Manual - Page 23
weber.com® Connectez-vous sur www.weber.com®, sélectionnez votre pays d'origine, et enregistrez votre grill aujourd'hui. ◆ INSTRUcTIONS GENERALES Si vous avez des questions ou avez besoin d'une assistance concernant votre grill ou son fonctionnement, contactez l'agent de service Weber® electric - Weber Q 140 | Owner Manual - Page 24
grill: allumez le barbecue électrique Weber® conformément aux instructions de cuisson figurant dans ce manuel. Fermez le couvercle et tournez le bouton de température sur High (élevé). Préchauffez le grill pendant 15 minutes (Q140) ou 20 minutes (Q240 B B - FAIBLE (LOW) 5 + 1 4 24 C C - - Weber Q 140 | Owner Manual - Page 25
10 degrés pendant ce délai. Ne dépassez les 60 minutes de cuisson. Pour plus de conseils sur la cuisson au grill et des recettes, allez sur www.weber.com®. Volaille Porc Agneau Boeuf Morceau Steak, filet, surlonge Kebab Hamburger Côtelettes d'agneau Carré d'agneau Epaisseur et/ou poids 3/4 po - Weber Q 140 | Owner Manual - Page 26
procéder au nettoyage. Pour en savoir sur la disponibilité des grilles de cuisson, contactez l'agent du service client de votre région, à partir des coordonnées de contact que vous trouverez sur notre site Web. Allez sur www.weber.com®. Contrôleur de température avec cordon d'alimentation - Utilisez - Weber Q 140 | Owner Manual - Page 27
Weber® et laissez-le refroidir avant de procéder au b nettoyage. a m AVERTISSEMENT: évitez l'accumulation de graisse sur la grille utilisation. m Branchez toujours le contrôleur de température entièrement dans le grill avant de brancher le cordon d'alimentation dans la prise. Le trop-plein de - Weber Q 140 | Owner Manual - Page 28
de tests de sécurité et est certifié pour une utilisation dans un pays particulier uniquement. Vérifiez la désignation de pays située sur le carton d'emballage. Ces pièces peuvent contenir du gaz ou être des éléments dont la combustion produit du gaz. Veuillez consulter le Service clientèle de Weber
-
 1
1 -
 2
2 -
 3
3 -
 4
4 -
 5
5 -
 6
6 -
 7
7 -
8
-
9
-
10
-
11
-
12
-
13
-
14
-
15
-
16
-
17
-
18
-
19
-
20
-
21
-
22
-
23
-
24
-
25
-
26
-
27
-
28
 |
 |
PLACE STICKER HERE
When using electrical appliances, basic safety
precautions should always be followed including the
following:
m
Read all instructions.
m
CAUTION: Grill brushes should be checked for loose
bristles and excessive wear on a regular basis. Replace
brush if any loose bristles are found on cooking grates or
brush. Weber recommends purchasing a new stainless
steel grill brush at the beginning of every spring.
m
CAUTION: To ensure continued protection against risk of
electric shock, connect to properly grounded three prong
GFI outlets only. Do not use a two prong adapter.
m
WARNING: Use only outdoors, do not expose to rain.
This is to prevent electric shock which can cause serious
bodily injury or death.
m
WARNING: Disconnect appliance from supply circuit
before performing maintenance and cleaning.
m
WARNING: For protection against risk of electric shock,
connect to properly grounded outlets only.
m
WARNING: For protection against risk of electric shock,
keep extension cord connection dry and off the ground.
m
CAUTION: Store Temperature Controller indoors when not
in use.
m
Do not place on or near a hot gas or electric burner, or in
a heated oven.
m
Use extreme caution when removing tray or disposing of
hot grease.
m
Do not clean with metal scouring pads. Pieces can break
off the pad and touch electrical parts, creating a risk of
electric shock.
m
Do not use charcoal in this appliance.
m
Do not touch surfaces that may be hot. Use handles or
knobs provided.
m
To protect against electrical shock do not immerse cord,
plugs, portable appliances (or other specific part or parts)
in water or other liquid.
m
Close supervision is necessary when any appliance is
used by or near children.
m
Make sure appliance is OFF and remove plug from outlet
when not in use, before putting on or taking off parts, and
before cleaning. Allow to cool before handling.
m
Do not operate any appliance with a damaged cord or
plug or after the appliance malfunctions or is dropped or
damaged in any manner. Contact the Customer Service
Representative in your area using the contact information
on our web site. Log onto www.weber.com®.
m
The use of accessories not recommended by Weber may
cause damage or injuries.
m
Do not let cord hang over edge of table or counter or
touch hot surfaces.
m
Where applicable, always attach plug to appliance and
check that the control is OFF before plugging cord into
wall outlet. To disconnect, turn the control to OFF, then
remove plug from wall outlet.
m
Do not use appliance for other than intended use.
m
Avoid contacting moving parts.
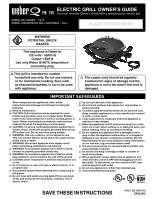
WARNING!
POTENTIAL SHOCK
HAZARD
This appliance is Rated for
120 volts - 50/60 Hz
Output: 1500 W
Use only Weber Q140TC temperature-
controlling plug.
m
This grill is intended for outdoor
household use only. Do not use indoors
or for commercial cooking. Fuel, such
as charcoal briquettes, is not to be used
with appliance.
m
The supply cord should be regularly
examined for signs of damage and the
appliance is not to be used if the cord is
damaged.
ELECTRIC GRILL OWNER’S GUIDE
You must read this Owner’s Guide before operating your electric grill.
IMPORTANT SAFEGUARDS
MANUAL DEL USUARIO
-
Pg 13
MANUEL UTILISATEUR DU GRILL ELECTRIQUE
-
Pg 21
SAVE THESE INSTRUCTIONS
41121 US 10/31/12
ENGLISH