Weber Summit Gold A Owner Manual - Page 35
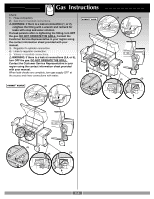
a = Yellow Tab with Black Wire, b = White Tab with Black Wire, c = Green Tab with Black Wire, d =
 |
View all Weber Summit Gold A manuals
Add to My Manuals
Save this manual to your list of manuals |
Page 35 highlights
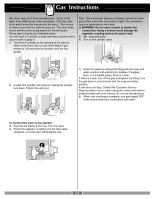
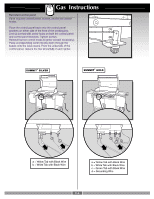
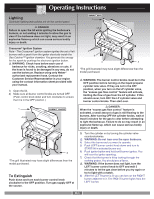
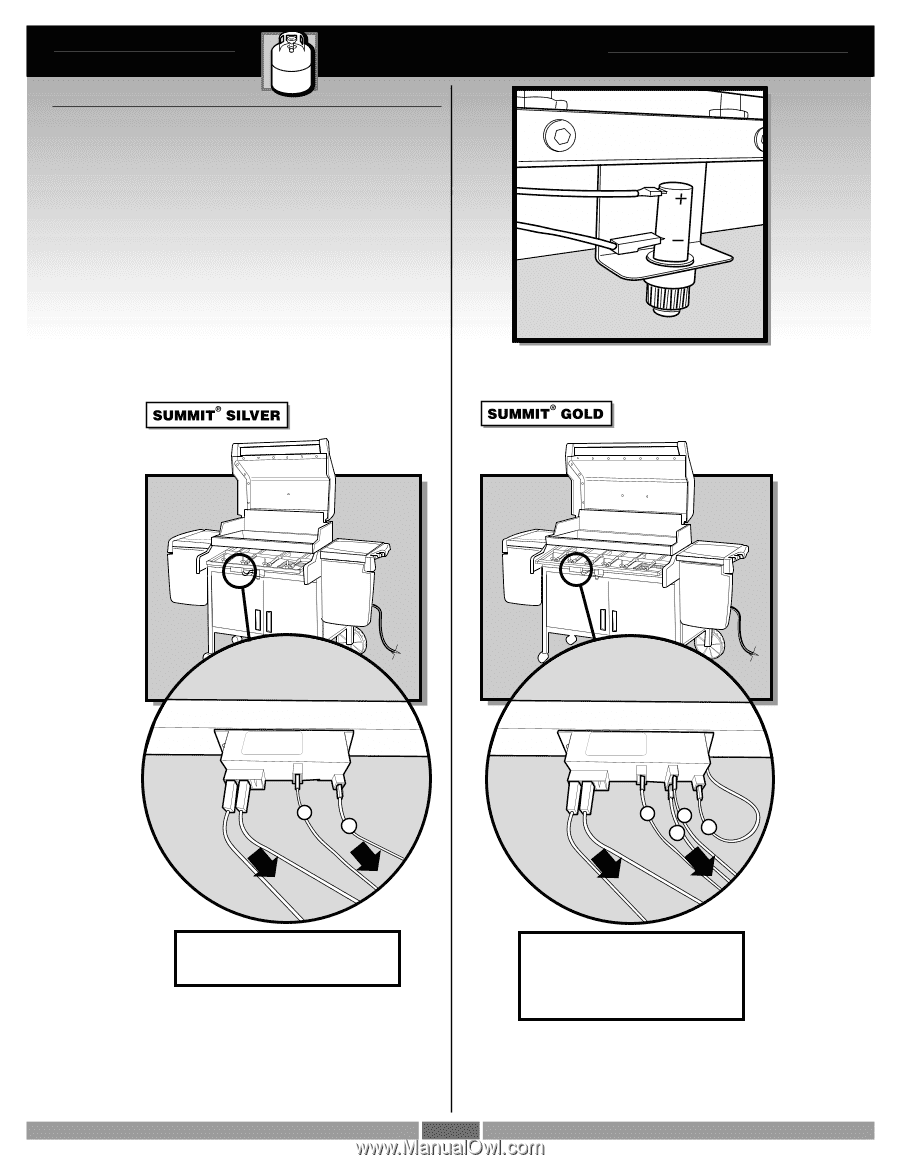
Gas Instructions Reinstall control panel Parts required: control panel, screws, and burner control knobs. Place the control panel back onto the control panel brackets on either side of the front of the cooking box. (1) Line up screws with screw holes on both the control panel and control panel brackets. Tighten screws. (2) Reinstall burner control knobs & igniter wires(if necessary). Place corresponding control knobs down through the bezels onto the valve stems. From the underside of the control panel, replace the two wires(1,2) of each igniter. -+ -+ a b a = Yellow Tab with Black Wire b = White Tab with Black Wire -+ -+ ac bd a = Yellow Tab with Black Wire b = White Tab with Black Wire c = Green Tab with Black Wire d = Grounding Wire C-6
-
 1
1 -
2
-
3
-
4
-
5
-
6
-
7
-
8
-
9
-
10
-
11
-
12
-
13
-
14
-
15
-
16
-
17
-
18
-
19
-
20
-
21
-
22
-
23
-
24
-
25
-
26
-
27
-
28
-
29
-
 30
30 -
 31
31 -
 32
32 -
 33
33 -
 34
34 -
 35
35 -
 36
36 -
 37
37 -
 38
38 -
 39
39 -
 40
40 -
41
-
42
-
43
-
44
-
45
-
46
-
47
 |
 |
C-6
Gas
Instructions
(1)
(2)
Reinstall control panel
Parts required: control panel, screws, and burner control
knobs.
Place the control panel back onto the control panel
brackets on either side of the front of the cooking box.
Line up screws with screw holes on both the control panel
and control panel brackets. Tighten screws.
Reinstall burner control knobs & igniter wires(if necessary).
Place corresponding control knobs down through the
bezels onto the valve stems. From the underside of the
control panel, replace the two wires
(1,2)
of each igniter.
a = Yellow Tab with Black Wire
b = White Tab with Black Wire
-
+
-
+
a
b
a = Yellow Tab with Black Wire
b = White Tab with Black Wire
c = Green Tab with Black Wire
d = Grounding Wire
-
+
-
+
c
b
a
d