Weber Summit S-470 LP Owner Manual - Page 36
Removing The Sear Station
 |
View all Weber Summit S-470 LP manuals
Add to My Manuals
Save this manual to your list of manuals |
Page 36 highlights
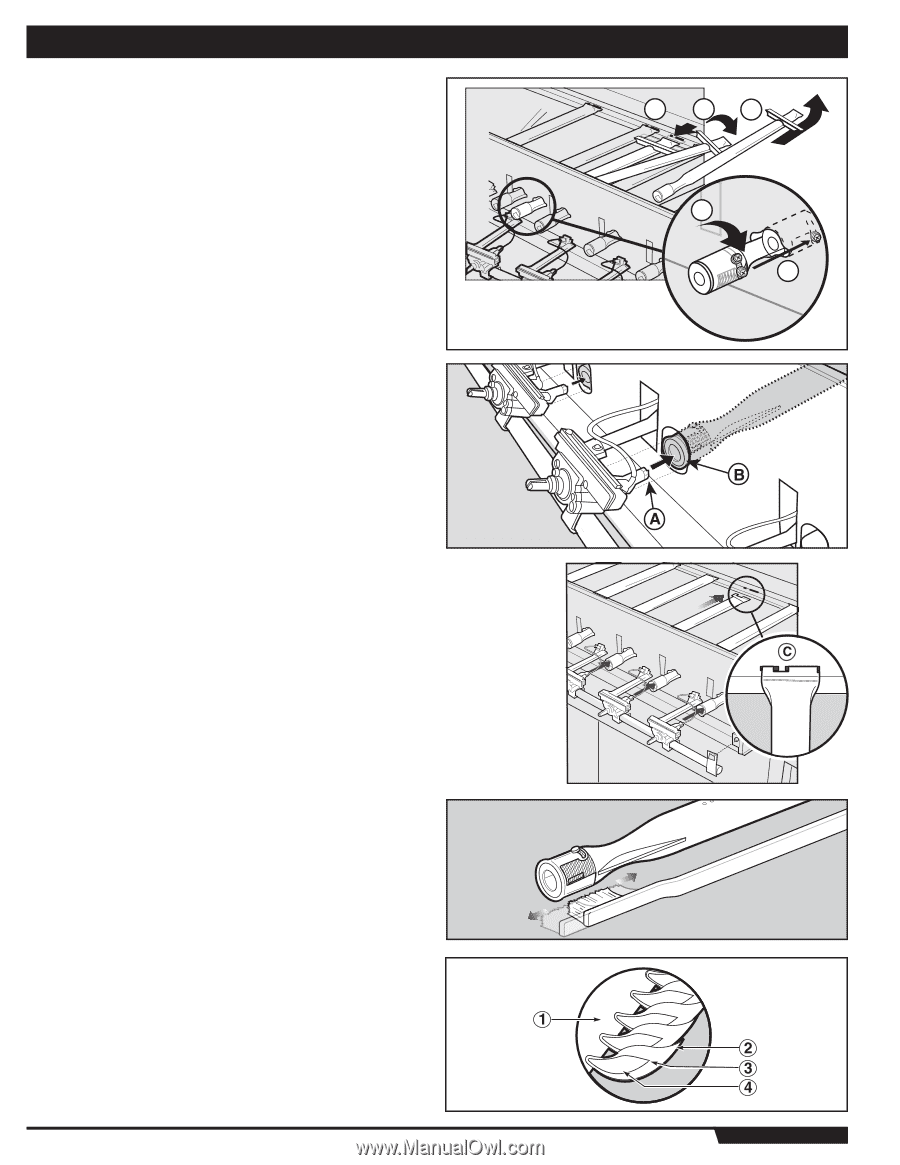
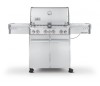
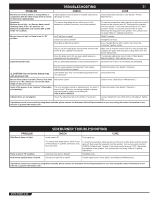
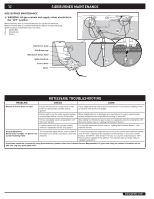
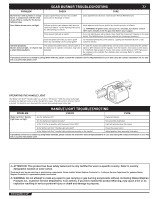
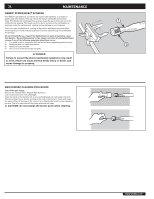
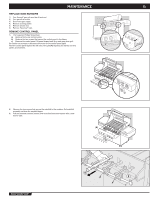
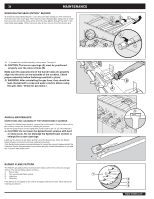
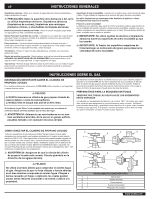
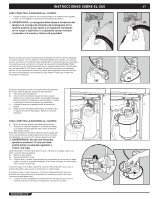
36 MAINTENANCE REMOVING THE SEAR STATION™ BURNER To remove the Sear Station Burner™, pull the burner tube toward you. This removes it from the burner tube notch (a.). Then rotate the tube clockwise (b.), taking care to rotate the burner tube so that the screw at the end of the tube (d.) fits through the notch in the heat shield opening (e.). When the burner tube is free, remove it from the firebox (c.). 10) To reinstall the manifold assembly, reverse steps 7 through 9. ƽ CAUTION: The burner openings (A) must be positioned properly over the valve orifices (B). Make sure the opposite end of the burner tubes (C) properly align into the slots on the backside of the cookbox. Check proper assembly before fastening manifold in place. ƽ WARNING: After reinstalling the gas lines, they should be leak checked with a soap and water solution before using the grill. (See, "Check for gas leaks.") a. b. c. d. e. ANNUAL MAINTENANCE INSPECTION AND CLEANING OF THE SPIDER/INSECT SCREENS To inspect the Spider/Insect screens, remove the control panel. If there is dust or dirt on the screens, remove the burners for cleaning the screens. Brush the Spider/Insect screens lightly with a soft bristle brush (i.e. an old toothbrush). ƽ CAUTION: Do not clean the Spider/Insect screens with hard or sharp tools. Do not dislodge the Spider/Insect screens or enlarge the screen openings. Lightly tap the burner to get debris and dirt out of the burner tube. Once the Spider/ Insect screens and burners are clean replace the burners. If the Spider/Insect screen becomes damaged or cannot be cleaned, please contact the Customer Service Representative in your area using the contact information on our web site. Log onto www.weber.com®. BURNER FLAME PATTERN The Weber® gas barbecue burners have been factory set for the correct air and gas mixture. The correct flame pattern is shown. 1) Burner tube 2) Tips occasionally flicker yellow 3) Light blue 4) Dark blue If the flames do not appear to be uniform throughout the burner tube, follow the burner cleaning procedures. WWW.WEBER.COM®
-
 1
1 -
2
-
3
-
4
-
5
-
6
-
7
-
8
-
9
-
10
-
11
-
12
-
13
-
14
-
15
-
16
-
17
-
18
-
19
-
20
-
21
-
22
-
23
-
24
-
25
-
26
-
27
-
28
-
29
-
30
-
 31
31 -
 32
32 -
 33
33 -
 34
34 -
 35
35 -
 36
36 -
 37
37 -
 38
38 -
 39
39 -
 40
40 -
 41
41 -
42
-
43
-
44
-
45
-
46
-
47
-
48
-
49
-
50
-
51
-
52
-
53
-
54
-
55
-
56
-
57
-
58
-
59
-
60
-
61
-
62
-
63
-
64
-
65
-
66
-
67
-
68
-
69
-
70
-
71
-
72
-
73
-
74
-
75
-
76
-
77
-
78
-
79
-
80
-
81
-
82
-
83
-
84
-
85
-
86
-
87
-
88
-
89
-
90
-
91
-
92
 |
 |