Weider Crossbow By 2000x English Manual
Weider Crossbow By 2000x Manual
 |
View all Weider Crossbow By 2000x manuals
Add to My Manuals
Save this manual to your list of manuals |
Weider Crossbow By 2000x manual content summary:
- Weider Crossbow By 2000x | English Manual - Page 1
you have questions, or if there are missing or damaged parts, we will guarantee complete satisfaction through direct assistance from our Read all precautions and instructions in this manual before using this equipment. Save this manual for future reference. USERʼS MANUAL Visit our website at - Weider Crossbow By 2000x | English Manual - Page 2
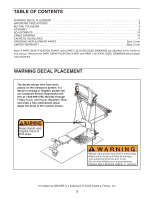
13 CABLE DIAGRAM 16 EXERCISE GUIDELINES 17 ORDERING REPLACEMENT PARTS Back Cover LIMITED WARRANTY Back Cover Note: A PART IDENTIFICATION CHART and a PART LIST/EXPLODED DRAWING are attached in the center of this manual. Remove the PART IDENTIFICATION CHART and PART LIST/EXPLODED DRAWING before - Weider Crossbow By 2000x | English Manual - Page 3
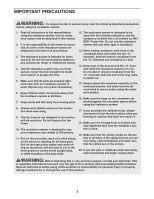
the included resistance, and the resistance included with a CrossBow by WEIDER™ Power Pak. Do not use the resistance system with exercise program, consult your physician. This is especially important for persons over the age of 35 or persons with pre-existing health problems. Read all instructions - Weider Crossbow By 2000x | English Manual - Page 4
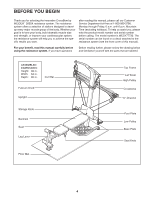
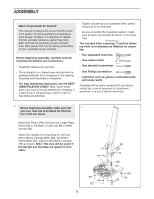
CrossBow by WEIDER™ 2000X this manual, please call our Customer Service Department toll manual). For your benefit, read this manual carefully before using the resistance system. If you have questions Before reading further, please review the drawing below and familiarize yourself with the parts - Weider Crossbow By 2000x | English Manual - Page 5
. • For help identifying small parts, use the PART IDENTIFICATION CHART. Note: Some small parts may have been pre-attached for shipping. If a part is not in the parts bag, check to see if it has been pre-attached. • Tighten all parts as you assemble them, unless instructed to do otherwise. • As - Weider Crossbow By 2000x | English Manual - Page 6
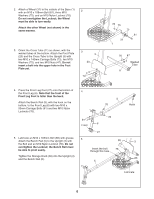
2. Attach a Wheel (31) to the outside of the Base (1) 2 with an M10 x 108mm Bolt (81), three M10 Washers (75), and an M10 Nylon Locknut (76). Do not overtighten the Locknut; the Wheel must be able to turn easily. Attach the other Wheel (not shown) in the same manner. 3. Orient the Cross Tube - Weider Crossbow By 2000x | English Manual - Page 7
6. Attach the Lat Tower (4) to the Upright (3) with 6 four M10 x 25mm Button Head Screws (87) and four M10 Lock Washers (103). Attach the Name Plate (89) to the Lat Tower (4) 4 with two M4 x 16mm Screws (62). 62 89 62 103 87 87 103 3 7. Attach two Eyebolts (34) to the Top Frame (10) with - Weider Crossbow By 2000x | English Manual - Page 8
of the Seat Carriage (12) with an M8 x 104mm Button Head Bolt (60) and an M8 Nylon Locknut (65) as shown. Make sure that the parts are oriented as shown in the inset drawing; the Seat Knob (not shown) will not engage the Bench Rail (not shown) if they are incorrectly - Weider Crossbow By 2000x | English Manual - Page 9
and slide the rod into the slot, as shown in the inset drawing. 15 14. Attach the two 10-pound Short Crossbow Caps 14 (20) to the 10-pound Center Crossbow (44) with two M4 x 12mm Flat Head Screws (85). Using twelve M4 x 12mm Flat Head Screws (85), attach the two 10 - Weider Crossbow By 2000x | English Manual - Page 10
flat edge of the Pulley Guard is on the side shown. 19. Attach a Pulley Housing (94) to the indicated "U"channel on the 10-pound Center Crossbow (44) with an M10 x 102mm Button Head Bolt (24), two Pivot Bushings (74), and an M10 Nylon Locknut (76). Wrap the Long Cable (80) over - Weider Crossbow By 2000x | English Manual - Page 11
on the bottom. 20 3 40 28 76 29 80 Flat Edge 21. Attach a Pulley Housing (94) to the indicated "U"channel on the 10-pound Center Crossbow (44) with an M10 x 102mm Button Head Bolt (24), two Pivot Bushings (74), and an M10 Nylon Locknut (76). Wrap the Long Cable (80) around - Weider Crossbow By 2000x | English Manual - Page 12
use of the remaining parts will be explained in ADJUSTMENTS, beginning on the following page. Before using the resistance system, pull the long cable a few times to Make sure that it moves smoothly over the pulleys. If the cable does not move smoothly, find and correct the problem. IMPORTANT: If the - Weider Crossbow By 2000x | English Manual - Page 13
exercise guide to see the correct form for each exercise. Make sure all parts are properly tightened each time the resistance system is used. Replace worn parts immediately. The resistance system can be cleaned with a damp cloth and a mild, non-abrasive detergent. Do not use solvents. The crossbows - Weider Crossbow By 2000x | English Manual - Page 14
To purchase a lat bar, call our Customer Service Department toll-free at 1-800-9993756 and ask crossbow to be used, and finish with the lightest crossbow. When removing crossbows from the "U"-channels, start with the lightest crossbow and finish with the heaviest. Note: The CrossBow by WEIDER™ 2000X - Weider Crossbow By 2000x | English Manual - Page 15
the Bench Rail (5). Rest the Backrest against the Upright (3). For row exercises, remove the Backrest (14). Hold the Backrest vertically over the Seat (13 and the Bench Rail. Remove all of the crossbows from the "U"-channels on the 10-pound Center Crossbow (44) (see ADJUSTING THE RESISTANCE on page - Weider Crossbow By 2000x | English Manual - Page 16
apart from the resistance system, as shown in the video or on the exercise guide. To remove a Crossbow, pull it out of the Crossbow Spacer (35). 67 36 To replace the Removable Crossbows (36, 67), slide them into the Crossbow Spacer (35) from the side shown, so that the arrows on the rings point - Weider Crossbow By 2000x | English Manual - Page 17
the appropriate parts of the body. Exercising in an uncontrolled manner will leave you feeling exhausted. On the exercise guide accompanying this manual you will find photographs showing the correct form for several exercises, and a list of the muscles affected. Refer to the muscle chart on page - Weider Crossbow By 2000x | English Manual - Page 18
chart on page 19 of this manual can be photocopied and used to schedule and record your workouts. List the date, the exercises to achieving the greatest results is to make exercise a regular and enjoyable part of your everyday life. MUSCLE CHART A. Sternomastoid (neck) B. Pectoralis Major (chest - Weider Crossbow By 2000x | English Manual - Page 19
MONDAY Date: // EXERCISE RESISTANCE SETS REPS TUESDAY Date: // AEROBIC EXERCISE WEDNESDAY Date: // EXERCISE RESISTANCE SETS REPS THURSDAY Date: // AEROBIC EXERCISE FRIDAY Date: // EXERCISE RESISTANCE SETS REPS Make photocopies of this page for scheduling and recording your - Weider Crossbow By 2000x | English Manual - Page 20
PART IDENTIFICATION CHART Refer to the drawings below to identify small parts used in assembly. The number in parentheses below each drawing is the key number of the part, from the PART LIST on the reverse side of this page. Note: Some small parts may have been pre-attached. If a part is not in the - Weider Crossbow By 2000x | English Manual - Page 21
M10 x 53mm Carriage Bolt (61) 1/4" x 12mm Flat M10 x 65mm Button Head Screw (70) Head Screw (107) M10 x 60mm Bolt (63) 1/4" x 45mm Button Head Screw (58) M10 x 42mm Button Head Bolt (71) M10 x 25mm Button Head Screw (87) 1/4" x 25mm Screw (108) M4 x 19mm Screw (77) M8 x 19mm Button Head Screw (86) - Weider Crossbow By 2000x | English Manual - Page 22
x 5mm Screw 80-pound Top Crossbow "U"-channel Extension 1/4" x 12mm Screw 1/4" x 25mm Screw Curl Bar Floor Mat Userʼs Manual Exercise Guide Exercise Manual Exercise Decal Large Allen Wrench Small Allen Wrench Note: "#" indicates a non-illustrated part. Specifications are subject to change without - Weider Crossbow By 2000x | English Manual - Page 23
EXPLODED DRAWING-Model No. WESY77730 R0104A 21 76 71 28 33 8 65 59 38 34 14 75 70 93 10 85 100 59 65 85 38 85 79 100 95 34 21 71 16 76 28 33 85 20 88 101 67 4 85 86 100 105 100 96 79 100 36 85 85 15 53 62 62 58 62 58 72 103 87 35 85 88 108 44 101 54 58 62 17 62 89 - Weider Crossbow By 2000x | English Manual - Page 24
CrossBow by WEIDER™ 2000X resistance system) • The SERIAL NUMBER of the product (see the front cover of this manual) • The KEY NUMBER and DESCRIPTION of the part(s) (see the PART usage or repairs not provided by an ICON authorized service center; products used for commercial or rental purposes; or
-
 1
1 -
 2
2 -
 3
3 -
 4
4 -
 5
5 -
 6
6 -
 7
7 -
8
-
9
-
10
-
11
-
12
-
13
-
14
-
15
-
16
-
17
-
18
-
19
-
20
-
21
-
22
-
23
-
24
 |
 |

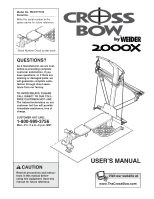
CAUTION
Read all precautions and instruc-
tions in this manual before
using this equipment. Save this
manual for future reference.
Model No. WESY77730
Serial No.
Write the serial number in the
space above for future reference.
QUESTIONS?
As a manufacturer, we are com-
mitted to providing complete
customer satisfaction. If you
have questions, or if there are
missing or damaged parts, we
will guarantee complete satis-
faction through direct assis-
tance from our factory.
TO AVOID DELAYS, PLEASE
CALL DIRECT TO OUR TOLL-
FREE CUSTOMER HOT LINE.
The trained technicians on our
customer hot line will provide
immediate assistance, free of
charge.
CUSTOMER HOT LINE:
1-800-999-3756
Mon.–Fri., 6 a.m.–6 p.m. MST
Visit our website at
www.TheCrossBow.com
USERʼS MANUAL
Serial Number Decal (under seat)