Weider Platinum Plus 1000 English Manual
Weider Platinum Plus 1000 Manual
 |
View all Weider Platinum Plus 1000 manuals
Add to My Manuals
Save this manual to your list of manuals |
Weider Platinum Plus 1000 manual content summary:
- Weider Platinum Plus 1000 | English Manual - Page 1
CONTACT OUR CUSTOMER SERVICE DEPARTMENT DIRECTLY. CALL TOLL-FREE: 1-877-992-5999 Mon.-Fri., 6 a.m.-6 p.m. MST ON THE WEB: www.weiderservice.com CAUTION Read all precautions and instructions in this manual before using this equipment. Save this manual for future reference. USER'S MANUAL Visit our - Weider Platinum Plus 1000 | English Manual - Page 2
OPERATION 21 TROUBLESHOOTING 23 EXERCISE GUIDELINES 24 ORDERING REPLACEMENT PARTS Back Cover LIMITED WARRANTY Back Cover Note: A PART IDENTIFICATION CHART and a PART LIST/EXPLODED DRAWING are attached in the center of this manual. Remove the PART IDENTIFICATION CHART and PART LIST/EXPLODED - Weider Platinum Plus 1000 | English Manual - Page 3
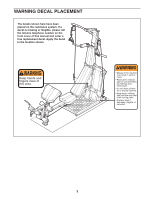
WARNING DECAL PLACEMENT The decals shown here have been placed on the resistance system. If a decal is missing or illegible, please call the toll-free telephone number on the front cover of this manual and order a free replacement decal. Apply the decal in the location shown. Keep hands and fingers - Weider Platinum Plus 1000 | English Manual - Page 4
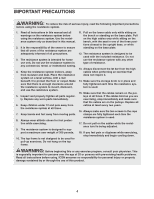
. 7. Keep hands and feet away from moving parts. 8. Always wear athletic shoes for foot protection while exercising. 9. The resistance system is designed to support a maximum user weight of 300 pounds. 10. The top frame is not designed to be used for pull-up exercises. Do not hang on the top frame - Weider Platinum Plus 1000 | English Manual - Page 5
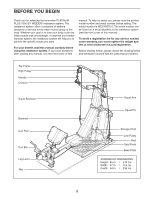
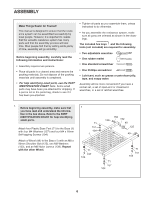
the front cover of this manual). To avoid a registration fee for any service needed under warranty, you must register the weight system at www.weiderservice.com/registration. Before reading further, please review the drawing below and familiarize yourself with the parts that are labeled. Top Frame - Weider Platinum Plus 1000 | English Manual - Page 6
parts, use the PART IDENTIFICATION CHART. Note: Some small parts may have been pre-attached for shipping. If a part is not in the parts bag, check to see if it has been pre-attached. • Tighten all parts as you assemble them, unless instructed to do otherwise. • As you assemble the resistance system - Weider Platinum Plus 1000 | English Manual - Page 7
2. Insert two M10 x 65mm Carriage Bolts (103) up through the Base (1). Place a piece of tape over the Bolt heads to hold them in place. Connect the Upright Base (2) to the Base with the two Carriage Bolts and two M10 Nylon Locknuts (112). Do not tighten these Locknuts yet. Connect the Upright Base - Weider Platinum Plus 1000 | English Manual - Page 8
5. Remove the two M14 Nylon Locknuts (127). 5 Attach the Left Arm Frame (8) to the Upright Base (2) with the two M14 x 155mm Bolts (107) used in step 2 and the two M14 Nylon Locknuts. 2 107 127 8 107 127 6. Attach the Backing Plate (59) to the Upright Base 6 (2) with two M10 x 65mm - Weider Platinum Plus 1000 | English Manual - Page 9
8. Slide the Squat Carriage (10) onto the Upright (3) 8 as shown. Insert the Squat Pin (35) into an upper hole in the Upright. 3 10 35 9. Press the Front Cover (31) onto the Upright Base 9 (2). Make sure the Cover is oriented as shown in the inset drawing. Route the Upper Wire Harness (172 - Weider Platinum Plus 1000 | English Manual - Page 10
Frame are properly aligned before tighten the Screw. Tighten the four M10 x 73mm Bolts (137) in the Base (1) and the two M10 Nylon Locknuts (112) used in the first paragraph of step 2. 10 129 144 137 129 124 3 14 15 137 1 129 137 11. Locate the Lower Wire Harness (173) (see - Weider Platinum Plus 1000 | English Manual - Page 11
13. Wet a Squat Arm (18) and the inside of a Small 13 Foam Pad (36) with soapy water. Slide the Foam Pad onto the Squat Arm. 137 Grease Grease an M10 x 73mm Bolt (137). Attach a Squat Arm (18) to the Squat Carriage (10) with 36 110 10 the Bolt, two 24mm Plastic Washers (110), and 18 an M10 - Weider Platinum Plus 1000 | English Manual - Page 12
17. Orient the Rail (5) with the holes on the side 17 shown. Attach the Rail to the Upright Base (2) 44 with an M10 x 106mm Bolt (19) and an M10 Nylon Locknut (112). Do not overtighten the Locknut; the Rail must be able to pivot easily. Tighten the Storage Knob (44) into the 112 Attach at - Weider Platinum Plus 1000 | English Manual - Page 13
(74) to the bottom holes in the Seat Carriage (16) with an M8 Nylon Jamnut (139) and an M8 x 102mm Bolt (119). Make sure the parts are oriented as 16 138 shown in the inset drawing. 5 21. Make sure that the wide sides of all six Seat Wheels (74) are pressed - Weider Platinum Plus 1000 | English Manual - Page 14
23. Route the short end of the Split Cable (72) through the Front Leg (4) and attach it inside the Leg Lever (13) with a Leg Lever Pin (91) and a Cotter Pin (90). Attach a 90mm Pulley (92) inside the Front Leg (4), over the Split Cable (72), with an M10 x 92mm Bolt (116), two M10 Washers (129), two - Weider Platinum Plus 1000 | English Manual - Page 15
12) with 28 two M6 x 16mm Screws (108). 29. Make sure that all parts have been properly tightened. The use of the remaining parts will be explained in ADJUSTMENTS, beginning on the next page. Before using the resistance system, turn on the console and change the resistance setting as described in - Weider Platinum Plus 1000 | English Manual - Page 16
get the most benefit from your exercise program. Also, see the accompanying exercise guide to see the correct form for each exercise. Make sure all parts are properly tightened each time the resistance system is used. Replace worn parts immediately. The resistance system can be cleaned with a damp - Weider Platinum Plus 1000 | English Manual - Page 17
Ab Strap (not shown) can be attached to the Rope (not shown) using the two Extension Straps (not shown) and four Cable Clips (161). ATTACHING (26) from the resistance system when performing an exercise that does not require it. 26 12 45 4 ATTACHING THE CURL BAR To use the Curl Bar (43), first - Weider Platinum Plus 1000 | English Manual - Page 18
user could become 161 trapped under the Squat Arms (18). ADJUSTING THE BACKREST The Backrest (24) can be used in a level position or an inclined position. To use the highest position (see ATTACHING THE SQUAT STATION above). For row exercises, remove the Backrest Frame (17) from the Seat Carriage ( - Weider Platinum Plus 1000 | English Manual - Page 19
Seat Knob into an adjustment hole in the Rail. To perform row exercises, the hip strap must be attached to the rope (see ATTACHING THE the MAX PACK to your resistance system will increase your minimum and maximum resistance levels. The resistance system can be used at a lower resistance level again - Weider Platinum Plus 1000 | English Manual - Page 20
the toe of your shoe on the end of the Base (1). Tilt the resistance system back onto the Wheels (49) and roll it to the new location. WARNING: Make sure that the Storage Knob (44) is in place and fully tightened each time the resistance system is used. 20 25 5 4 3 2 44 49 1 20 - Weider Platinum Plus 1000 | English Manual - Page 21
with the touch of a button. When a program is selected, the console will guide you through an effective upper body, ab and back, or lower body workout. To use the manual mode of the console, follow the steps at the right. To use a program, see page 22. If no buttons are pressed and no cables are - Weider Platinum Plus 1000 | English Manual - Page 22
: Always plug in the transformer when using the resistance system. Note: If no buttons are pressed and no cables are pulled for ten minutes, the console will go to sleep. Press any button to resume exercising. 2. Select a program. When the power is on, the words MANUAL MODE will appear in the main - Weider Platinum Plus 1000 | English Manual - Page 23
TROUBLESHOOTING RECALIBRATING THE CONSOLE To recalibrate the Console (21), first plug in the resistance system (see PLUGGING IN THE RESISTANCE SYSTEM on page 21). Then, press and hold the NEXT button and the MOTORIZED WEIGHT used on the resistance system can stretch slightly when it is first used. - Weider Platinum Plus 1000 | English Manual - Page 24
only the appropriate parts of the body. Exercising in an uncontrolled manner will leave you feeling exhausted. On the exercise guide accompanying this manual you will find photographs showing the correct form for several exercises, and a list of the muscles affected. Refer to the muscle chart on the - Weider Platinum Plus 1000 | English Manual - Page 25
keep a record of each workout. The chart on pages 26 and 27 of this manual can be photocopied and used to schedule and record your workouts. List the date, the exercises performed, the resistance used, and the numbers of sets and repetitions completed. Record your weight and key body measurements at - Weider Platinum Plus 1000 | English Manual - Page 26
MONDAY Date: // EXERCISE WEIGHT SETS REPS TUESDAY Date: // AEROBIC EXERCISE WEDNESDAY Date: // EXERCISE WEIGHT SETS REPS THURSDAY Date: // AEROBIC EXERCISE FRIDAY Date: // EXERCISE WEIGHT SETS REPS Make photocopies of this page for scheduling and recording your workouts. 26 - Weider Platinum Plus 1000 | English Manual - Page 27
MONDAY Date: // EXERCISE WEIGHT SETS REPS TUESDAY Date: // AEROBIC EXERCISE WEDNESDAY Date: // EXERCISE WEIGHT SETS REPS THURSDAY Date: // AEROBIC EXERCISE FRIDAY Date: // EXERCISE WEIGHT SETS REPS Make photocopies of this page for scheduling and recording your workouts. 27 - Weider Platinum Plus 1000 | English Manual - Page 28
PART IDENTIFICATION CHART-Model No. WESY9975.0 M10 Nylon Locknut (112) M8 Nylon Jamnut (139) M6 x 38mm Screw (128) M10 x 53mm Button Bolt (140) M14 Nylon Locknut (127) M10 - Weider Platinum Plus 1000 | English Manual - Page 29
PART LIST-Model No. WESY9975.0 Key No. Qty. 1 1 2 1 3 1 4 1 5 1 6 1 7 1 8 1 9 1 10 1 11 6 12 1 13 1 102 3 103 4 104 16 105 2 106 13 R1105A Description Max Pack Frame Motor Assembly Mech Arm Plate Lower Pulley Plate M12 Washer Backing Plate Rep Counter Band Wheel Rod - Weider Platinum Plus 1000 | English Manual - Page 30
Endcap M3 Washer Threaded Spacer Button Screw Pin Oil Pad Mat Sensor M3 x 6mm Self-tapping Screw M4 x 10mm Self-tapping Screw User's Manual Exercise Guide Hex Key Grease Pack Note: "#" indicates a non-illustrated part. Specifications are subject to change without notice. See the back cover of the - Weider Platinum Plus 1000 | English Manual - Page 31
EXPLODED DRAWING C-Model No. WESY9975.0 R1105A 83 181 86 82 88 148 85 22 59 148 129 112 144 89 118 112 62 80 163 80 87 77 77 78 102 88 106 112 60 78112 106 143 142 79 134 112 163 11 33 102 11 88 33 78 102 15 112 112 124 88 182 116 170 112 56 160 112 146 76 180 57 160 104 - Weider Platinum Plus 1000 | English Manual - Page 32
EXPLODED DRAWING A-Model No. WESY9975.0 R1105A 25 108 123 74 119 108 119 122 123 119 139 139 16 136 121 136 139 74 121160 160 138 123 122 122 74 123 74123 26 24 106 42 66 155 43 108 40 104 104 126 128 126 168 128 157 104 17 128 126 126 106 41 106 44 112 154 66 48 - Weider Platinum Plus 1000 | English Manual - Page 33
EXPLODED DRAWING B-Model No. WESY9975.0 R1!05A 21 68 18 28 172 173 65 112 46 106 106 47 58 27 117 73 141 73 129 141 20 23 149 158 92 27 50 67 36 115 73 110 137 14151 112 114 112 73 92 65 6 159 114 141 159 110 112 51 115 137 110 67 159 112 36 108 110 112 15968 108 112 - Weider Platinum Plus 1000 | English Manual - Page 34
MODEL NUMBER of the product (WESY9975.0) • the NAME of the product (PLATINUM PLUS 1000 BY WEIDER resistance system) • the SERIAL NUMBER of the product (see the front cover of this manual) • the KEY NUMBER and DESCRIPTION of the part(s) (see the PART LIST and EXPLODED DRAWING in the center of this
-
 1
1 -
 2
2 -
 3
3 -
 4
4 -
 5
5 -
 6
6 -
 7
7 -
8
-
9
-
10
-
11
-
12
-
13
-
14
-
15
-
16
-
17
-
18
-
19
-
20
-
21
-
22
-
23
-
24
-
25
-
26
-
27
-
28
-
29
-
30
-
31
-
32
-
33
-
34
 |
 |

CAUTION
Read all precautions and instruc-
tions in this manual before
using this equipment. Save this
manual for future reference.
QUESTIONS?
As a manufacturer, we are com-
mitted to providing complete
customer satisfaction. If you
have questions, or if a part is
damaged or missing, PLEASE
CONTACT OUR CUSTOMER
SERVICE DEPARTMENT
DIRECTLY.
CALL TOLL-FREE:
1-877-992-5999
Mon.–Fri., 6 a.m.–6 p.m. MST
ON THE WEB:
www.weiderservice.com
Serial Number Decal (under seat)
Model No. WESY9975.0
Serial No.
Write the serial number in the
space above for future reference.
Visit our website at
www.weiderfitness.com
new products, prizes,
fitness tips, and much more!
USER’S MANUAL