Weider Precision 200 English Manual
Weider Precision 200 Manual
 |
View all Weider Precision 200 manuals
Add to My Manuals
Save this manual to your list of manuals |
Weider Precision 200 manual content summary:
- Weider Precision 200 | English Manual - Page 1
providing complete customer satisfaction. If you have questions, or if parts are damaged or missing, PLEASE DO NOT CONTACT THE STORE; please Read all precautions and instructions in this manual before using this equipment. Keep this manual for future reference. USER'S MANUAL Visit our website at - Weider Precision 200 | English Manual - Page 2
CABLE DIAGRAM 14 EXERCISE GUIDELINES 15 PART LIST 17 EXPLODED DRAWING 18 ORDERING REPLACEMENT PARTS Back Cover LIMITED WARRANTY Back cover of this manual and request a free replacement decal. Apply the decal in the location shown. Note: The decals may not be shown at actual size. WEIDER is a - Weider Precision 200 | English Manual - Page 3
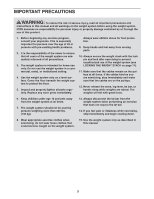
IMPORTANT PRECAUTIONS WARNING: To reduce the risk of serious injury, read all important precautions and instructions in this manual and all warnings on the weight system before using the weight system. ICON assumes no responsibility for personal injury or property damage sustained by or through the - Weider Precision 200 | English Manual - Page 4
versatile WEIDER® PRECISION SYSTEM 200 weight system. The weight system manual. To avoid a registration fee for any service needed under warranty, you must register the weight system at www.weiderservice.com/registration. For your benefit, read this manual carefully before using the weight system - Weider Precision 200 | English Manual - Page 5
will be used. Make sure that there is enough clearance to walk around the weight system. • To hire an authorized service technician to assemble the weight system in your home, call 1-800-445-2480. • Place all parts in a cleared area and remove the packing materials. Do not dispose of the packing - Weider Precision 200 | English Manual - Page 6
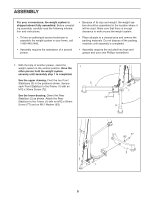
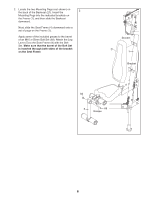
2. Locate the two Mounting Pegs (not shown) on 2 the back of the Backrest (21). Insert the Mounting Pegs into the indicated brackets on the Frame (1), and then slide the Backrest downward. Next, slide the Seat Frame (4) downward onto a set of pegs on the Frame (1). Apply some of the included - Weider Precision 200 | English Manual - Page 7
The use of the remaining parts will be explained in ADJUSTMENT, beginning on page 8. Before using the weight system, pull each cable a few times to make sure that the cables move smoothly around the pulleys. If one of the cables does not move smoothly, find and correct the problem. IMPORTANT: If the - Weider Precision 200 | English Manual - Page 8
your exercise program. Also, refer to the accompanying exercise guide to see the correct form for a variety of exercises. Make sure all parts are properly tightened each time the weight system is used. Replace any worn parts immediately. The weight system can be cleaned with a damp cloth and a mild - Weider Precision 200 | English Manual - Page 9
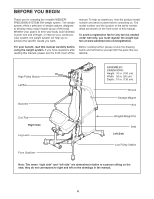
Seat Frame (4) onto a set of pegs on the Frame (1). When the Seat (22) is not in use, set the Seat Frame (4) away from the weight system. 91 42 31 43 43 44 22 4 1 USING THE PRESS ARMS To use the Press Arms (7, 8) pull them away from the Press Arm Magnets (39 - Weider Precision 200 | English Manual - Page 10
CONNECTING THE LEG LEVER To use the Leg Lever (5), first slide the Seat Frame (4) on a set of pegs on the Frame (1). Next, attach a Chain (44) between the Leg Lever (5) and the Low Cable (31) with two Cable Clips (43). USING THE CURL PAD To use the Curl Pad (23), first remove the upper Seat Frame - Weider Precision 200 | English Manual - Page 11
LOCKING THE WEIGHT STACK Lock the weight stack by inserting the Lock Pin (54) into one of the Weight Guides (19) and securing the Lock (55) onto the Lock Pin. 19 55 54 11 - Weider Precision 200 | English Manual - Page 12
. Note: The actual resistance at each station may vary due to differences in individual weights as well as friction between the cables, pulleys, and weight guides. WEIGHT 1 2 3 4 5 6 7 8 PRESS ARM (lbs.) 44 64 83 104 123 145 170 199 HIGH PULLEY (lbs.) 24 31 41 57 66 78 86 99 LEG LEVER - Weider Precision 200 | English Manual - Page 13
system is used. Replace any worn parts immediately. The weight system can be cleaned with a damp cloth and a mild, non-abrasive detergent. Do not use solvents. TIGHTENING THE CABLES Woven cable, the type of cable used on the weight system REPLACEMENT PARTS on the back cover of this manual. 13 - Weider Precision 200 | English Manual - Page 14
. Use the diagram to make sure that the cables and the cable traps are assembled correctly. If the cables are not assembled correctly, the weight system will not function properly and damage may occur. Make sure that the cable traps do not touch or bind the cables. High Cable (30) Length - Weider Precision 200 | English Manual - Page 15
each exercise, and moving only the appropriate parts of the body. Exercising in an uncontrolled way will leave you feeling exhausted. On the exercise guide accompanying this manual you will find photographs showing the correct form for several exercises, and a list of the muscles affected. See the - Weider Precision 200 | English Manual - Page 16
the end of every month. The key to achieving the greatest results is to make exercise a regular and enjoyable part of your everyday life. A B C D E F G H I J K L M N O P Q R S T U V W X MUSCLE CHART A. Sternomastoid (neck) B. Pectoralis Major (chest) C. Biceps (front of arm) D. Obliques (waist - Weider Precision 200 | English Manual - Page 17
PART LIST-Model No. WESY2037.0 R0807B Key No. Qty. Description Key No. Qty. Description 1 1 Frame 2 Cap 91 1 Handle Strap 92 4 13mm x 26mm Inner Cap * - User's Manual * - Exercise Guide * - Grease Packet * - Hex Key Note: Specifications are subject to change without - Weider Precision 200 | English Manual - Page 18
EXPLODED DRAWING A-Model No. WESY2037.0 R0807B 45 42 43 91 44 24 45 82 11 57 33 56 62 28 27 28 61 10 59 23 6 88 39 73 57 7 34 63 88 34 9 73 64 59 10 39 65 22 67 45 34 64 9 57 8 34 59 65 45 87 40 47 25 35 40 25 5 87 68 4 60 25 66 25 73 46 69 35 40 33 40 68 - Weider Precision 200 | English Manual - Page 19
EXPLODED DRAWING B-Model No. WESY2037.0 R0807B 20 73 13 13 30 12 31 3 92 80 38 57 38 27 80 27 79 57 49 57 59 49 50 59 26 59 58 57 74 50 30 15 59 70 64 49 27 59 59 63 49 59 63 21 29 32 1 85 86 60 85 60 86 84 71 37 70 51 27 57 18 64 29 57 31 73 18 69 17 64 51 27 27 26 - Weider Precision 200 | English Manual - Page 20
and description of the replacement part(s) (see the PART LIST and the EXPLODED DRAWING near the end of this manual) LIMITED WARRANTY ICON Health & Fitness, Inc. (ICON) warrants this product to be free from defects in workmanship and material, under normal use and service conditions, for a period of
-
 1
1 -
 2
2 -
 3
3 -
 4
4 -
 5
5 -
 6
6 -
 7
7 -
8
-
9
-
10
-
11
-
12
-
13
-
14
-
15
-
16
-
17
-
18
-
19
-
20
 |
 |
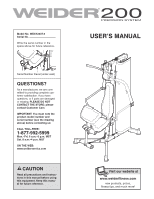
Model No. WESY2037.0
Serial No.
Write the serial number in the
space above for future reference.
QUESTIONS?
As a manufacturer, we are com-
mitted to providing complete cus-
tomer satisfaction. If you have
questions, or if parts are damaged
or missing,
PLEASE DO NOT
CONTACT THE STORE; please
contact Customer Care.
IMPORTANT: You must note the
product model number and
serial number (see the drawing
above) before contacting us:
CALL TOLL-FREE:
1-877-992-5999
Mon.–Fri. 6 a.m.–6 p.m. MST
Sat. 8 a.m.–4 p.m. MST
ON THE WEB:
www.weiderservice.com
USER’S MANUAL
CAUTION
Read all precautions and instruc-
tions in this manual before using
this equipment. Keep this manu-
al for future reference.
Visit our website at
www.weiderfitness.com
new products, prizes,
fitness tips, and much more!
Serial Number Decal (under seat)