Weider Pro 230 Bench English Manual
Weider Pro 230 Bench Manual
 |
View all Weider Pro 230 Bench manuals
Add to My Manuals
Save this manual to your list of manuals |
Weider Pro 230 Bench manual content summary:
- Weider Pro 230 Bench | English Manual - Page 1
E XE R C I S ECZIJI I='MEN -r QUE ST IONS HLI LINEI 1-800-736-6879 CAUTION! Read all precautions and Instructions in this user's manual before using thls equipment. Save this user's manual for future reference. PATENT PENDING 0 0 0 0 C 0 SEARS, ROEBUCK AND CO., HOFFMAN ESTATES, IL 60179 - Weider Pro 230 Bench | English Manual - Page 2
BEFORE YOU BEGIN ASSEMBLY TROUBLE-SHOOTING AND MAINTENANCE USING THE BODYLIFT ORDERING REPLACEMENT PARTS WARRANTY 2 3 4 10 11 Back Cover Back Cover Note: There is a PART IDENTIFICATION CHART and an EXPLODED DRAWING stapled to the center of this user's manual. Remove them before beginning - Weider Pro 230 Bench | English Manual - Page 3
Weight Resistance System. The compact BODYLIFT features an impressive array of weight manual carefully before using the BODYLIFT. If you have additional questions, please call our Customer Service manual). Before reading further, please look at the drawing below and familiarize yourself with the parts - Weider Pro 230 Bench | English Manual - Page 4
parts used in assembly, remove the PART IDENTIFICATION CHART from the center of this user's manual. Note: Some small parts may have been preattached for shipping purposes. If a part is not found in the parts 1. Before you begin, read the information and instructions at the top of this page. Note: The - Weider Pro 230 Bench | English Manual - Page 5
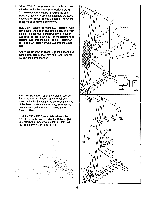
3. Attach the Footrest (35) to the Front Upright (7) with two 3/8" x 2 3/4" Bolts (85), two 3/8" Flat 3 Washers (53), and two 3/8" Nylon Locknuts (33) as shown. 0 0 7 35 33 4. Remove the 3/8" x 1 1/2" Carriage Bolt (80) and the 3/8" Nylon Jam Nut (41) from the indicated brackets on the Front - Weider Pro 230 Bench | English Manual - Page 6
6. Slide a Weld Cover (63) onto each of the indicat- 6 ed axles on the Front and Rear Uprights (7, 2). The Weld Covers must be turned so the open sides are facing the Uprights. Lubricate the axles. Slide a Short Riser (4) onto the axles. The Short Riser must be turned as shown. Hold a 3/4" - Weider Pro 230 Bench | English Manual - Page 7
8. Carefully cut the wire tie attached to the Cable (25). Wrap the loop of Cable from steps 4 and 5 8 around the 3 1/2" Pulley (27) as shown. Hold the Pulley and the Pulley Covers (88) between the indicated holes in the Selector Plate (19). Make sure that the Pulley Covers are turned so the - Weider Pro 230 Bench | English Manual - Page 8
Locknuts (33). The Bolts must be inserted from the side shown, or the BODYLIFT will not function properly. Press a Small Bumper (91) onto the underside of the Handle (12). Assemble the Right Press Arm (11) in the same manner. 11. Insert the 1/4" x 2 1/2" Carriage Bolt (46) into the Seat Bracket (38 - Weider Pro 230 Bench | English Manual - Page 9
properly tightened. The use of all remaining parts will be explained in USING THE Remy' !FT An pnga 11 elf ti* rnnnliaL Before using the BODYLIFT, the cable should be adjusted. See HOW TO TIGHTEN THE CABLE on page 10 of this user's manual. In addition, pull the cable a few times to - Weider Pro 230 Bench | English Manual - Page 10
TROUBLE-SHOOTING AND MAINTENANCE Inspect and tighten all parts each time you use the BODYLIFT. Replace any worn parts immediately. The BODYLIFT can be cleaned using Cable (25) is needed, see ORDERING REPLACEMENT PARTS on the back cover of this user's manual. Ball Adjustment Sleeve 25 0 27 81 10 - Weider Pro 230 Bench | English Manual - Page 11
instructions below describe how each part of the BODYLIFT can be adjusted. Refer to the EXERCISE GUIDE accompanying this user's manual for exercise guidelines, and to see how the BODYLIFT should be set up for each exercise unique BODYLIFT utilizes its own weight and the weight of the user to provide - Weider Pro 230 Bench | English Manual - Page 12
the product (PROFORM® BODYLIFT Body Weight Resistance System). • The PART NUMBER of the part(s) (see the PART LIST/EXPLODED DRAWING accompanying this user's manual). • The DESCRIPTION of the part(s) (see the PART LIST/EXPLODED DRAWING accompanying this user's manual). Your BODYLIFT has added value - Weider Pro 230 Bench | English Manual - Page 13
REMOVE THIS PART LIST/EXPLODED DRAWING FROM THE MANUAL! - Weider Pro 230 Bench | English Manual - Page 14
Model No. 831.159412 This chart is provided to help you identify the small parts used in assembly. The number in parenthesis below each part refers to the key number of the part. The second number refers to the quantity needed for assembly. Note: Some parts may have been pre-assembled for shipping - Weider Pro 230 Bench | English Manual - Page 15
\\\\\\\\\\ 1/4" x 1 1/4" Bolt (49)-3 1/4" x 3/4" Screw (47)-2 5/16" x 2 3/4" Bolt (78)-1 O 3/8" x 2" Bolt (87)-1 W\\\\\\\\ 1/4" x 2 1/2" Screw (32)-1 M V 1/4" x 2 1/2" Carriage Bolt (46)-1 )0 3/8" x 2 1/2" Carriage Bolt (70)-4 3/8" x 2 1/2" Bolt (44)--4 O \\\\\\\\\\ O 1/4" x 1 3/4" Bolt - Weider Pro 230 Bench | English Manual - Page 16
1 Leg Lever 10 120583 1 Moment Arm 11 121470 1 Right Press Arm 12 121471 2 Press Arm Handle 13 120586 2 Pad Tube 14 120587 1 Seat 15 1 Knob Pin # 123329 1 User's Manual # 123763 1 Exercise Guide Note: "r indicates a non-illustrated part. Specifications are subject to change without notice - Weider Pro 230 Bench | English Manual - Page 17
EXPLODED DRAWING-Model No. 831.159412 79 30 71 79 14 24 67 69 13 :4 1.47 33 21 V 73 78 67 32 55 24 24 1 33 89 61 53 67 43 42 1 24 66 68 86 8 56 33 45 31 77 • 45 77 , 18 27 te 50 41 33\ 53 \ 6/ 72 75 53 1 1128 49 fr.-- 62 69 F 9 16 3 41 34 74 62 69 74 15 ao "4-32
-
 1
1 -
 2
2 -
 3
3 -
 4
4 -
 5
5 -
 6
6 -
 7
7 -
8
-
9
-
10
-
11
-
12
-
13
-
14
-
15
-
16
-
17
 |
 |

)."'"
LARS®
Model
No.
831.159412
Serial
No.
Write
the
serial
number
in
the
space
above
for
reference.
•
.
SerialNumber
Decal
E
X
E
R C I S
ECZIJI
I='MEN
-r
QUE
ST
IONS
HLI
LINEI
1-800-736-6879
CAUTION!
Read
all
precautions
and
Instructions
in
this
user's
man-
ual
before
using
thls
equip-
ment.
Save
this
user's
manual
for
future
reference.
PATENT
PENDING
USER'S
MANUAL
0
0
O
O
0
0
C
0
SEARS,
ROEBUCK
AND
CO.,
HOFFMAN
ESTATES,
IL
60179