Weider Pro 350 L Bench English Manual
Weider Pro 350 L Bench Manual
 |
View all Weider Pro 350 L Bench manuals
Add to My Manuals
Save this manual to your list of manuals |
Weider Pro 350 L Bench manual content summary:
- Weider Pro 350 L Bench | English Manual - Page 1
. Serial Number Decal (under seat) QUESTIONS? If you have questions, or if parts are damaged or missing, DO NOT CONTACT THE STORE; please contact Customer Care. IMPORTANT: Please register this product (see the limited warranty on the back cover of this manual) before contacting Customer Care - Weider Pro 350 L Bench | English Manual - Page 2
drawing shows the location(s) of the warning decal(s). If a decal is missing or illegible, see the front cover of this manual and request a free replacement decal. Apply the decal in the location shown. Note: The decal(s) may not be shown at actual size. WEIDER PRO is a trademark of ICON IP, Inc. 2 - Weider Pro 350 L Bench | English Manual - Page 3
you are performing bench press exercises, your partner should stand behind you to catch the barbell if you cannot complete a repetition. 6. Inspect and properly tighten all parts regularly. Replace any worn parts immediately. 7. The weight bench is designed to support a maximum user weight of 300 - Weider Pro 350 L Bench | English Manual - Page 4
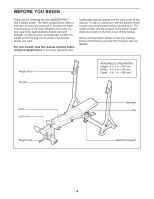
the new WEIDER PRO™ 350 L weight bench. The 350 L weight bench offers a model number and the location of the serial number decal are shown on the front cover of this manual. Before reading further, please review the drawing below and familiarize yourself with the parts that are labeled. Weight - Weider Pro 350 L Bench | English Manual - Page 5
number in parentheses by each drawing is the key number of the part, from the PART LIST near the end of this manual. Note: If a part is not in the hardware kit, check to see if it has been preattached. To avoid damaging parts, do not use power tools for assembly. M16 Washer (41) M8 - Weider Pro 350 L Bench | English Manual - Page 6
service technician to assemble the weight bench in your home, call 1-800-445-2480. • Assembly requires two persons. • Because of its size and weight, assemble the weight bench is enough clearance to walk around the weight bench as you assemble it. • Place all parts in a cleared area and remove the - Weider Pro 350 L Bench | English Manual - Page 7
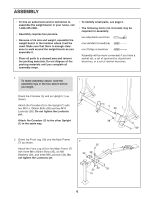
Lever (6) as shown, and insert it into the lower bracket on the Crossbar 3 (5). Attach the Folding Lever (6) to Bolt (31), two M8 Washers (30), a Weight Tube Bushing (29), and an M8 Locknut (32). Press the Bumper (25) onto the end of the Weight Tube (12). Apply some of the included grease - Weider Pro 350 L Bench | English Manual - Page 8
ent them so that the welded tubes are in the locations shown. 16 Then, identify the Backrest Support (4) and the Short Axle (3). Insert the Short Axle through the Backrest Support. Next, press a Backrest Frame (8, 9) onto each end of the Short Axle (3). Attach the Backrest (16) to the Backrest - Weider Pro 350 L Bench | English Manual - Page 9
Frames must pivot easily. Set the Backrest Support (4) in an adjustment bracket on the Main Frame (7). 8 13 41 Grease 8, 9 4 41 42 7 9. Insert a Pad Tube (14) through the Front Leg (10). Slide a Foam Pad (28) onto each end of the Pad Tube (14). Then, press - Weider Pro 350 L Bench | English Manual - Page 10
this step on the other side of the weight bench. Make sure that the Weight Rests (2) are at the same height. Hook 2 1 Adjustment Holes 11. Make sure that all parts are properly tightened before you use the weight bench. The use of the remaining parts will be explained in ADJUSTMENT, beginning on - Weider Pro 350 L Bench | English Manual - Page 11
from your exercise program. Also, refer to the accompanying exercise guide to see the correct form for each exercise. Make sure all parts are properly tightened each time you use the weight bench. Replace any worn parts immediately. The weight bench can be cleaned with a damp cloth and a mild, non - Weider Pro 350 L Bench | English Manual - Page 12
1 FOLDING THE WEIGHT BENCH To fold the weight bench for storage, first remove the Pin (22) from the Crossbar (5) and the Main Frame (7). Next, lift the Main Frame upward to the position shown. Then, reinsert the Pin into the Crossbar and the Main Frame. To unfold the weight bench, press down on the - Weider Pro 350 L Bench | English Manual - Page 13
post-exercise problems. EXERCISE FORM Move through the full range of motion for each exercise and move only the appropriate parts of the minutes after each set. • Toning-Rest for one minute after each set. • Weight Loss-Rest for 30 seconds after each set. STAYING MOTIVATED For motivation, keep a - Weider Pro 350 L Bench | English Manual - Page 14
Inner Cap 47 1 Weight Clip * - Userʼs Manual * - Exercise Guide * - Grease Packet * - Assembly Tool Note: Specifications are subject to change without notice. For information about ordering replacement parts, see the back cover of this manual. *These parts are not illustrated. 14 - Weider Pro 350 L Bench | English Manual - Page 15
EXPLODED DRAWING Model No. WEBE15910.0 R1210A 2 46 15 16 18 13 33 33 44 34 9 1 4 41 23 18 44 34 23 23 37 24 23 3 8 23 18 44 - Weider Pro 350 L Bench | English Manual - Page 16
information when contacting us: • the model number and serial number of the product (see the front cover of this manual) • the name of the product (see the front cover of this manual) • the key number and description of the replacement part(s) (see the PART LIST and the EXPLODED DRAWING near the
-
 1
1 -
 2
2 -
 3
3 -
 4
4 -
 5
5 -
 6
6 -
 7
7 -
8
-
9
-
10
-
11
-
12
-
13
-
14
-
15
-
16
 |
 |

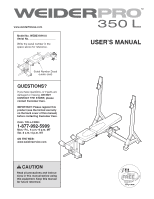
Serial Number Decal
(under seat)
CAUTION
Read all precautions and instruc-
tions in this manual before using
this equipment. Keep this manual
for future reference.
Model No. WEBE15910.0
Serial No.
Write the serial number in the
space above for reference.
USERʼS MANUAL
www.weiderfitness.com
QUESTIONS?
If you have questions, or if parts are
damaged or missing,
DO NOT
CONTACT THE STORE; please
contact Customer Care.
IMPORTANT: Please register this
product (see the limited warranty
on the back cover of this manual)
before contacting Customer Care.
CALL TOLL-FREE:
1-877-992-5999
Mon.–Fri., 6 a.m.–6 p.m. MT
Sat. 8 a.m.–4 p.m. MT
ON THE WEB:
www.weiderservice.com