Weider Pro 400l Bench User Manual
Weider Pro 400l Bench Manual
 |
View all Weider Pro 400l Bench manuals
Add to My Manuals
Save this manual to your list of manuals |
Weider Pro 400l Bench manual content summary:
- Weider Pro 400l Bench | User Manual - Page 1
Model No. 831.15945.0 Serial No. Write the serial number in the space above for reference. Serial Number Decal •• Assembly •• Operation •• Maintenance •• Part List and Drawing WEIGHT BENCH User’'s Manual Sears, Roebuck and Co. Hoffman Estates, IL 60179 CAUTION Read all precautions and instructions - Weider Pro 400l Bench | User Manual - Page 2
CHART 5 ASSEMBLY 6 ADJUSTMENT 11 EXERCISE GUIDELINES 12 PART LIST 14 EXPLODED DRAWING 15 HOW TO ORDER REPLACEMENT PARTS Back Cover 90 DAY FULL WARRANTY Back Cover WARNING DECAL PLACEMENT This drawing shows the location(s) of the warning decal(s). If a decal is missing or illegible, call - Weider Pro 400l Bench | User Manual - Page 3
IMPORTANT PRECAUTIONS WARNING: To reduce the risk of serious injury, read all important precautions and instructions in this manual and all warnings on your weight bench before using your weight bench. Sears assumes no responsibility for personal injury or property damage sustained by or through - Weider Pro 400l Bench | User Manual - Page 4
the 400 L weight bench will help you to achieve the specific results you want. For your benefit, read this manual carefully before using the weight bench. If you have questions after reading this manual, please see the back cover of this manual. To help us assist you, note the product model number - Weider Pro 400l Bench | User Manual - Page 5
for assembly. The number in parentheses below each drawing is the key number of the part, from the PART LIST near the end of this manual. The number following the key number is the quantity needed for assembly. Note: If a part is not in the hardware kit, check to see if - Weider Pro 400l Bench | User Manual - Page 6
watch an assembly video, go to http://productvideo.co/ assembly/sears/weider or use your mobile phone or your smartphone to read the QR code at the right. •• Assembly requires two persons. •• Due to its weight and size, the weight bench should be assembled in the location where it will be used. Make - Weider Pro 400l Bench | User Manual - Page 7
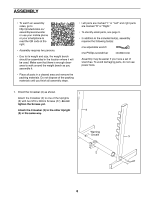
2. Slide the end of the Frame (1) onto the Crossbar (2). Attach the Frame with four M10 x 20mm 2 Screws (29) and four M10 Washers (28). Start all four Screws, and then tighten them. See step 1. Tighten the four M10 x 80mm Screws (27). 29 28 2 1 28 29 3. Identify the Right Backrest Frame - Weider Pro 400l Bench | User Manual - Page 8
4. Insert the Backrest Bracket (7) into the slot in the Frame (1). 4 Next, align the brackets on the Backrest Frames (5, 6) with the welded tube on the Frame (1). Attach the Backrest Frames (5, 6) to the Frame (1) with an M12 x 122mm Bolt (25) and an M12 Locknut (26). Do not overtighten the - Weider Pro 400l Bench | User Manual - Page 9
6. Attach the Seat (18) to the Frame (1) with four M6 x 20mm Screws (31). Start all four Screws, 6 and then tighten them. 18 1 31 7. Attach the Backrest (19) to - Weider Pro 400l Bench | User Manual - Page 10
M6 x 20mm Screws (31). Start all four 8 17 Screws, and then tighten them. 31 31 4 9. Make sure that all parts are properly tightened before the weight bench is used. Note: Extra parts may be included. The use of all remaining parts will be explained in ADJUSTMENT, beginning on page 11. 10 - Weider Pro 400l Bench | User Manual - Page 11
sure that all parts are properly tightened each time the weight bench is used. Replace any worn parts immediately. The weight bench can be cleaned with a damp cloth and a mild, non-abrasive detergent; do not use solvents to clean the weight bench. ADJUSTING THE BACKREST To adjust the angle of the - Weider Pro 400l Bench | User Manual - Page 12
the flexibility of your muscles and helps to prevent post-exercise problems. Toning—-Tone your muscles by working them to a moderate by completing more sets rather than by using high amounts of resistance. Weight Loss—-To lose weight, use a low amount of resistance and increase the number of - Weider Pro 400l Bench | User Manual - Page 13
EXERCISE LOG Make copies of this page, and use the copies to schedule and record your strength and aerobic workouts. Scheduling and recording your workouts will help you to make exercise a regular and enjoyable part of your life. Strength Date: Exercise 1. Lbs. Sets Reps Exercise 6. Lbs. Sets - Weider Pro 400l Bench | User Manual - Page 14
PART LIST Model No. 831.15945.0 1 Seat 19 1 Backrest 20 4 Foot 21 4 Small Oval Cap 22 4 Rectangular Cap 23 1 Crossbar Cover 24 Manual Note: Specifications are subject to change without notice. For information about ordering replacement parts, see the back cover of this manual - Weider Pro 400l Bench | User Manual - Page 15
EXPLODED DRAWING 12 Model No. 831.15945.0 R0812A 22 3 27 21 20 17 24 19 9 10 26 21 22 20 24 18 32 5 8 6 10 9 32 8 25 22 7 12 11 29 30 31 29 3 31 31 28 2 23 24 31 4 13 15 21 16 14 28 1 15 29 21 20 24 20 24 27 15 - Weider Pro 400l Bench | User Manual - Page 16
-4-MY-HOME® (1-800-469-4663) to arrange for free repair (or replacement if repair proves impossible). This warranty does not apply when the Weight Bench Exerciser is used commercially or for rental purposes. This warranty gives you specific legal rights, and you may also have other rights which vary
-
 1
1 -
 2
2 -
 3
3 -
 4
4 -
 5
5 -
 6
6 -
 7
7 -
8
-
9
-
10
-
11
-
12
-
13
-
14
-
15
-
16
 |
 |
Model No. 831.15945.0
Serial No.
Write the serial number in the space
above for reference.
Serial Number
Decal
CAUTION
Read all precautions and instruc-
tions in this manual before using
this equipment. Keep this manual
for future reference.
WEIGHT BENCH
User°s Manual
± Assembly
± Operation
± Maintenance
± Part List and Drawing
Sears, Roebuck and Co.
Hoffman Estates, IL 60179