Weider Pro 4100 English Manual
Weider Pro 4100 Manual
 |
View all Weider Pro 4100 manuals
Add to My Manuals
Save this manual to your list of manuals |
Weider Pro 4100 manual content summary:
- Weider Pro 4100 | English Manual - Page 1
(under seat) USER'S MANUAL SEARS, ROEBUCK AND CO. HOFFMAN ESTATES, IL 60179 CAUTION Read all precautions and instructions in this manual before using this equipment. Save this manual for future reference. Visit our website at www.weiderfitness.com new products, prizes, fitness tips, and much - Weider Pro 4100 | English Manual - Page 2
4 ASSEMBLY 5 ADJUSTMENTS 21 WEIGHT RESISTANCE CHART 23 CABLE DIAGRAM 24 EXERCISE GUIDELINES 26 ORDERING REPLACEMENT PARTS Back Cover FULL 90 DAY WARRANTY Back Cover Note: A PART IDENTIFICATION CHART and a PART LIST/EXPLODED DRAWING are attached in the center of this manual. Remove the PART - Weider Pro 4100 | English Manual - Page 3
the weight system. 1. Read all instructions in this manual and in the accompanying literature before using the weight system. Use the weight system only as described in this manual. 11. Make sure that the cables remain on the pulleys at all times. If the cables bind while you are exercising, stop - Weider Pro 4100 | English Manual - Page 4
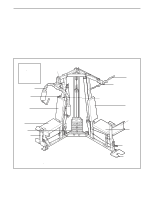
versatile WEIDER® PRO 4100 weight system. The PRO 4100 weight system offers a selection of weight stations weight system (see the front cover of this manual). Before reading further, please review the drawing below and familiarize yourself with the parts that are labeled. ASSEMBLED DIMENSIONS - Weider Pro 4100 | English Manual - Page 5
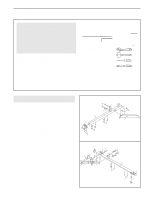
packing materials until assembly is completed. • Tighten all parts as you assemble them, unless instructed to do otherwise. • As you assemble the weight system, make sure all parts are oriented as shown in the drawings. • For help identifying small parts, use the PART IDENTIFICATION CHART. An Allen - Weider Pro 4100 | English Manual - Page 6
3. Attach the Base Plate (37) to the Left Base (2) 3 with a 3/8" x 5 1/2" Bolt (58) and a 3/8" Nylon Locknut (70). Attach the Left Upright (7) to the Left Base (2) with the two indicated 5/16" x 2 1/2" Carriage Bolts (57) and two 5/16" Nylon Locknuts (71). Attach the Left Leg (36) to the Left - Weider Pro 4100 | English Manual - Page 7
26 6 73 26 71 26 6. Press a 2" Square Inner Cap (33) into the end of the Left Seat Frame (29). Attach the Left Seat Frame (29) to the Left Set two Weight Bumpers (83) over the indicated holes in the Center Base (67). Insert the two Weight Guides (20) into the holes. Attach the Weight Guides to - Weider Pro 4100 | English Manual - Page 8
Weight onto the Weight Guides (20), with the pin groove on the bottom. 20 74 Pin Groove Lubricate Holes 82 32 72 9. Press two 2" x 2 1/2" Inner Caps (22) into the ends of the Left Top Frame (3). Attach the Left Top Frame (3) to the Left Upright (7) with two 5/16" x 3 1/4" Bolts (59), a Support - Weider Pro 4100 | English Manual - Page 9
the Center Top Frame onto the Weight Guides (20). Attach the Center Top The remaining hardware from the "Frame Assembly" bag will be used later. ARM ASSEMBLY 12. Press a 1 1/2" Square (12). Press a 1" Round Inner Cap (24) into the end of the Handle. Attach the Handle to the Right Butterfly Arm (11 - Weider Pro 4100 | English Manual - Page 10
pivot easily. Be sure the indented sides of the Plastic Washers fit over the welded bushing in the Butterfly Arm. Repeat this step the #10 x 1" Screw (77). Press two 1 1/2" x 2" Inner Caps (23) into the ends of the Leg Lever (4). Lubricate a 3/8" x 2 1/2" Bolt (63) with grease. Attach the Leg - Weider Pro 4100 | English Manual - Page 11
: While assembling the cables, do not over tighten the locknuts attaching the pulleys; the pulleys must be able to turn freely. Refer to the CABLE DIAGRAMS and CABLE ID CHART on pages 24 and 25 for proper cable routing and help identifying the cables. Locate the High Cable (45). Route the Cable up - Weider Pro 4100 | English Manual - Page 12
21. Wrap the High Cable (45) around a 3 1/2" Pulley 21 (38). Attach the Pulley at the forward hole, inside of the bracket on the Center Top Frame (14) with a 3/8" x 1 3/4" Bolt (66) and a 3/8" Nylon Locknut (70). 22. Attach the end of the High Cable (45) to the Small "U"-Bracket (79) with a - Weider Pro 4100 | English Manual - Page 13
Route the Leg Press Cable (95) through the Left 25 Leg (36) and the Left Upright (7) as shown. Wrap the Cable around a 3 1/2" Pulley (38). Attach the Pulley Remove the preattached 3 1/2" Pulley (not 27 shown) from the "U"-Bracket (85). Attach the end of the Leg Press Cable (95) to the "U"- - Weider Pro 4100 | English Manual - Page 14
the other Double "U"-Bracket (56) with a 3/8" x 2" Bolt (62) and a 3/8" Nylon Locknut (70). 31. Wrap the Butterfly Cable (46) around a "V"-Pulley 31 (39). Attach the Pulley and a Long Cable Trap (40) to the bracket on the Right Upright (6) with a 3/8" x 2 1/2" Bolt (63) and a 3/8" Nylon Locknut - Weider Pro 4100 | English Manual - Page 15
33. Locate the Leg Lever Cable (96). Route the eyelet end of the Cable through the Right Leg (73) and attach it to the Leg Lever (4) with a 5/16" x 1" Shoulder Bolt (78) and a 5/16" Nylon Locknut (71). 33 4 71 73 34. Attach a 3 1/2" Pulley (38) inside the Right Leg (73) with a 3/8" x 2 3/4" Bolt - Weider Pro 4100 | English Manual - Page 16
end of the Cable, as shown in the inset drawing. 38. Locate the Low Cable (47). Route the small ball 38 on the Cable through the cage on the Leg Press Frame (30). Attach a 3 1/2" Pulley Low Cable (47) around a 3 1/2" Pulley 40 (38). Attach the Pulley and a Cable Trap (91) to the lower set of - Weider Pro 4100 | English Manual - Page 17
) and a 3/8" Nylon Locknut (70). 47 38 70 62 2 47 2 62 38 70 43. Wrap the Low Cable (47) around a 3 1/2" Pulley 43 (38). Attach the Pulley and a Cable Trap (91) to the bottom set of holes in the indicated Double "U"-Bracket (56) with a 3/8" x 2" Bolt (62) and a 3/8" Nylon Locknut (70). Be - Weider Pro 4100 | English Manual - Page 18
Base (1) with a 3/8" x 2" Bolt (62) and a 3/8" Nylon Locknut (70). 38 47 70 46. Wrap the Low Cable (47) around a 3 1/2" Pulley 46 (38). Attach the Pulley and a Cable Trap (91) to the lower set of holes in the indicated "U"-Bracket (85) with a 3/8" x 2" Bolt (62) and a 3/8" Nylon Locknut (70 - Weider Pro 4100 | English Manual - Page 19
SEAT ASSEMBLY 49 49. Attach a Seat (16) to the Right Seat Frame (5) with a 1/4" x 2 1/2" Leg Lever (4). 51 18 27 17 4 52. Press a 2" x 2 1/2" Inner Cap (22) into the indicat- 52 ed end of the Adjustment Tube (88). Attach the Leg Press Plate (31) to the Adjustment Tube (88) with a 5/16" x 2 - Weider Pro 4100 | English Manual - Page 20
move smoothly over the pulleys. If one of the cables does not move smoothly, find and correct the problem. IMPORTANT: If the cables are not properly routed, they may be damaged when heavy weight is used. See the CABLE DIAGRAM on pages 24 and 25 of this manual for proper cable routing. If there is - Weider Pro 4100 | English Manual - Page 21
the bent end downward. The weight setting of the weight stack can be changed from 6 pounds to 106 pounds, in increments of 12.5 pounds. Note: Due to the cables and pulleys, the actual amount of resistance at each exercise station may vary from the weight setting. Use the WEIGHT RESISTANCE CHART on - Weider Pro 4100 | English Manual - Page 22
, the type of cable used on the weight system, can stretch slightly when it is first used. If there is slack in the cables before resistance is felt, the cables should be tightened. See drawing A. Slack can be removed by moving the 3 1/2" Pulley (38) and Cable Trap (91) to a higher set of holes in - Weider Pro 4100 | English Manual - Page 23
each butterfly arm. Note: The actual resistance at each station may vary due to differences in individual weight plates as well as friction between the cables, pulleys, and weight guides. WEIGHT Left Top 1 2 3 4 5 6 7 8 HIGH PULLEY (lbs.) 13 27 46 59 74 87 102 115 129 PRESS ARM (lbs.) 20 40 59 79 - Weider Pro 4100 | English Manual - Page 24
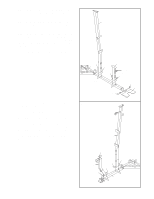
routing of the High Cable (45), the Butterfly Cable (46), the Low Cable (47), the Leg Press Cable (95), and the Leg Lever Cable (96). Use the diagrams to make sure that the cables and the cable traps have been assembled correctly. If the cables have not been correctly routed, the weight system - Weider Pro 4100 | English Manual - Page 25
4 4 Leg Lever Cable (96) 5 5 3 12 CABLE ID CHART - (46) 47 3/7" - (96) 95 1/2" - (95) 148 1/4" - (47) 276 3/4" - (45) 116 3/4" Leg Press Cable (95) 3 2 1 25 - Weider Pro 4100 | English Manual - Page 26
per- formed. (A "repetition" is one complete cycle of an exercise, such as one sit-up. A "set" is a series of repetitions.) The proper amount of weight for each exercise depends upon the individual user. You must gauge your limits and select the amount of weight that is right for you. Begin with - Weider Pro 4100 | English Manual - Page 27
exercises performed, the weight used, and the numbers of sets and repetitions completed. Record your weight and key body measurements at the end of every month. Remember, the key to achieving the greatest results is to make exercise a regular and enjoyable part of your everyday life. MUSCLE CHART - Weider Pro 4100 | English Manual - Page 28
PART IDENTIFICATION CHART-Model No. 831.159823 R0103A 1/4" Nylon Locknut (65) 5/16" Nylon Locknut (71) 3/8" Nylon Jamnut (50) 3/8" Washer (75) 3/8" Nylon Locknut (70) 5/16" Washer (56) 1" Round Inner - Weider Pro 4100 | English Manual - Page 29
3/8" x 2" Bolt (62) 5/16" x 1 3/4" Bolt (69) 3/8" x 1 3/4" Bolt (66) 5/16" x 1" Shoulder Bolt (78) 1/4" x 1" Screw (77) 1/4" x 3/4" Bolt (13) #8 x 3/4" Screw (68) 5/16" x 3/4" Button Head Bolt (64) 1/4" x 2 1/2" Bolt (90) 5/16" x 2 1/2" Bolt (89) 3/8" x 2 1/2" Bolt (63) 5/16" x 2 3/4" Bolt (60) - Weider Pro 4100 | English Manual - Page 30
Foam Pad 20 2 Weight Guide 21 2 Support Plate 22 7 2" Cable Trap 92 2 Pulley Cover 93 1 Ab Strap 94 1 Short Pad Tube 95 1 Leg Press Cable 96 1 Leg Lever Cable 97 2 3/8" x 3" Button Head Bolt 98 1 Rubber Bumper 99 4 Nut Clips # 1 User's Manual # 1 Exercise Guide - Weider Pro 4100 | English Manual - Page 31
EXPLODED DRAWING-Model No. 831.159823 71 38 71 66 70 14 64 19 99 59 60 21 40 71 66 70 71 78 62 46 26 63 39 44 71 44 8 11 48 71 50 64 23 24 22 71 46 78 62 48 50 97 75 70 54 71 22 53 9 61 68 97 71 84 41 75 38 47 92 70 39 40 70 63 75 13 50 38 20 76 12 10 24 64 - Weider Pro 4100 | English Manual - Page 32
material or workmanship in this Sears Weight System Exerciser, contact the nearest Sears Service Center throughout the United States and Sears will repair or replace the Weight System Exerciser, free of charge. This warranty does not apply when the Weight System Exerciser is used commercially or for
-
 1
1 -
 2
2 -
 3
3 -
 4
4 -
 5
5 -
 6
6 -
 7
7 -
8
-
9
-
10
-
11
-
12
-
13
-
14
-
15
-
16
-
17
-
18
-
19
-
20
-
21
-
22
-
23
-
24
-
25
-
26
-
27
-
28
-
29
-
30
-
31
-
32
 |
 |

USER'S MANUAL
CAUTION
Read all precautions and instruc-
tions in this manual before using
this equipment. Save this manual
for future reference.
Model No. 831.159823
Serial No.
Write the serial number in the
space above for reference.
Serial Number Decal (under seat)
Visit our website at
www.weiderfitness.com
new products, prizes,
fitness tips, and much more!
SEARS, ROEBUCK AND CO.
HOFFMAN ESTATES, IL 60179