Weider Pro 455 English Manual
Weider Pro 455 Manual
 |
View all Weider Pro 455 manuals
Add to My Manuals
Save this manual to your list of manuals |
Weider Pro 455 manual content summary:
- Weider Pro 455 | English Manual - Page 1
serial number in the space above for future reference. ® 455 USER'S MANUAL Serial Number Decal (Under Seat) QUESTIONS? As a manufacturer p.m. MST CAUTION Read all precautions and instructions in this manual before using this equipment. Save this manual for future reference. Visit our website at - Weider Pro 455 | English Manual - Page 2
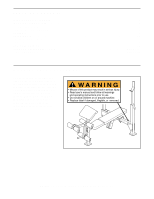
Cover WARNING DECAL PLACEMENT The decal shown at the right has been placed on the weight bench in the indicated location. If the decal is missing or illegible, please call our Customer Service Department tollfree at 1-800-999-3756, Monday through Friday, 6 a.m. until 6 p.m. Mountain Time, to order - Weider Pro 455 | English Manual - Page 3
all instructions in this manual before using the weight bench. Use the weight bench only as described in this manual. 2. It is the responsibility of the owner to ensure that all users of the weight bench are adequately informed of all precautions. 3. The weight bench is intended for home use only - Weider Pro 455 | English Manual - Page 4
, or a healthier cardiovascular system, the PRO 455 weight bench will help you to achieve the specific results you want. For your benefit, read this manual carefully before using the weight bench. If you have additional questions, please call our Customer Service Department toll-free at 1-800-999 - Weider Pro 455 | English Manual - Page 5
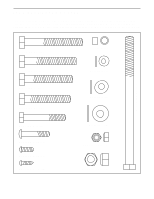
PART IDENTIFICATION CHART This chart is provided to help you identify the small parts used in assembly. The number in parenthesis below each part refers to the key number of the part. Important: Some parts may have been pre-assembled for shipping purposes. If you cannot find a part in the parts bags - Weider Pro 455 | English Manual - Page 6
manual is designed to ensure that the weight bench can be assembled successfully by anyone. However, it is important to realize that the versatile weight bench all parts as you assemble them, unless instructed to do otherwise. • As you assemble the weight bench, make sure all parts are oriented as - Weider Pro 455 | English Manual - Page 7
the Extension Tubes to the Upright Bases with four M10 x 81mm Bolts (35), two Support Plates (20), and four M10 Nylon Locknuts (19). 35 7 1 19 20 (21) into the 6 Leg Lever (4) as shown. Insert the Weight Tube (41) into the indicated hole in the Leg Lever (4). Tap a 1" Round Inner Cap - Weider Pro 455 | English Manual - Page 8
7. Lubricate an M10 x 72mm Bolt (40). Attach the Leg Lever (4) to the Front Leg (8) with the Bolt and an M10 Nylon Locknut (19). Attach the Weight Tube (41) to the Leg Lever (4) with the M8 x 58mm Bolt (39), two M8 Washers (38), the Spacer (37), and an M8 Nylon Locknut (13). - Weider Pro 455 | English Manual - Page 9
Leg (8). Slide two Foam Pads (22) onto each Pad Tube. 13 22 14. Make sure that all parts are properly tightened before you use the weight bench. The use of all remaining parts will be explained in ADJUSTMENTS, beginning on page 10. 4 10 8 9 22 9 10 9 9 10 22 9 - Weider Pro 455 | English Manual - Page 10
is designed to be used with your own weight set (not included). The steps below explain how the weight bench can be adjusted. See EXERCISE GUIDELINES on page 12 for important exercise information and refer to the accompanying exercise guide to see the correct form for several exercises. Refer also - Weider Pro 455 | English Manual - Page 11
ATTACHING THE CURL POST For some exercises, the Curl Post (26) must be attached to the weight bench. Slide the Curl Post (26) into the Front Leg (8). Align one of the adjustment holes in the Curl Post with the adjustment hole in the - Weider Pro 455 | English Manual - Page 12
more sets rather than by using high amounts of weight. Weight Loss To lose weight, use a low amount of weight and increase the number of repetitions in each manner will leave you feeling exhausted. On the exercise guide accompanying this manual you will find photographs showing the correct form for - Weider Pro 455 | English Manual - Page 13
set for a muscle building workout. • Rest for one minute after each set for a toning work- out. • Rest for 30 seconds after each set for a weight loss workout. Plan to spend the first couple of weeks familiarizing yourself with the equipment and learning the proper form for each exercise. COOLING - Weider Pro 455 | English Manual - Page 14
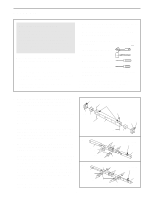
16mm Screw M6 x 38mm Screw M10 x 178mm Bolt M10 x 65mm Bolt M10 Nylon Locknut Support Plate 45mm Square Inner Cap Foam Pad 1" Round Inner Cap M10 Washer Key No. Qty. Weight Tube Left Backrest Tube Extension Tube M10 x 68mm Bolt Extension Tube Bushing Crossbar Bushing User's Manual Exercise Guide - Weider Pro 455 | English Manual - Page 15
EXPLODED DRAWING-Model No. WEBE13102 R0902A 27 6 12 1 5 28 34 30 7 35 15 31 34 20 43 19 26 19 45 34 35 24 44 20 3 34 19 46 12 25 16 36 40 42 16 25 16 20 19 34 34 24 46 45 19 43 22 21 21 19 4 11 17 33 19 35 44 32 19 24 21 24 3938 18 37 22 40 24 29 8 41 23 21 9 - Weider Pro 455 | English Manual - Page 16
The NAME of the product (WEIDER® PRO 455 weight bench) • The SERIAL NUMBER of the product (see the front cover of this manual) • The KEY NUMBER and repairing, at ICON's option, the product through one of its authorized service centers. All repairs for which warranty claims are made must be pre
-
 1
1 -
 2
2 -
 3
3 -
 4
4 -
 5
5 -
 6
6 -
 7
7 -
8
-
9
-
10
-
11
-
12
-
13
-
14
-
15
-
16
 |
 |

®
455
455
CAUTION
Read all precautions and instruc-
tions in this manual before using
this equipment. Save this manual
for future reference.
Serial Number Decal (Under Seat)
Model No. WEBE13102
Serial No.
Write the serial number in the space
above for future reference.
Visit our website at
www.weiderfitness.com
new products, prizes,
fitness tips, and much more!
USER’S MANUAL
QUESTIONS?
As a manufacturer, we are com-
mitted to providing complete
customer satisfaction. If you
have questions, or if parts are
missing, we will guarantee com-
plete satisfaction through direct
assistance from our factory.
TO AVOID DELAYS, PLEASE
CALL DIRECT TO OUR TOLL-
FREE CUSTOMER HOT LINE.
The trained technicians on our
customer hot line will provide
immediate assistance, free of
charge to you.
CUSTOMER HOT LINE:
1-800-999-3756
Mon.–Fri., 6 a.m.–6 p.m. MST