Weider Pro 9545 English Manual
Weider Pro 9545 Manual
 |
View all Weider Pro 9545 manuals
Add to My Manuals
Save this manual to your list of manuals |
Weider Pro 9545 manual content summary:
- Weider Pro 9545 | English Manual - Page 1
No. Write the serial number in the space above for reference. USER'S MANUAL Serial Number Decal (under seat) QUESTIONS? As a manufacturer, we are MST AUTIONI Read all precautions and instruclions in th.is manual before using thlsequipment. Save this manual for future reference. OS> • • WEIDER - Weider Pro 9545 | English Manual - Page 2
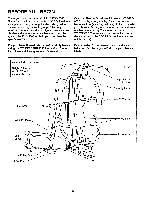
before using the WEIDE:1'8,PR° 9545 Read all instructions in this manual and in 7 Remove the lat bar from the hiah pulley sta- the accompanying literature before using the tion when performing any, exercise that does PRO 9545. not use the lat ban 2. Use the PRO 9545 only on a level surface - Weider Pro 9545 | English Manual - Page 3
or a healthier cardiovascular system, the PRO 9545 will help you to achieve the specific results you want. Customer Service Department toll-free at the PRO 9545 (see the front cover of this manual). For your benefit, read this manual carefully before using the WEIDER® PRO 9545 Home Gym System. If - Weider Pro 9545 | English Manual - Page 4
assemble the PRO 9545, make sure that all parts are oriented exactly as shown in the drawings. Tighten all parts as you attach them, unless instructed to do otherwise. For help identifying small parts, refer to the PART IDENTIFICATION CHART attached to the center of this manual. Assembly requires - Weider Pro 9545 | English Manual - Page 5
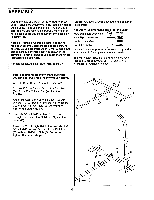
in the same manner. 5d 1 103 Slide two Weight Bumpers (47) onto the lower end of each Weight Guide (51) (there is a hole near the upper end of each Weight Guide). Insert the Weight Guides into the holes in the indicated bracket on the Base (43). 48 104 Slide the Weights (46) onto - Weider Pro 9545 | English Manual - Page 6
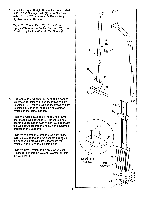
Jam Nuts (2). Tighten all of the 3/8" Jam Nuts (2) used in assembly steps 1 through 5. 80 7 88 71 2 70 2 6. Attach the upper ends of the Weight Guides (51) to the Frame (80) with the 5/16" x 6 1/2" Bolt (79), 6 fuur 5416" Rai vVashers (60), the two x 3/4" Spacers (100), the 1/2" x 1 15/16 - Weider Pro 9545 | English Manual - Page 7
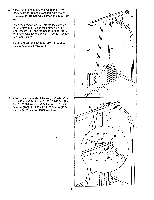
7. Tap a 1 1/2" x 3" Inner Cap (101) into each side of the Butterfly Arm Frame (42). Attach the Butterfly Arm Frame (42) to the Frame (80) with a 3/8" x 3 1/4" Bolt (5) and a 3/8" Jam Nut (2). Do not fully tighten the Jam Nut yet. 7 101 80 2 a 5 42 101 80 Attach the Butterfly Frame using this - Weider Pro 9545 | English Manual - Page 8
10. Make sure that there are two Long 3/4" Flange Bushings (18) in the indicated side of the Butterfly Arm Frame (42). Tap two 1 3/4" x 1 3/4" Inner Caps (24) into one of the Butterfly Arms (30) as shown. Slide an Adjustment Bracket (32) onto the axle on the Butterfly Arm (30). Turn the Adjustment - Weider Pro 9545 | English Manual - Page 9
13. Tap two 1 3/4" x 1 3/4" Inner Caps (24) into the Squat Arm (72). Tap two 1" Round Caps (22) into the Squat Arm (72). 13 24 24 22 72 14. Lubricate a 3/8" x 3 1/4" Bolt (5). Attach the Squat 14 Arm (72) to the VKR Upright (70) with the 3/8" x C 3 1/4" Bolt and a 3/8" Jam Nut (2). Do not - Weider Pro 9545 | English Manual - Page 10
16. Tap a 1" x 1 1/2" Inner Cap (23) into a Handle (26). Tap a 1" Round Cap (22) into the Handle. Apply lubricant to a 3/8" x 2 1/2" Bolt (3). Attach the Handle (26) to the Press Arm (28) with the Bolt and a 3/8" Jam Nut (2). Remove the adhesive backing from a Square Bumper (9). Apply the Square - Weider Pro 9545 | English Manual - Page 11
20. Feed the Short Cable (44) around one of the 4 1/2" Pulleys (85). Feed the Short Cable (44) up over the 3 1/2" Pulley (12) in the Pivot Arm (91) as shown. 20 12 91 6 85 a 44 21. Using two Cable Clips (53), attach the Short Chain (52) between the Short Cable (44) and the 21 . - 3/8" - Weider Pro 9545 | English Manual - Page 12
24. Route the Long Cable (45) under a 3 1/2" Pulley 24 (12). Attach the Pulley and two Pulley Covers (13) to the "U" bracket on the Stabilizer (69) with the 3/8" x 2" Bolt (38) and a 3/8" Jam Nut (2). Make . sure that the Pulley Covers are turned so the wide tabs are positioned as shown. / - Weider Pro 9545 | English Manual - Page 13
64) with the 3/8" Nylon Locknut (27). Do not overtighten the Nylon Locknut; the Cable must pivot freely. IMPORTANT: Before continuing, refer to TROUBLE-SHOOTING AND MAINTENANCE on page 21, and adjust the cables as described. 30 N I I I /P°A, 80 . X 27 64 45 31. Tap a 1 3/4" x 1 3/4" Inner Cap (24 - Weider Pro 9545 | English Manual - Page 14
32. Attach a VKR Arm Pad (75) to the Left VKR Arm (73) with two 1/4" x 2 1/2" Screws (41) and two 1/4" Flat Washers (40). Attach a VKR Arm Pad (75) to the Right VKR Arm (74) in the same manner. 33. Attach the VKR Backrest (76) to the VKR Upright (70) with two 1/4" x 2 1/2" Bolts (94) and two 1/4" - Weider Pro 9545 | English Manual - Page 15
36. Tap a 1 3/4" x 1 3/4" Inner Cap (24) into the Leg Lever (62). Lubricate a 3/8" x 2 3/4" Bolt (81). Attach the Leg Lever (62) to the Squat Seat Frame (11) with the 3/8" x 2 3/4" Bolt and a 3/8" Jam Nut (2). Insert the 3/8" x 4" Eyebolt (55) through the Leg Lever (62) from the indicated side. - Weider Pro 9545 | English Manual - Page 16
40. Insert the Press Seat Frame (36) into the Frame (80). Attach the Press Seat Frame with a 3/8" x 40 2 1/4" Carriage Bolt (8) and the 3/8" Knob (105). The Press Seat Frame can be attached at any of four heights. 36 105 80 $ 8 41. Attach a Backrest (39) to the Frame (80) with two 1/4" x 2 - Weider Pro 9545 | English Manual - Page 17
be explained in HOW TO USE THE WEIDER') PRO 9545, beginning on page 18 of this manual. Before using the PRO 9545, pull the end of each cable a few times to make sure that the cables move smoothly. If the cables bind, correct the problem before using the PRO 9545. See the CABLE DIAGRAMS on pages 22 - Weider Pro 9545 | English Manual - Page 18
HOW TO USE THE WEIDER® PRO 9545 The instructions below describe how each part of the WEIDER® PRO 9545 can be adjusted. Refer to the EXERCISE POSTER accompanying this manual for exercise guidelines, and to see how the PRO 9545 should be set up for each exercise. IMPORTANT: When attaching the lat bar - Weider Pro 9545 | English Manual - Page 19
(96) to the Short Cable (44) with a Cable Clip (53). For some exercises, the Long Chain (97) should be attached between the Lat Bar and the Short Cable (96) to the Long Cable (45) with a Cable Clip (53). For some exercises, the Long Chain (97) should be attached between the Lat Bar and the Long Cable - Weider Pro 9545 | English Manual - Page 20
WEIGHT RESISTANCE CHART ACTUAL WEIGHT 10 lbs. '20 lbs. 30 lbs. 40 lbs. 50 lbs. 60 lbs. 7914s80 lbs. 90 lbs. 1004s. 110 lbs. 120 lbs. 130 lbs. 140 lbs. 50 lbs. 160 lbs. 170 lbs. 180 lbs. 190',.!4. 200 lbs. BUTTERFLY ARMS (Lbs.) 14 28 38 46 62 67 78 82 105 110 122 135 149 157 169 175 185 DO NOTkUSE - Weider Pro 9545 | English Manual - Page 21
TROUBLE-SHOOTING AND MAINTENANCE Inspect and tighten all parts each time you use the WEIDER' PRO 9545. Replace all worn parts immediately (see ORDERING REPLACEMENT PARTS on the back cover of this manual). The PRO 9545 can be cleaned using a damp cloth and a mild detergent. Do not use solvents or - Weider Pro 9545 | English Manual - Page 22
CABLE DIAGRAMS The cable diagrams below and on page 23 show the proper routing of the Short Cable (44) and the Long Cable (45). Use the diagrams to make sure that the two Cables are routed correctly. SHORT CABLE (44) ROUTING 4 2 O O 0 0 1-High Pulley 0 3 rr a 5-Weight Selector 22 - Weider Pro 9545 | English Manual - Page 23
LONG CABLE (45) ROUTING 0 2 0 0 5 1-Low Pulley Station 3 47 48 8 0 0 4 6 10-Frame 9 Make sure that the Long Cable is under the Weights (not shown), between the Weight Selector (48) and the indicated Weight Bumpers (47) 23 - Weider Pro 9545 | English Manual - Page 24
The NAME of the product (WEIDER° PRO 9545 Home Gym System). 3. The SERIAL NUMBER of the product (see the front cover of this manual). 4. The KEY NUMBER and or abnormal usage or repairs not provided by an ICON authorized service center, for products used for commercial or rental purposes, or for - Weider Pro 9545 | English Manual - Page 25
REMOVE THIS PART IDENTIFICATION CHART FROM THE MANUAL! This chart is provided to help you identify the small parts used in assembly. Note: Some parts may have been preassembled for shipping purposes; if you cannot find a part in the parts bags, check the frame to see if it has been preassembled. - Weider Pro 9545 | English Manual - Page 26
parts used in assembly. Note: Some parts have been pre-assembled for shipping purposes; if a part cannot be found in the parts bags, check the system frame to see if it has been pre-assembled. The number in parenthesis below each part refers to the key number of the part. The - Weider Pro 9545 | English Manual - Page 27
&\\\\\\\ 3/8" x 2" Bolt (38)-1 N 3/8" x 2 1/4" Carriage Bolt (8)-1 3/8" x 2 3/4" Carriage Bolt (1)-6 3/8" x 2 3/4" Bolt (81)-6 D \\\\\\\ 5/16" x 2 3/4" Carriage Bolt (59)-1 \\\\\\\\. 3/8" x 3" Bolt (7)-2 o 1/4" x 2 1/2" Bolt (94)-6 -o 3/8" x 3 1/4" Bolt (5)-5 \ \\\\\1 \\ \\\ 3/8" x 3 - Weider Pro 9545 | English Manual - Page 28
0 5/8" x 13/32" Spacer (99)-2 0 1/2" x 3/4" Spacer (100)-2 0 1/2" x 1" Spacer (84)-1 0 1/2" x 1 15/16" Spacer (107)-1 3/4" Round Cap (50)-4 0 c 1" Round Cap (22)-6 c 1" x 1 1/2" Inner Cap (23)-2 0 3/4" Retainer Cap (19)-4 1 3/4" x 1 3/4" Inner Cap (24)-12 / e". 3/4" Retainer (17)-6 ,_-------- - Weider Pro 9545 | English Manual - Page 29
REMOVE THIS PART LIST AND EXPLODED DRAWING FROM THE MANUAL! I - Weider Pro 9545 | English Manual - Page 30
EXPLODED DRAWING-Model No. WESY95450 R0995A 106 17 1014 18 2 1 6 33 42 2 5 101 34,0-108( 6 32-0 33 34 7 32 24 24 24 29 30 24 tL,. 9 ak 92 /4 99 90 113 1 2 12 1 83 91 12- 44 7 6,0ro 80 60 60 leo rgt o 44 53 52 53 56 102 103 39 40 94 48 29 23 26 2 37 22 1, 24 3 .23 8 - Weider Pro 9545 | English Manual - Page 31
Base Short Cable Long Cable Weight Weight Bumper Weight Selector Weight Pin 3/4" Round Cap Weight Guide Short Chain Cable Clip Small Weight Cover 3/8" x 4" Eyebolt 3/8" Nut Key No. Qty 3/8" Knob 5/16" Jam Nut 1/2" x 1 15/16" Spacer Short 3/4" Flange Bushing User's Manual Exercise Guide Decal Sheet
-
 1
1 -
 2
2 -
 3
3 -
 4
4 -
 5
5 -
 6
6 -
 7
7 -
8
-
9
-
10
-
11
-
12
-
13
-
14
-
15
-
16
-
17
-
18
-
19
-
20
-
21
-
22
-
23
-
24
-
25
-
26
-
27
-
28
-
29
-
30
-
31
 |
 |

PR
Model
No.
WESY95450
Serial
No.
Write
the
serial
number
in
the
space
above
for
reference.
Serial
Number
Decal
(under
seat)
QUESTIONS?
As
a
manufacturer,
we
are
com-
mitted
to
providing
complete
customer
satisfaction.
If
you
have
questions,
or
find
that
there
are
missing
nr
tiAMALIPti rlArtC
,
wA
will
guarantee
you
complete
sat-
isfaction
through
direct
assis-
tance
from
our
factory.
TO
AVOID
UNNECESSARY
DELAYS,
PLEASE
CALL
DIRECT
TO
OUR
TOLL
-FREE
CUSTOMER
HOT
LINE.
The
trained
techni-
cians
on
our
customer
hot
line
will
provide
immediate
assis-
tance,
free
of
charge
to
you.
CUSTOMER
HOT
LINE:
1-800-225-0653
Mon.
—Fri.,
6
a.m.-6
p.m.
MST
AUTIONI
Read
all
precautions
and
instruc-
lions
in
this
manual
before
using
.
thlsequipment.
Save
this
manual
for
future
reference.
0
0
•
•
USER'S
MANUAL
OS>
WEIDER