Weider Pro 9628 English Manual
Weider Pro 9628 Manual
 |
View all Weider Pro 9628 manuals
Add to My Manuals
Save this manual to your list of manuals |
Weider Pro 9628 manual content summary:
- Weider Pro 9628 | English Manual - Page 1
the serial number in the space above. Serial Number Decal ® Patent Pending SEARS, ROEBUCK AND CO. HOFFMAN ESTATES, IL 60179 CAUTION Read all precautions and instructions in this manual before using this equipment. Save this manual for future reference. USER'S MANUAL - Weider Pro 9628 | English Manual - Page 2
home gym system for protection. 11. Always wear athletic shoes for foot protection when exercising. 12. Never release the Press Arm, Butterfly Arms, Leg Lever, Lat Bar or Nylon Strap while Weights are raised. The Weights will fall with great force. 5. Inspect and tighten all parts often. Replace - Weider Pro 9628 | English Manual - Page 3
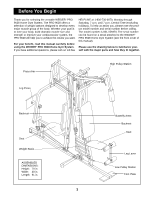
decal attached to the WEIDER® PRO 9628 Home Gym System (see the front cover of this manual). Please use the drawing below to familiarize yourself with the major parts and how they fit together. Press Arm High Pulley Station Leg Press Backrest Seat Weight Stack ASSEMBLED DIMENSIONS: Height: 79 in - Weider Pro 9628 | English Manual - Page 4
frame. Cable Assembly Completes the cables and pulleys that connect the moving arms with each other and with the weights. This ties the different parts together and makes the equipment function as a unit Arm Assembly Completes the press and butterfly arms that you operate while you are exercising - Weider Pro 9628 | English Manual - Page 5
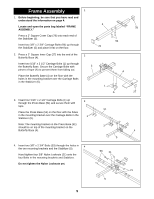
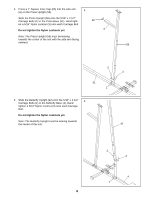
1 1. Before beginning, be sure that you have read and understood the information on page 4. 5 Locate and open the parts bag labeled "FRAME 78 ASSEMBLY." Press a 2" Square Cover Cap (78) onto each end of the Stabilizer (5). Insert two 3/8" x 2 3/4" Carriage Bolts (94) up through the Stabilizer - Weider Pro 9628 | English Manual - Page 6
tighten a 5/16" Nylon Locknut (3) onto each Carriage Bolt. Do not tighten the Nylon Locknuts yet. 65 A Note: The Press Upright (56) must be leaning towards the center of the unit with the side arm facing outward. 56 3 3 51 1 6. Slide the Butterfly Upright (42) onto - Weider Pro 9628 | English Manual - Page 7
(B) facing down, slide the Top Weight onto the Weight Guides and set it on the stack of Weights (25). 60 B 25 61 21 5 76 Pin 63 64 Pin Groove 9. Press a 2" Square Inner Cap (27) into each end of 9 the Top Frame (55) and the weight support arm (A). 27 Press a 1 3/4" Square Inner Cap (44) into - Weider Pro 9628 | English Manual - Page 8
42 3 11. Attach the upper ends of the Weight Guides (62) to 11 the Top Frame (55) with Assembly 13. Press Arm Assembly-Locate and open the parts bag labeled "ARM ASSEMBLY." Press a 1" x 7/8" Plastic Bushing (75) onto each welded spacer on the Press Frame (17). Align the welded spacers on the Press - Weider Pro 9628 | English Manual - Page 9
Round Inner Cap (49) into the side of each Press Arm. Attach each Press Arm to the Press Frame (17) with two 5/16" x 2 1/2" Bolts (22) and two 5/16" Nylon Locknuts (3). 17 22 3 46 49 44 15. Butterfly Arm Assembly Attach a "V"-Pulley (6) and a Long Cable Trap (50) to each Butterfly Arm (47) and - Weider Pro 9628 | English Manual - Page 10
Press Base (51) with the Bolt and a 3/8" Nylon Locknut (21). 92 82 77 Cable Assembly 85 Lubricate 27 77 51 18. Locate and open the parts bag labeled "Cable 18 Assembly and Pulleys." For Cable identification and routing during steps 18-35, refer to the Cable 50 Diagram and Cable ID Chart - Weider Pro 9628 | English Manual - Page 11
3/8" Nylon Locknut (21). Make sure the Cable Trap (66) is positioned as shown. Route the Short Cable (23) around the Pulley (15) attached to the "I"-plates in the direction shown. Route the Short Cable (23) through the first 3 1/2" Pulley (15) on the weight support arm (A). 15 81 12 11 50 6 50 - Weider Pro 9628 | English Manual - Page 12
as shown. 24 17 6 Tighten the Bolt and Locknut on the pre-assembled "V"-pulley (6) on the Press Frame (17). 9 21 25. Attach a 3 1/2" Pulley (15) and a Cable Trap (66) to the lower end of the Press Upright (56) with a 3/8" x 3 3/4" Bolt (71), a 3/8" Flat Washer (9) and a 3/8" Nylon Jam Nut (83 - Weider Pro 9628 | English Manual - Page 13
66 83 21 77 Attach two 3 1/2" Pulleys (15) and two Cable Traps (66) to the Leg Press Arm (89) with a 3/8" x 4 1/2" 50 Bolt (79) and a 3/8" Nylon Jam Nut (83). Make sure 79 the Cable Traps are positioned as shown. 6 7 27. Locate the Long Cable (58). It has a closed loop on 27 one end and - Weider Pro 9628 | English Manual - Page 14
other side of the unit. Route the Long 29 Cable (58) around the second 3 1/2" Pulley (15) on the Leg Press Arm (89) in the direction shown. 89 15 30. Route the Long Cable (58) around the 3 1/2" Pulley 30 (15) on the Butterfly Base (4). Attach the Long Cable to the Long "U"-Bracket (57) with - Weider Pro 9628 | English Manual - Page 15
x 2" Bolt (12) and the 3/8" Nylon Locknut (21). Make sure the Cable Trap (66) is positioned as shown. 33 86 66 12 57 15 21 34 11 3 Seat Assembly 35 35. Locate and open the parts bag labeled "Seat 41 10 Assembly." Attach the Backrest (41) with the name decal to the 43 Press Upright (56) - Weider Pro 9628 | English Manual - Page 16
- 38 ing Backrest (41) to the Butterfly Upright (42) with two 1/4" x 2 1/2" Screws (43) and two 1/4" Flat Washers (10). 42 41 43 10 39. Press a 1 1/2" Square Inner Cap (32) into the Butterfly Seat Frame (36). Insert the 1/4" x 2" Carriage Bolt (38) into the center hole in a Seat Plate (37 - Weider Pro 9628 | English Manual - Page 17
(29). Slide a Foam Pad (30) onto each end of the Pad Tube. 14 A 36 30 34 30 34 28 29 Miscellaneous Assembly 43 43. Leg Press Assembly Attach the Leg Press Plate (87) to the Adjustment Tube (88) with a 5/16" x 2 1/2" Bolt (22), two 5/16" Flat Washers (8) and a 5/16" Nylon Locknut (3). Make - Weider Pro 9628 | English Manual - Page 18
87 Make sure the Leg Press Plate (87) is oriented as shown. 88 90 89 45. Remove the decals from the decal sheets (not shown) and apply them to the home gym system in the locations shown in the illustration below. 45 HIGH PULLEY LEG PRESS BUTTERFLY ARM PRESS SERIAL NUMBER DECAL LOW PULLEY - Weider Pro 9628 | English Manual - Page 19
this manual. Before using the home gym system, pull each cable a few times to be sure that the cables move smoothly over the pulleys. If one of the cables does not move smoothly, find and correct the problem. IMPORTANT: If the cables are not properly installed, they may be damaged when heavy weight - Weider Pro 9628 | English Manual - Page 20
Adjustment The instructions below describe how each part of the home gym system can be adjusted. Refer to the exercise poster accompanying this manual to see how the home gym system should be set up for each exercise. IMPORTANT: When attaching the lat bar or nylon strap, make sure that the - Weider Pro 9628 | English Manual - Page 21
. Adjust the length of the Chain between the Lat Bar and the Long Cable so the Lat Bar is in the correct starting position for the exercise to be performed. The Nylon Strap (39) can be attached in the same manner. Attaching the Leg Lever to the Low Pulley Station To use the - Weider Pro 9628 | English Manual - Page 22
between the cables, pulleys, and weight guides. Weight Plates Top 1 2 3 4 5 6 7 8 Press Arm (lbs.) 19 41 62 84 108 131 168 195 225 Butterfly Arm (lbs.) 5 10 23 32 38 43 48 51 60 High Pulley (lbs.) 7 20 30 40 53 65 76 87 98 Leg Lever (lbs.) 7 17 30 43 58 68 83 95 107 Leg Press (lbs - Weider Pro 9628 | English Manual - Page 23
Trouble-shooting and Maintenance Inspect and tighten all parts each time you use the home gym system. Replace any worn parts immediately. The home gym system can be cleaned using a damp cloth and mild non-abrasive detergent. Do not use solvents. Tightening the Cables 1 Woven cable, the type of - Weider Pro 9628 | English Manual - Page 24
3/4" Round Inner Cap (34) 1" Round Inner Cap (49) 1" Round Cover Cap (70) 1" Square Inner Cap (65) 5/16" x 2" Eyebolt (35) 1 3/4" Square Inner Cap (44) 2" Square Cover Cap (78) 2" Square Inner Cap (27) 1 1/2" Square Inner Cap (32) - Weider Pro 9628 | English Manual - Page 25
1 1/8" x 2 1/2" Plastic Bushing (74) 1" x 7/8" Plastic Bushing (75) 1/2" x 1 1/4" Spacer (73) 1/2" x 3/4" Spacer (61) 3/8" x 3 1/4" Bolt (85) 3/8" x 3 1/2" Bolt (16) 1" Retainer (69) Cable Clip (53) 3/8" x 3 3/4" Bolt (71) 3/8" x 4 1/4" Bolt (80) 3/8" x 4 1/2" Bolt (79) 3/8" x 7 1/2" Bolt (59) - Weider Pro 9628 | English Manual - Page 26
Cable 87 1 Leg Press Plate 88 1 Adjustment Tube 89 1 Leg Press Arm 90 1 Lock Pin 91 1 1/4" x 2 1/2" Carriage Bolt 92 1 1" Tap Screw 93 2 3/8" x 2 3/4" Bolt 94 2 3/8" x 2 3/4" Carriage Bolt # 1 User's Manual # 1 Exercise Poster Note: "#" indicates a non-illustrated part - Weider Pro 9628 | English Manual - Page 27
Exploded Drawing-Model No. 831.159370 EXPLODED DRAWING-Model No. 831.159370 R0697A R0697A 75 6 73 73 83 22 83 59 17 59 3 46 11 27 86 11 8 11 83 55 11 8 27 12 21 3 15 44 15 16 49 15 23 12 21 27 83 21 68 44 21 61 12 66 20 15 60 3 83 7 65 56 50 74 7 50 6 74 69 - Weider Pro 9628 | English Manual - Page 28
Ordering Replacement Parts QUESTIONS? If you find that: • you need help assembling or operating the WEIDER® PRO 9628 Home Gym System • a part is missing • or you need to schedule repair service call our toll-free HELPLINE 1-800-736-6879 Monday-Saturday, 7 am-7 pm Central Time (excluding holidays)
-
 1
1 -
 2
2 -
 3
3 -
 4
4 -
 5
5 -
 6
6 -
 7
7 -
8
-
9
-
10
-
11
-
12
-
13
-
14
-
15
-
16
-
17
-
18
-
19
-
20
-
21
-
22
-
23
-
24
-
25
-
26
-
27
-
28
 |
 |

®
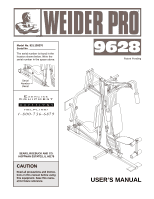
USER’S MANUAL
Model No. 831.159370
Serial No.
The serial number is found in the
location shown below. Write the
serial number in the space above.
CAUTION
Read all precautions and instruc-
tions in this manual before using
this equipment. Save this manu-
al for future reference.
Serial
Number
Decal
SEARS, ROEBUCK AND CO.
HOFFMAN ESTATES, IL 60179
Patent Pending