Weider Pro Lx7 English Manual
Weider Pro Lx7 Manual
 |
View all Weider Pro Lx7 manuals
Add to My Manuals
Save this manual to your list of manuals |
Weider Pro Lx7 manual content summary:
- Weider Pro Lx7 | English Manual - Page 1
hot line will provide immediate assistance, free of charge to you. CUSTOMER HOT LINE: 1-800-999-3756 Mon.-Fri., 6 a.m.-6 p.m. MST CAUTION Read all precautions and instructions in this manual before using this equipment. Save this - Weider Pro Lx7 | English Manual - Page 2
Part Identification Chart 6 Assembly 7 Adjusting the Weight Bench 13 Exercise Guidelines 16 Ordering Replacement Parts Back Cover Note: A Part List/Exploded Drawing is attached to the center of this manual. Remove the Part service WEIDER is a registered trademark of ICON Health & Fitness, Inc. 2 - Weider Pro Lx7 | English Manual - Page 3
the risk of serious injury, read the following important precautions before using the weight bench. 1. Read all instructions in this manual before using the weight bench. Use the weight bench only as described in this manual. 2. It is the responsibility of the owner to ensure that all users of - Weider Pro Lx7 | English Manual - Page 4
has been placed on the weight bench. If the decal is missing, or if it is not legible, please call our Customer Service Department toll-free at 1- may result in serious injury. • Read user's manual and follow all warnings and operating instructions prior to use. • Replace label if damaged, illegible - Weider Pro Lx7 | English Manual - Page 5
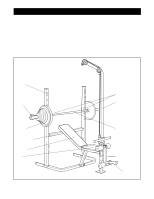
WEBE22080. The serial number can be found on a decal attached to the PRO LX7 Weight Bench (see the front cover of this manual). For your benefit, read this manual carefully before using the WEIDER® PRO LX7 Weight Bench. If you have additional questions, please call our Customer Service Department - Weider Pro Lx7 | English Manual - Page 6
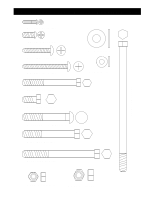
Part Identification Chart - Model No. WEBE22080 R0798A M4 x 19mm Screw (34) M6 x 16mm Screw (33) M6 x 38mm Screw (35) M6 x 62mm Screw (32) M10 Washer (21) M6 Washer (39) M8 x 72mm - Weider Pro Lx7 | English Manual - Page 7
until assembly is completed. • Tighten all parts as you assemble them, unless instructed to do otherwise. • For help identifying the small parts, use the PART IDENTIFICATION CHART on page 7 of the manual. • As you assemble the weight bench, make sure all parts are oriented as shown in the drawings - Weider Pro Lx7 | English Manual - Page 8
Locknuts yet. Fasten the mounting bracket on the Bench Frame (1) to the Right and Left Base (5, at 4 the upper two holes for the Weight Rests. On one side the two holes are Support Tube (8). Place the Support Tube (8) in one set of adjustment brackets (B) on the Uprights. Make sure the Support - Weider Pro Lx7 | English Manual - Page 9
be able to move freely. Tighten the four Screws (35) from the previous step. Lower the Backrest (13) onto the Support Tube (8). 8. Attach one end of the Seat (14) to the Bench Frame (1) with the M6 x 62mm Screw (32) and an M6 Washer (39). Attach the other end of the Seat (14 - Weider Pro Lx7 | English Manual - Page 10
two Foam Pads (18) onto each Pad Tube (17). 11 18 23 17 23 3 18 2 12. Insert a Weight Rest (9) into one of the holes on each 12 Upright (6, 7). Make sure the shaft on the Weight Rest goes 9 through both sides of the Upright. 6 9 7 13. Press a Bushing (10) into the top and bottom - Weider Pro Lx7 | English Manual - Page 11
to the Lat Tower with an M8 x 72mm Bolt (28) and an M8 Nylon Locknut (36). Attach the Cable (50) to the bracket on the Weight Carriage (48) with an M10 x 19mm Bolt (55) and an M10 Nylon Locknut (37). Do not overtighten the Nylon Locknut. 15 50 37 Align These - Weider Pro Lx7 | English Manual - Page 12
the Adjustment Knob (16). 47 16 2 17. Slide a Grip (38) onto each end of the Lat Bar (53). 17 38 Make sure all parts are properly tightened before you use the weight bench. The use of all remain- ing parts will be explained in Adjusting the Weight Bench beginning on the next page. 53 38 12 - Weider Pro Lx7 | English Manual - Page 13
. Inspect and tighten all parts each time you use the weight bench. Replace any worn parts immediately. The weight bench can be cleaned with a Backrest (13), move the Support Tube (8) to a different set of adjustment brackets (B) on the Uprights. When moving the Support Tube (8), always make sure - Weider Pro Lx7 | English Manual - Page 14
THE WEIGHT BENCH FOR SQUAT EXERCISES To perform squat or toe raise exercises, fold the Backrest (13) to the upright position as described earlier in this section). Remove the Support Tube (8). Move the Weight Rests (9) to the upper holes on the back side of the Uprights (see ADJUSTING THE WEIGHT - Weider Pro Lx7 | English Manual - Page 15
For some exercises, the Lat Tower (47) must be attached to the weight bench. Insert the Lat Tower (47) into the indicated hole in the . When the Lat Tower (47) is not in use, store it away from the weight bench so that it does not interfere with your exercise program. 2 ATTACHING THE LAT BAR TO - Weider Pro Lx7 | English Manual - Page 16
range of motion for each exercise and moving only the appropriate parts of the body. Exercising in an uncontrolled manner will leave you balanced program is: • Plan weight training workouts on Monday, feeling exhausted. On the exercise poster accompanying this manual, you will find photographs - Weider Pro Lx7 | English Manual - Page 17
record of each workout. The chart on page 18 of this manual can be photocopied and used to schedule and record your workouts. List the date, the exercises performed, the weight plus the numbers of sets and repetitions completed. Record your weight and key body measurements at the end of every month - Weider Pro Lx7 | English Manual - Page 18
MONDAY Date: / / EXERCISE WEIGHT SETS REPS TUESDAY Date: / / WEDNESDAY Date: / / AEROBIC EXERCISE EXERCISE WEIGHT SETS REPS THURSDAY Date: / / FRIDAY Date: / / AEROBIC EXERCISE EXERCISE WEIGHT SETS REPS Make photocopies of this page for scheduling and recording your workouts. 18 - Weider Pro Lx7 | English Manual - Page 19
19 - Weider Pro Lx7 | English Manual - Page 20
Replacement Parts To order replacement parts, simply call our Customer Service WEBE22080). 2. The NAME of the product (WEIDER® PRO LX7 Weight Bench). 3. The SERIAL NUMBER of the product (see the front cover of this manual). 4. The KEY NUMBER and DESCRIPTION of the desired part(s) (see the PART - Weider Pro Lx7 | English Manual - Page 21
REMOVE THIS PART LIST/EXPLODED DRAWING FROM THE MANUAL SAVE THIS PART LIST/EXPLODED DRAWING FOR FUTURE REFERENCE 81 - Weider Pro Lx7 | English Manual - Page 22
Weight Plate 5 1/2 lb Weight Plate 11 lb Weight Plate 22 lb Weight Plate 33 lb Weight Plate Lat Tower Weight Carriage Pulley Cable Cable Trap Cable Clip Lat Bar 60mm Square Cap M10 x 19mm Bolt Weight Clip Cover 30mm Square Cap User's Manual Exercise Chart Note: "#" indicates a non-illustrated part - Weider Pro Lx7 | English Manual - Page 23
37 27 9 6 37 37 20 4 30 5 30 40 42 44 43 45 57 54 46 26 9 7 37 37 20 30 R0798A Exploded Drawing - Model No. WEBE22080
-
 1
1 -
 2
2 -
 3
3 -
 4
4 -
 5
5 -
 6
6 -
 7
7 -
8
-
9
-
10
-
11
-
12
-
13
-
14
-
15
-
16
-
17
-
18
-
19
-
20
-
21
-
22
-
23
 |
 |

PATENT PENDING
QUESTIONS?
As a manufacturer, we are com-
mitted to providing complete
customer satisfaction. If you have
questions, or find that there are
missing or damaged parts, we
will guarantee you complete sat-
isfaction through direct assis-
tance from our factory.
TO AVOID UNNECESSARY
DELAYS, PLEASE CALL DIRECT
TO OUR TOLL-FREE CUSTOMER
HOT LINE. The trained techni-
cians on our customer hot line
will provide immediate assis-
tance, free of charge to you.
CUSTOMER HOT LINE:
1-800-999-3756
Mon.–Fri., 6 a.m.–6 p.m. MST
Model No. WEBE22080
Serial No.
Write the serial number in the space
above for reference.
CAUTION
Read all precautions and instruc-
tions in this manual before using
this equipment. Save this manual
for future reference.
Serial Number Decal (under seat)
USER’S
MANUAL