Weslo Body Shop 9 English Manual
Weslo Body Shop 9 Manual
 |
View all Weslo Body Shop 9 manuals
Add to My Manuals
Save this manual to your list of manuals |
Weslo Body Shop 9 manual content summary:
- Weslo Body Shop 9 | English Manual - Page 1
BO Model No. WL809030 Serial No. WESLO® SHOP OWNER'S MANUAL Serial Number Decal QUESTIONS? As a manufacturer, we are Mon.-Fri., 6 a.m.-6 p.m. MST CAUTION! Read all safety precautions and instructions in this manual before using this equipment. Save this manual for future reference. PATENT PENDING - Weslo Body Shop 9 | English Manual - Page 2
CROSS TRAINING SYSTEM TROUBLE-SHOOTING AND MAINTENANCE Read all instructions in this owner's manual and in exercise program, consult your physician. This is es- pecially important for persons over the age of 35 or persons with pre-existing health problems. Read all Instructions before using. WESLO - Weslo Body Shop 9 | English Manual - Page 3
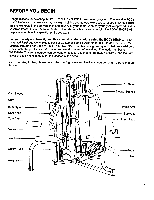
WESLO® BODY SHOP 9 cross training system. The versatile BODY SHOP 9 offers an impressive array of weight training and aerobic exercises to and benefit, read this manual carefully before using the BODY SHOP 9. If you have additional questions, please call our Customer Service Department toll-free at - Weslo Body Shop 9 | English Manual - Page 4
carefully. Make sure that all parts are oriented as shown in the drawings. Refer to the PART IDENTIFICATION CHART accompanying this owner's manual for help identifying the small parts used in assembly. The following tools (not Included) are required: two adjustable wrenches, a phillips screwdriver - Weslo Body Shop 9 | English Manual - Page 5
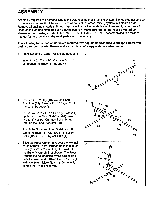
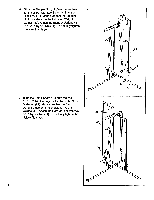
.-4 -Vtr ' 871 7. Find the lower ends of the four Weight 7 Guides (80)-there are holes near the upper ends of the Weight Guides. Slide the four Bumpers (17) onto the lower ends of the Weight Guides. Insert the lower ends of the Weight Guides into the Short and Long Stabilizers (82, 83). 80 - Weslo Body Shop 9 | English Manual - Page 6
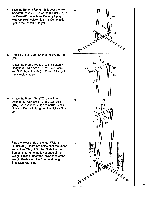
) onto the two 8 5/16" x 2 1/2" Carriage Bolts (14) in the Long Stabilizer (83). Make sure that the Stepper Upright slides onto the indicated Weight Guides (80). Attach the Stepper Upright with two 5/16" Nylock Nuts (1). Do not fully tighten the Nylock Nuts yet. 9. Siide the Cam Upright (85 - Weslo Body Shop 9 | English Manual - Page 7
(80) to the Stepper Upright (84) with 5/16" x 2 1/2" Bolts 11 (9) and 5/16" Nylock Nuts (1). Attach two of the Weight Guides (80) to the Cam Upright (85) with 5/16" x 2 1/2" Bolts (9) and 5/16" Nylock Nuts (1). Tighten all Nylock Nuts used In assembly steps 2 through 11. 85 1 9 ...----- 9 80 - Weslo Body Shop 9 | English Manual - Page 8
14. Grease the cylinder axles on the Stepper Upright (84). Slide a Cylinder Spacer (92) and a Resistance Cylinder (91) onto the right axle. Make sure that the open side of the Spacer is turned toward the Stepper Upright (84). Tap a 5/8" Retainer (42) and 5/8" Plastic Cap (115) onto the right axle. - Weslo Body Shop 9 | English Manual - Page 9
17. Press two 1 3/4" x 1 3/4" Caps (34) into the 17 Leg Press Frame (88). Attach the Leg Press Frame (88) to the indicated bracket on the Base (81) with a 3/8" x 2 3/4" Bolt (15) and 3/8" Nylock Nut (2). 34 88 ..•• 34Na 2 A.,,1 81 '0V15 18. Attach a 3" Pulley (7) to each side of the Leg 18 - Weslo Body Shop 9 | English Manual - Page 10
21. Press the Round Caps (75) into the upper ends 21 of the Left and Right Butterfly Arms (70, 71). Wet the upper ends of the Left and Right Butterfly Arms (70, 71) with soapy water. Slide the Butterfly Arm Pads (72) onto the Butterfly Arms. Insert the pin on the lower end of the Right Butterfly Arm - Weslo Body Shop 9 | English Manual - Page 11
water. Slide a Grip (22) onto each Handle. 26. Press two Weight Guides (58) into each of the twenty-five Weights (105). Slide about half of the Weights (105) onto each pair of Weight Guides (80) by tipping the Weights as shown. Make sure that all of the - Weslo Body Shop 9 | English Manual - Page 12
27. Attach two 3" Pulleys (7) to the two "I" Plates (108) with 3/8" x 1 3/4" Bolts (6) and 3/8" Nylock Nuts (2). Make sure that the Pulleys are attached to the holes in the ends of the "I" Plates. Attach a 3" Pulley (7) to the "U" Bracket (19) with a 3/8" x 1 3/4" Bolt (6) and 3/8" Nylock Nut (2). - Weslo Body Shop 9 | English Manual - Page 13
30. Slide a Cable Trap (24) and a 3" Pulley (7) 30 onto a 3/8" x 4" Bolt (33). Insert the Bolt from the indicated side through the Press Upright (87). Lay the 258" Cable (97) over the Pulley. Tighten a 3/8" Nylock Nut (2) with a 3/8" Washer (110) onto the Bolt. Make sure that 87 the Cable is - Weslo Body Shop 9 | English Manual - Page 14
33. Attach one end of the 195" Cable (98) to the 33 Cam Upright (85) with a 5/16" x 2 1/2" Bolt (9) and 5/16" Nylock Nut (1). As you tighten the Nylock Nut, make sure that the Cable is pointed in the indicated direction. Slide a Wide Cable Trap (113) and a Wide "V" Pulley (112) onto the 3/8" x - Weslo Body Shop 9 | English Manual - Page 15
36. Find the upper end of a Weight Tube (78)- there is a single hole near the upper end. Insert the 195" Cable (98) into the upper end of the Weight Tube and attach it with a 5/16" x 1 1/2" Bolt (54) and 5/16" Nylock Nut (1). Press a Weight Tube Cap (77) into the lower end of the Weight Tube (78). - Weslo Body Shop 9 | English Manual - Page 16
39. Attach a Backrest (74) to the Press Upright (87) with two 1/4" x 3 1/2" Screws (116) and 1/4" Washers (5). 39 74 1 116 -87 40. Press a 2" x 2" Cap (117) into the Seat Bracket (20). 40 Attach a 6" Plate (27) to the Seat Bracket (20) with a 1/4" x 2 1/2" Carriage Bolt (106), 1/4" Washer (5) - Weslo Body Shop 9 | English Manual - Page 17
43. Slide a Cable Trap (24) and a 3" Pulley (7) onto the 3/8" x 5" Bolt (36). Hold a Cam Sleeve Bushing (35) inside the Cam Sleeve (44). Insert the Bolt through the indicated hole in the Cam Sleeve (44) and the Cam Sleeve Bushing. Tighten a 3/8" Nylock Nut (2) onto the Bolt. Do not fully tighten the - Weslo Body Shop 9 | English Manual - Page 18
47. Pull down on the 195" Cable (98) so there is 47 slack in the Cable. Route the Cable under the 3" Pulley (7) on the Cam Sleeve (44). Make sure that the Cable is between the Pulley and the Cable Trap (24). Tighten the 3/8" Nylock Nut (2) attaching the Pulley to the Cam Sleeve. Route the 195 - Weslo Body Shop 9 | English Manual - Page 19
them in the locations shown in the drawing below. O Exercise List "RADIUS CAM ARM" "Butterfly" Cam Decals O on page 20 of this owner's manual. 53. Before using the cross training system not move smoothly, locate and correct the problem before using the cross training system. IMPORTANT: - Weslo Body Shop 9 | English Manual - Page 20
ADJUSTING THE CROSS TRAINING SYSTEM The instructions below describe how each part of the cross training system can be adjusted. See the EXERCISE GUIDE accompanying this owners manual to see how the cross training system should be set up for each individual exercise. CHANGING THE WEIGHT SETTING The - Weslo Body Shop 9 | English Manual - Page 21
) and remove the Bench. CHANGING THE HEIGHT OF THE CAM SLEEVE The height of the Cam Sleeve (44) must be changed for different exercises. To change the height, first support the weight of the Cam Sleeve with one hand. Remove the 6 3/4" "L" Pin (49), slide the Cam Sleeve up or down, and reinsert - Weslo Body Shop 9 | English Manual - Page 22
TROUBLE-SHOOTING AND slack in the cables before resistance is felt, the cables can be tightened. Follow the instructions below to tighten the cables. To tighten the cables attached to the weight stack near back cover of this owner's manual for information about ordering replacement parts. 22 - Weslo Body Shop 9 | English Manual - Page 23
23 - Weslo Body Shop 9 | English Manual - Page 24
NAME of the product (WESLO® BODY SHOP 9 cross training system). 3. The SERIAL NUMBER of the product (see the front cover of this manual). 4. The KEY NUMBER , improper or abnormal usage or repairs not provided by a WESLO authorized service center or for products used for commercial or rental purposes.
-
 1
1 -
 2
2 -
 3
3 -
 4
4 -
 5
5 -
 6
6 -
 7
7 -
8
-
9
-
10
-
11
-
12
-
13
-
14
-
15
-
16
-
17
-
18
-
19
-
20
-
21
-
22
-
23
-
24
 |
 |

WESLO®
BO
SHOP
OWNER'S
MANUAL
Model
No.
WL809030
Serial
No.
Serial
Number
Decal
QUESTIONS?
As
a
manufacturer,
we
are
committed
to
providing
you
complete
customer
satisfac-
tion.
If
you
have
questions,
or
find
there
are
missing
or
damaged
parts,
we
will
guarantee
you
complete
satisfaction
through
direct
assistance
from
our
factory.
TO
AVOID
UNNECESSARY
DELAYS,
PLEASE
CALL
DIRECT
TO
OUR
TOLL
-FREE
CUSTOMER
HOT
LINE.
The
trained
technicians
on
our
customer
hot
line
will
provide
immediate
assis-
tance,
free
of
charge
to
you.
CUSTOMER
HOT
LINE:
1-800-999-3756
Mon.
—Fri.,
6
a.m.-6
p.m.
MST
CAUTION!
Read
all
safety
precautions
and
instructions
in
this
manual
before
using
this
equipment.
Save
this
manual
for
future
reference.
PATENT
PENDING