Weslo Cadence C6 Treadmill Uk Manual
Weslo Cadence C6 Treadmill Manual
 |
View all Weslo Cadence C6 Treadmill manuals
Add to My Manuals
Save this manual to your list of manuals |
Weslo Cadence C6 Treadmill manual content summary:
- Weslo Cadence C6 Treadmill | Uk Manual - Page 1
or write: ICON Health & Fitness, Ltd. Customer Service Department Unit 4 Revie Road Industrial Estate Revie Road Beeston Leeds, LS118JG UK email: [email protected] CAUTION Read all precautions and instructions in this manual before using this equipment. Save this manual for future reference. USER - Weslo Cadence C6 Treadmill | Uk Manual - Page 2
3 BEFORE YOU BEGIN 5 ASSEMBLY 6 OPERATION AND ADJUSTMENT 12 HOW TO FOLD AND MOVE THE TREADMILL 16 MAINTENANCE AND TROUBLESHOOTING 18 CONDITIONING GUIDELINES 20 PART LIST 22 EXPLODED DRAWING 24 ORDERING REPLACEMENT PARTS Back Cover WESLO is a registered trademark of ICON IP, Inc. 2 - Weslo Cadence C6 Treadmill | Uk Manual - Page 3
the walking belt while the power is turned off. Do not operate the treadmill if the power cord or plug is damaged, or if the treadmill is not working properly. (See MAINTENANCE AND TROUBLESHOOTING on page 18 if the treadmill is not working properly.) 13. Read, understand, and test the emergency stop - Weslo Cadence C6 Treadmill | Uk Manual - Page 4
procedures de- scribed in this manual. Never remove the motor hood unless instructed to do so by an authorized service representative. Servicing other than the procedures in this manual should be performed by an authorized service representative only. 24. This treadmill is intended for in-home - Weslo Cadence C6 Treadmill | Uk Manual - Page 5
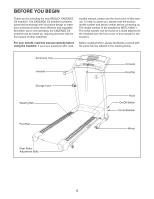
BEGIN Thank you for selecting the new WESLO® CADENCE C6 treadmill. The CADENCE C6 treadmill combines advanced technology with innovative design to make your workouts at home more effective and enjoyable. And when you're not exercising, the CADENCE C6 treadmill can be folded up, requiring less than - Weslo Cadence C6 Treadmill | Uk Manual - Page 6
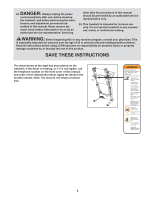
. During shipping, a small amount of lubricant may be transferred to the top of the walking belt or the shipping carton. This does not affect treadmill performance. If there is lubricant on top of the walking belt, simply wipe off the lubricant with a soft cloth and a mild, non-abrasive cleaner - Weslo Cadence C6 Treadmill | Uk Manual - Page 7
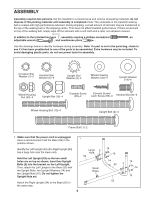
Housing Nuts (43). 2 32 45 43 13 32 45 13 52 32 43 32 3. Position the Base (52) as close to the front of the 3 treadmill as possible. See drawing 3a. Locate the wire tie in the Right Upright (54). Tie the wire tie securely to the connector on the end - Weslo Cadence C6 Treadmill | Uk Manual - Page 8
4. See the left inset drawing and identify a Frame Spacer (11). Hold the Frame Spacer between 4 the Right Upright (54) and the Frame (51). Attach the Right Upright to the Frame with a Frame Bolt (1), an Upright Washer (14), and an Upright Star Washer (9); do not tighten the Frame Bolt yet. 11 - Weslo Cadence C6 Treadmill | Uk Manual - Page 9
6. Set the Console (91) face down on a soft surface to avoid scratching it. Hold the Right Handrail (33), which has a large hole in the location shown, near the Console. Next, insert the console wire into the hole in the side of the Right Handrail (33). Using needlenose pliers, pull the console wire - Weslo Cadence C6 Treadmill | Uk Manual - Page 10
8. With the help of a second person, hold the Console 8 (91) near the Right Upright (54). Remove the wire tie from the Wire Harness (98). Connect the Wire Harness to the console wire. Make sure to connect the connectors properly (see drawing 8a). The connectors should slide together easily and - Weslo Cadence C6 Treadmill | Uk Manual - Page 11
drawing. Position the Uprights 11 (53, 54) so that the treadmill Frame (51) is cen- tered between the Uprights. Firmly tighten 48 53 95 13. Make sure that all parts are properly tightened before you use the treadmill. Keep the included hex key in a secure place. The hex key is used to adjust - Weslo Cadence C6 Treadmill | Uk Manual - Page 12
cord into an appropriate outlet that is properly installed and earthed in accordance with all local codes and 3 ordinances. Important: The treadmill is not compatible with GFCI-equipped outlets. Outlet IT GR DANGER: Improper connection of the equipment-earthing conductor can result in an - Weslo Cadence C6 Treadmill | Uk Manual - Page 13
your workouts more effective. While the manual mode of the console is selected, the speed and incline of the treadmill can be changed with the touch speed programs. Each program automatically controls the speed of the treadmill as it guides you through an effective workout. To prevent damage to the - Weslo Cadence C6 Treadmill | Uk Manual - Page 14
Select the manual mode. When the key is inserted, the manual mode will be selected. If you have selected a speed program, reselect the manual mode by button. 4 Change the incline of the treadmill as desired. To change the incline of the treadmill, hold down the Incline increase or decrease button - Weslo Cadence C6 Treadmill | Uk Manual - Page 15
setting is too high or too low during the program, you can manually override the setting by pressing the Speed buttons. However, when the next speed setting is programmed for the next period. 4 Change the incline of the treadmill as desired. See step 4 on page 14. 5 Follow your progress with the - Weslo Cadence C6 Treadmill | Uk Manual - Page 16
to safely lift 20 kg (45 lbs.) to raise, lower, or move the treadmill. 1. Hold the metal frame firmly in the location shown by the arrow at the position. Frame 2. Move your right hand to the position shown and hold the treadmill firmly. Using your left hand, pull the latch knob to the left and hold - Weslo Cadence C6 Treadmill | Uk Manual - Page 17
USE 1. Hold the upper end of the treadmill with your right hand as shown. Using your left hand, pull the latch knob to the left and hold it. Next, lower the frame until - Weslo Cadence C6 Treadmill | Uk Manual - Page 18
MAINTENANCE AND TROUBLESHOOTING Most treadmill problems can be solved by following the steps below. Find the symptom that applies, and follow the steps listed. If further assistance is needed, please see the front cover of this manual. PROBLEM: The power does not turn on SOLUTION: a. Make sure - Weslo Cadence C6 Treadmill | Uk Manual - Page 19
power cord, insert the key, and run the treadmill for a few minutes. Repeat until the walking belt is properly tightened. b 5-7cm Rear Roller Bolts c. If the walking belt still slows when walked on, please see the front cover of this manual. PROBLEM: The walking belt is off-center or slips when - Weslo Cadence C6 Treadmill | Uk Manual - Page 20
by using your heart rate as a guide. The chart below shows recommended heart rates aerobic exercise, adjust the speed and incline of the treadmill until your heart rate is near the highest number your muscles and will help prevent post-exercise problems. EXERCISE FREQUENCY To maintain or improve your - Weslo Cadence C6 Treadmill | Uk Manual - Page 21
SUGGESTED STRETCHES The correct form for several basic stretches is shown at the right. Move slowly as you stretch-never bounce. 1. Toe Touch Stretch Stand with your knees bent slightly and slowly bend forward from 1 your hips. Allow your back and shoulders to relax as you reach down toward - Weslo Cadence C6 Treadmill | Uk Manual - Page 22
Screw 26 6 Base Pad Screw 27 2 Rear Walking Platform Bolt 28 4 Belt Guide Screw 29 2 Rear Roller Adj. Bolt 30 2 Motor Bolt 31 1 Motor Pivot Bolt 32 4 Wheel Housing Washer 33 1 Right Handrail 34 2 Motor Tension Bolt 35 2 Wheel Bolt 36 2 Rear Roller Star Washer 37 - Weslo Cadence C6 Treadmill | Uk Manual - Page 23
108 2 109 1 110 1 111 1 112 1 Description Incline Motor Nut Incline Motor Bolt Belt Guide Console Screw/Latch Screw Belly Pan Grommet Incline Wheel Wire Harness Power Wire, M/F 4" Black Wire, M/F User's Manual # These parts are not illustrated. Specifications are subject to change without notice. - Weslo Cadence C6 Treadmill | Uk Manual - Page 24
EXPLODED DRAWING A-Model No. WETL13806.1 R1006A 24 25 89 3 46 25 114 83 82 31 77 62 56 94 102 25 67 25 64 50 25 109 28 71 112 113 25 82 114 78 4 68 102 111 25 27 101 19 21 42 60 36 29 25 19 74 46 6 21 27 42 55 17 18 29 74 61 36 114 46 76 86 51 107 114 114 50 - Weslo Cadence C6 Treadmill | Uk Manual - Page 25
EXPLODED DRAWING B-Model No. WETL13806.1 R1006A 47 47 47 47 65 47 30 34 41 38 21 87 110 79 44 38 21 59 34 42 104 101 21 42 57 117 117 103 114 20 114 117 20 105 39 24 66 20 37 39 10 24 99 118 20 90 58 115 114 114 20 96 25 - Weslo Cadence C6 Treadmill | Uk Manual - Page 26
EXPLODED DRAWING C-Model No. WETL13806.1 75 75 88 R1006A 114 114 95 33 95 7 85 120 95 114 120 114 5 95 7 85 120 22 8 8 98 75 8 5 5 5 75 48 8 116 95 116 80 53 54 1 11 9 14 2 2 11 52 49 13 32 32 43 43 35 14 63 16 26 98 63 69 45 63 70 16 26 69 63 26 13 26 - Weslo Cadence C6 Treadmill | Uk Manual - Page 27
EXPLODED DRAWING D-Model No. WETL13806.1 R1006A 91 15 21 84 12 4 4 4 4 4 4 4 73 4 81 4 4 27 - Weslo Cadence C6 Treadmill | Uk Manual - Page 28
, Ltd. office, or write: ICON Health & Fitness, Ltd. Customer Service Department Unit 4, Revie Road Industrial Estate Revie Road Beeston Leeds, LS118JG UK the NAME of the product (WESLO CADENCE C6 treadmill) • the SERIAL NUMBER of the product (see the front cover of this manual) • the KEY NUMBER and
-
 1
1 -
 2
2 -
 3
3 -
 4
4 -
 5
5 -
 6
6 -
 7
7 -
8
-
9
-
10
-
11
-
12
-
13
-
14
-
15
-
16
-
17
-
18
-
19
-
20
-
21
-
22
-
23
-
24
-
25
-
26
-
27
-
28
 |
 |

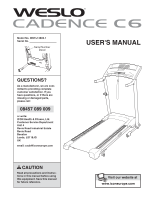
USER'S MANUAL
Model No. WETL13806.1
Serial No.
CAUTION
Read all precautions and instruc-
tions in this manual before using
this equipment. Save this manual
for future reference.
Serial Number
Decal
QUESTIONS?
As a manufacturer, we are com-
mitted to providing complete
customer satisfaction. If you
have questions, or if there are
missing or damaged parts,
please call:
or write:
ICON Health & Fitness, Ltd.
Customer Service Department
Unit 4
Revie Road Industrial Estate
Revie Road
Beeston
Leeds, LS118JG
UK
email: [email protected]
08457 089 009