Weslo Cadence G 3.9 Instruction Manual
Weslo Cadence G 3.9 Manual
 |
View all Weslo Cadence G 3.9 manuals
Add to My Manuals
Save this manual to your list of manuals |
Weslo Cadence G 3.9 manual content summary:
- Weslo Cadence G 3.9 | Instruction Manual - Page 1
FOR REVIEW. DO NOT PRINT FOR MASS PRODUCTION. Model No. WETL29817.0 Serial No. Write the serial number in the space above for reference. Serial Number Decal CUSTOMER SERVICE UNITED NSW 2153 AUSTRALIA CAUTION Read all precautions and instructions in this manual before using this equipment. Save this - Weslo Cadence G 3.9 | Instruction Manual - Page 2
TREADMILL 10 HOW TO FOLD AND MOVE THE TREADMILL 15 MAINTENANCE AND TROUBLESHOOTING or illegible, see the front cover of this manual and request a free replacement decal. Apply the decal : The decal(s) may not be shown at actual size. WESLO is a registered trademark of ICON Health & Fitness, Inc. - Weslo Cadence G 3.9 | Instruction Manual - Page 3
all important precautions and instructions in this manual and all warnings on your treadmill before using your treadmill. ICON assumes no problems. 12. Wear appropriate exercise clothes while using the treadmill. Do not wear loose clothes that could become caught in the treadmill. Athletic support - Weslo Cadence G 3.9 | Instruction Manual - Page 4
before clean- ing the treadmill, and before performing the maintenance and adjustment procedures described in this manual. Never remove the motor hood unless instructed to do so by an authorized service representative. Servicing other than the procedures in this manual should be performed by - Weslo Cadence G 3.9 | Instruction Manual - Page 5
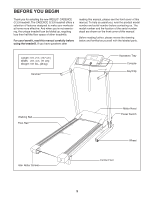
YOU BEGIN Thank you for selecting the new WESLO® CADENCE G 3.9 treadmill. The CADENCE G 3.9 treadmill offers a selection of features designed to make your workouts at home more effective. And when you're not exercising, the unique treadmill can be folded up, requiring less than half the floor space - Weslo Cadence G 3.9 | Instruction Manual - Page 6
each drawing is the key number of the part, from the PART LIST near the end of this manual. The number following the key number is the quantity be an oily substance on the exterior of the treadmill. This is normal. If there is an oily substance on the treadmill, wipe it off with a soft cloth and a - Weslo Cadence G 3.9 | Instruction Manual - Page 7
.eu. If 1 you do not have internet access, call Customer Service (see the front cover of this manual). To register your product and activate your warranty in Australia, email or this step on the left side of the treadmill. Then, tighten all four Screws (1, 2, 6) on each side. 35 56 5 2 1 6 35 7 - Weslo Cadence G 3.9 | Instruction Manual - Page 8
4. Pivot the Handrails (52) down to the horizontal position. 4 52 52 5. Tighten an M8 x 15mm Screw (3) with an M8 Washer (5) into the bottom of each Handrail (52) 5 as shown; firmly tighten the Screws. 52 5 3 52 6. Raise the Frame (40) to the upright position. IMPORTANT: Have a second person - Weslo Cadence G 3.9 | Instruction Manual - Page 9
parts are properly tightened before you use the treadmill. To protect the floor or carpet, place a mat under the treadmill. To avoid damage to the console, keep the treadmill out of direct sunlight. Keep the included hex keys in a secure place. One of the hex keys is used to adjust the walking belt - Weslo Cadence G 3.9 | Instruction Manual - Page 10
the steps below to plug in the power cord. 1. Plug the indicated end of the power cord into the socket on the treadmill. Socket on Treadmill DANGER: Improper connection of the equipment-earthing conductor can result in an increased risk of electric shock. Check with a qualified electrician or - Weslo Cadence G 3.9 | Instruction Manual - Page 11
also offers goal workouts and preset workouts. Each workout automatically controls the speed of the treadmill as it guides you through an effective exercise session. To turn on the power, see page 12. To use the manual mode, see page 12. To use a goal workout, see page 13. To use a preset workout - Weslo Cadence G 3.9 | Instruction Manual - Page 12
power cord (see page 10). Next, locate the power switch on the treadmill frame near the power cord. Make sure that the power switch is THE MANUAL MODE 1. Insert the key into the console. See HOW TO TURN ON THE POWER at the left. 2. Select the manual mode. When the key is inserted, the manual mode - Weslo Cadence G 3.9 | Instruction Manual - Page 13
the key from the console. See step 5 on page 12. Press the Start button to start the workout. When you press the button, the treadmill will you can manually override the setting by pressing the Speed buttons; however, when the current segment of the workout ends, the treadmill will automatically - Weslo Cadence G 3.9 | Instruction Manual - Page 14
To vary the intensity of your exercise, you can change the incline of the treadmill. There are two incline levels. Before changing the incline, remove the key and unplug the power cord. Next, fold the treadmill to the storage position (see page 15). To change the incline, rotate both incline - Weslo Cadence G 3.9 | Instruction Manual - Page 15
HOW TO FOLD AND MOVE THE TREADMILL HOW TO FOLD THE TREADMILL HOW TO MOVE THE TREADMILL To avoid damaging the treadmill, adjust the incline to zero before you fold the treadmill. Then, remove the key and unplug the power cord. CAUTION: You must be able to safely lift 45 lbs. (20 kg) to raise, - Weslo Cadence G 3.9 | Instruction Manual - Page 16
Reset TROUBLESHOOTING SYMPTOM: The power turns off during use Most treadmill problems can be solved by following the simple steps below. Find the symptom that applies, and follow the steps listed. If further assistance is needed, see the front cover of this manual - Weslo Cadence G 3.9 | Instruction Manual - Page 17
displays do not function properly a. Remove the key from the console and UNPLUG THE POWER CORD. Next, place the treadmill in the storage position (see HOW TO FOLD THE TREADMILL on page 15). Remove the four indicated M4 x 16mm Screws (15). Then, carefully remove the Motor Hood (46). 46 15 15 SYMPTOM - Weslo Cadence G 3.9 | Instruction Manual - Page 18
roller screw counterclockwise 1/2 of a turn. Be careful not to overtighten the walking belt. Then, plug in the power cord, insert the key, and walk on the treadmill for a few minutes. Repeat until the walking belt is centered. SYMPTOM: The walking belt slips when walked on a. First, remove the - Weslo Cadence G 3.9 | Instruction Manual - Page 19
exercising at the proper intensity is the key to achieving results. You can use your heart rate as a guide to find the proper intensity level. The the flexibility of your muscles and helps to prevent post-exercise problems. EXERCISE FREQUENCY To maintain or improve your condition, complete three - Weslo Cadence G 3.9 | Instruction Manual - Page 20
Walking Platform Walking Belt Belt Guide Front Platform Cushion Drive Roller/Pulley Drive Belt Wheel Base Drive Motor Motor Bracket Key No. Qty. 38 2 Motor Bushing Motor Isolator Reed Switch Reed Switch Clip Magnet M4 Nut Electronics Plate Filter M4 x 10mm Bolt M8 x 45mm Bolt User's Manual - Weslo Cadence G 3.9 | Instruction Manual - Page 21
EXPLODED DRAWING A 18 37 36 66 15 15 38 16 64 21 39 16 65 7 16 31 27 67 16 24 30 68 13 69 33 70 71 21 25 44 15 27 15 13 20 17 27 27 45 15 15 13 25 29 28 15 18 17 27 32 15 13 27 19 13 15 23 73 27 40 72 18 31 17 30 18 15 25 27 Model No. WETL29817.0 R0918A 22 - Weslo Cadence G 3.9 | Instruction Manual - Page 22
EXPLODED DRAWING B 15 15 Model No. WETL29817.0 R0918A 46 47 15 15 15 48 15 50 15 49 15 15 15 22 - Weslo Cadence G 3.9 | Instruction Manual - Page 23
EXPLODED DRAWING C Model No. WETL29817.0 R0918A 51 54 15 53 15 15 11 15 52 18 51 51 15 5 3 57 51 5 3 15 15 18 11 62 15 55 56 1 5 2 6 59 63 61 35 26 14 62 8 63 22 34 18 26 14 18 58 4 18 10 18 22 34 26 8 14 15 60 5 2 59 1 6 26 14 23 - Weslo Cadence G 3.9 | Instruction Manual - Page 24
when contacting us: • the model number and serial number of the product (see the front cover of this manual) • the name of the product (see the front cover of this manual) • the key number and description of the replacement part(s) (see the PART LIST and the EXPLODED DRAWING near the end of
-
 1
1 -
 2
2 -
 3
3 -
 4
4 -
 5
5 -
 6
6 -
 7
7 -
8
-
9
-
10
-
11
-
12
-
13
-
14
-
15
-
16
-
17
-
18
-
19
-
20
-
21
-
22
-
23
-
24
 |
 |

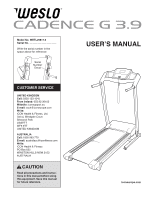
USER’S MANUAL
Model No. WETL29817.0
Serial No.
Write the serial number in the
space above for reference.
CAUTION
Read all precautions and instruc-
tions in this manual before using
this equipment. Save this manual
for future reference.
Serial
Number
Decal
CUSTOMER SERVICE
UNITED KINGDOM
Call:
0330 123 1045
From Ireland:
053 92 36102
Website:
iconsupport.eu
E-mail:
Write:
ICON Health & Fitness, Ltd.
Unit 4, Westgate Court
Silkwood Park
OSSETT
WF5 9TT
UNITED KINGDOM
AUSTRALIA
Call:
1800 993 770
E-mail:
Write:
ICON Health & Fitness
PO Box 635
WINSTON HILLS NSW 2153
AUSTRALIA
iconeurope.com