Weslo Easy Compact 2 Treadmill Uk Manual
Weslo Easy Compact 2 Treadmill Manual
 |
View all Weslo Easy Compact 2 Treadmill manuals
Add to My Manuals
Save this manual to your list of manuals |
Weslo Easy Compact 2 Treadmill manual content summary:
- Weslo Easy Compact 2 Treadmill | Uk Manual - Page 1
Serial Number Decal QUESTIONS? If you have questions, or if there are missing parts, please contact us at the numbers or addresses listed below: Call: 08457 089 and instructions in this manual before using this equipment. Save this manual for future reference. USER'S MANUAL www.iconeurope. - Weslo Easy Compact 2 Treadmill | Uk Manual - Page 2
THE TREADMILL 15 TROUBLESHOOTING 17 EXERCISE GUIDELINES 19 PART LIST 20 EXPLODED DRAWING 21 ORDERING REPLACEMENT PARTS Back Cover cover of this manual and request a free replacement decal. Apply the decal in the location shown. Note: The decals may not be shown at actual size. WESLO is a - Weslo Easy Compact 2 Treadmill | Uk Manual - Page 3
or persons with pre-existing health problems. 2. It is the responsibility of the owner to ensure that all users of this treadmill are adequately informed of all warnings and precautions. 3. Use the treadmill only as described in this manual. 4. Place the treadmill on a level surface, with at least - Weslo Easy Compact 2 Treadmill | Uk Manual - Page 4
cord immediately after use, before cleaning the treadmill, and before performing the maintenance and adjustment procedures de- scribed in this manual. Never remove the motor hood unless instructed to do so by an authorized service representative. Servicing other than the procedures in this - Weslo Easy Compact 2 Treadmill | Uk Manual - Page 5
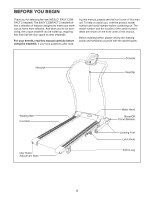
BEFORE YOU BEGIN Thank you for selecting the new WESLO® EASY COMPACT 2 treadmill. The EASY COMPACT 2 treadmill offers a selection of features designed to make your workouts at home more effective. And when youʼre not exercising, the unique treadmill can be folded up, requiring less than half the - Weslo Easy Compact 2 Treadmill | Uk Manual - Page 6
walking belt or the shipping carton. This is normal and does not affect treadmill performance. If there is lubricant on top of the walking belt, simply the part, from the PART LIST near the end of this manual. The number after the parentheses is the quantity needed for assembly. Note: If a part is - Weslo Easy Compact 2 Treadmill | Uk Manual - Page 7
1. Identify the Right Handrail (86), which is marked with an "R" sticker or a "Right" sticker. Have a second person hold the Right Handrail near the tube on the Base (79). See the inset drawing. Tie the wire tie in the Right Handrail securely around the end of the Wire Harness (84). Then, pull the - Weslo Easy Compact 2 Treadmill | Uk Manual - Page 8
3. Attach the Console Plate (81) to the Handrail 3 Crossbar (83) with two M8 x 16mm Bolts (1) and two M8 Star Washers (5). Make sure the Console Plate is oriented as shown and that the Wire Harness (84) is not pinched. Remove the wire tie from the Wire Harness (84). 83 81 84 5 1 5 1 Wire - Weslo Easy Compact 2 Treadmill | Uk Manual - Page 9
Screws (3) that you re- moved in step 4. See step 1. Tighten the two M8 x 16mm Bolts (1) on each side of the treadmill. See step 2. Tighten the M6 x 10mm Bolt (2) on each side of the treadmill. 3 80 Console Back 7. Tighten an M4.2 x 13mm Screw (32) into the Motor Hood (53). 7 3 3 53 32 9 - Weslo Easy Compact 2 Treadmill | Uk Manual - Page 10
(not shown) rest firmly on the floor (see HOW TO LEVEL THE TREADMILL on page 14). 77 Holes 10. Make sure that all parts are properly tightened before you use the treadmill. If there are sheets of clear plastic on the treadmill decals, remove the plastic. To protect the floor or carpet, place a mat - Weslo Easy Compact 2 Treadmill | Uk Manual - Page 11
cord into an appropriate outlet that is properly installed and earthed in accordance with all local codes and 3 ordinances. IMPORTANT: The treadmill is not compatible with RCD-equipped outlets. Outlet DANGER: Improper connection of the equipment-earthing conductor can result in an in- creased - Weslo Easy Compact 2 Treadmill | Uk Manual - Page 12
damage the console displays or other electrical components. Plug in the power cord (see page 11). Next, locate the reset/off circuit breaker on the treadmill frame near the power cord. Make sure that the circuit breaker is in the "reset" position. Reset Next, stand on the foot rails of the - Weslo Easy Compact 2 Treadmill | Uk Manual - Page 13
then reinsert it. Note: When you switch the reset/off circuit breaker to the "off" position, the unit of measurement will reset. For simplicity, all instructions in this section refer to kilometers. To reset the display, press the Stop button, remove the key, and then reinsert the key. 13 - Weslo Easy Compact 2 Treadmill | Uk Manual - Page 14
a few seconds, and then reposition your thumb on the pulse sensor. Remember to stand still while measuring your heart rate. To vary the intensity of your exercise, the incline of the treadmill can be changed. There are two incline levels. Before changing the incline, remove the key and unplug the - Weslo Easy Compact 2 Treadmill | Uk Manual - Page 15
the key and unplug the power cord. CAUTION: You must be able to safely lift 45 lbs. (20 kg) to raise, lower, or move the treadmill. 1. Hold the metal frame firmly in the location shown by the arrow at the right. CAUTION: To decrease the possibility of injury, do not lift - Weslo Easy Compact 2 Treadmill | Uk Manual - Page 16
USE 1. Hold the upper end of the treadmill with your left hand. Pull the latch knob to the right and hold it. It may be necessary to push the frame forward as you - Weslo Easy Compact 2 Treadmill | Uk Manual - Page 17
TROUBLESHOOTING Most treadmill problems can be solved by following the steps below. Find the symptom that applies, and follow the steps listed. If further assistance is needed, please see the front cover of this manual. PROBLEM: The power does not turn on SOLUTION: a. Make sure that the power - Weslo Easy Compact 2 Treadmill | Uk Manual - Page 18
the power cord, insert the key, and run the treadmill for a few minutes. Repeat until the walking belt is properly tightened. b 2-3 in. Idler Roller Bolts c. If the walking belt still slows when walked on, see the front cover of this manual. PROBLEM: The walking belt is off-center or slips when - Weslo Easy Compact 2 Treadmill | Uk Manual - Page 19
You can use your heart rate as a guide to find the proper intensity level. The chart below shows recommended heart rates for fat burning and aerobic intensity of your exercise until your heart rate is near the highest number in your training zone. WORKOUT GUIDELINES Warming Up-Start with 5 to 10 - Weslo Easy Compact 2 Treadmill | Uk Manual - Page 20
Ground Wire w/Decal Incline Leg Endcap Left Foot Rail Belt Guide Magnet Motor Belt Drive Roller/Pulley Gas Spring Shaft Warning Manual Note: Specifications are subject to change without notice. See the back cover of this manual for information about ordering replacement parts. *These parts are - Weslo Easy Compact 2 Treadmill | Uk Manual - Page 21
EXPLODED DRAWING A-Model No. WETL20709.0 R0509A 21 29 41 39 29 36 40 36 8 27 42 16 29 11 26 43 36 8 38 4 16 29 82 27 11 18 29 8 26 36 16 46 29 36 26 29 36 27 13 29 8 36 26 8 11 16 10 21 49 48 4 29 8 36 16 29 29 27 36 4 38 24 8 13 18 16 47 16 11 12 - Weslo Easy Compact 2 Treadmill | Uk Manual - Page 22
EXPLODED DRAWING B-Model No. WETL20709.0 32 32 53 32 R0509A 18 32 32 55 88 18 28 68 9 69 79 90 54 19 56 30 67 58 57 32 17 32 30 30 59 30 60 61 62 14 63 20 64 91 37 78 23 73 8 15 56 16 72 67 76 75 16 67 65 74 70 16 73 69 8 25 28 9 68 18 66 77 67 71 23 72 32 32 - Weslo Easy Compact 2 Treadmill | Uk Manual - Page 23
EXPLODED DRAWING C-Model No. WETL20709.0 3 R0509A 80 83 3 84 2 4 85 34 85 81 3 1 5 5 1 3 3 35 2 4 1 86 5 84 5 1 23 - Weslo Easy Compact 2 Treadmill | Uk Manual - Page 24
) • the name of the product (see the front cover of this manual) • the key number and description of the replacement part(s) (see the PART LIST and the EXPLODED DRAWING near the end of this manual) RECYCLING INFORMATION This electronic product must not be disposed of in municipal waste. To preserve
-
 1
1 -
 2
2 -
 3
3 -
 4
4 -
 5
5 -
 6
6 -
 7
7 -
8
-
9
-
10
-
11
-
12
-
13
-
14
-
15
-
16
-
17
-
18
-
19
-
20
-
21
-
22
-
23
-
24
 |
 |

USER'S MANUAL
Model No. WETL20709.0
Serial No.
Write the serial number in the space
above for reference.
QUESTIONS?
If you have questions, or if there
are missing parts, please contact
us at the numbers or addresses
listed below:
Call: 08457 089 009
Outside UK: 0 (44) 113 3877133
Fax: 0 (44) 113 3877125
E-mail: [email protected]
Website: www.iconsupport.eu
Write:
ICON Health & Fitness, Ltd.
Unit 4
Revie Road Industrial Estate
Revie Road, Beeston
Leeds, LS11 8JG
UK
CAUTION
Read all precautions and instruc-
tions in this manual before using
this equipment. Save this manual
for future reference.
Serial Number
Decal
www.iconeurope.com