Western Digital WD800B015 Quick Install Guide (pdf)
Western Digital WD800B015 - Dual-Option USB Manual
 |
View all Western Digital WD800B015 manuals
Add to My Manuals
Save this manual to your list of manuals |
Western Digital WD800B015 manual content summary:
- Western Digital WD800B015 | Quick Install Guide (pdf) - Page 1
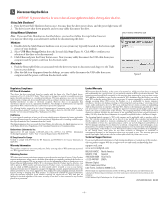
Manager and click Restart. 5. After restarting, a new hard drive icon appears on your desktop and your new external USB hard drive is ready to use. 6. Proceed to Section 5 to use the backup software. Mac OS X v10.2.8+ 1. To format the drive, select Applications > Utilities > Disk Utility. Select - Western Digital WD800B015 | Quick Install Guide (pdf) - Page 2
connect only the FireWire cable, USB devices are not supported. REMOVE STANDS 1. Connect the AC adapter cord to the DC power supply socket on the back of the drive (Figure 2). 2. Connect one end of the power cord to the AC adapter. 3. Connect the other end of the power cord to an electric outlet - Western Digital WD800B015 | Quick Install Guide (pdf) - Page 3
and select Paste. 5 Using the Backup Software This version of Dantz software does not support server applications. For more detailed instructions, refer to the user manual on the installation CD or obtain it from support.wdc.com/download. Note: To create a backup that includes restoration of your - Western Digital WD800B015 | Quick Install Guide (pdf) - Page 4
base. support.wdc.com www.westerndigital.com 800.ASK.4WDC 949.672.7199 +800.6008.6008 +31.20.4467651 North America Spanish Asia Pacific EMEA Western Digital 20511 Lake Forest Drive Lake Forest, California 92630 U.S.A. Western Digital is a registered trademark; and WD, the WD logo, WD Dual
-
 1
1 -
 2
2 -
 3
3 -
 4
4
 |
 |

– 1 –
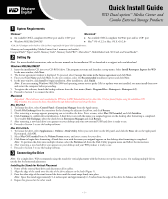
System Requirements
*USB 2.0 PCI adapter card or built-in USB 2.0 host is required for Hi-Speed USB 2.0 performance.
Memory card compatibility (Media Center 8-in-1 memory card reader):
CompactFlash
™
Types I and II, Memory Stick
®
, Memory Stick PRO
®
, Microdrive
™
, MultiMedia Card, SD Card, and SmartMedia
™
.
Setting Up
Note:
For more detailed instructions, refer to the user manual on the installation CD or download it at
support.wdc.com/download
.
Windows 98SE/Me/2000/XP
1.
Insert the installation CD into your CD-ROM drive. The program autoruns and launches a setup menu. Select
Install Retrospect Express for WD
.
In the next window, click
Next
.
2.
The license agreement window is displayed. To proceed, select
I accept the terms in the license agreement
and click
Next
.
3.
Enter your
User Name
and click
Next
. In the next window, select the
Recommended
installation option and click
Next
.
4.
In the next window, click
Install
to begin installation. After installation, click
Finish
.
Note:
If you are running Windows 98SE/Me/2000 and operating system service packs (SPs) or updates were not installed, you must install them now
and restart the computer before proceeding.
5.
To register the software, launch the backup software from the Start menu (
Start
>
Program Files
>
Retrospect
>
Retrospect 6.5
).
6.
Proceed to Section 3 to connect the drive.
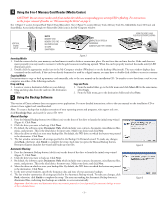
Macintosh
Important:
Macintosh users must reinitialize the WD drive to HFS Extended Format (or other Mac OS drive format) before using the installation CD.
Skip to Section 3 to connect the drive, then follow the steps below to format and set up the drive.
Mac OS v9.2.2
1.
To format the drive, select
Control
Panel
>
Extensions
Manager
from the Apple menu.
2.
Disable
File
Exchange
from the extensions list by clearing the adjacent check box, and click
Restart
.
3.
After restarting, a message appears prompting you to initialize the drive. Enter a name, select
Mac
OS
Extended
, and click
Initialize
.
4.
Click
Continue
to confirm drive initialization. A hard drive icon with the name you assigned appears on the desktop after formatting is completed.
To re-enable
File
Exchange
, select the check box in
Extensions
Manager
and click
Restart
.
5.
After restarting, a new hard drive icon appears on your desktop and your new external USB hard drive is ready to use.
6.
Proceed to Section 5 to use the backup software.
Mac OS X v10.2.8+
1.
To format the drive, select
Applications
>
Utilities
>
Disk
Utility
. Select your new drive on the left panel, and click the
Erase
tab on the right panel.
If prompted, click
OK
.
2.
Select
Mac
OS
Extended
from the
Volume
Format
menu, and enter a name for your drive.
3.
Click
Erase
to begin drive formatting. A hard drive icon with the name you assigned appears on the desktop after formatting is completed.
Note:
To partition the drive into multiple volumes, select the
Partition
tab from the Disk Utility program menu and follow the instructions.
4.
After restarting, a new hard drive icon appears on your desktop and your WD product is ready to use.
5.
Proceed to Section 5 to use the backup software.
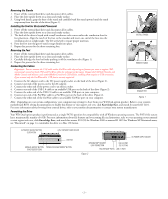
Connecting the Drive
Note:
For a single drive, WD recommends using the stands for vertical placement with the buttons on top for easy access. For stacking multiple drives,
use the feet for horizontal placement.
Installing the Stands for Vertical Placement
1.
Power off the external hard drive and disconnect all its cables.
2.
Align the edge of the stand onto the side of the drive adjacent to the back (Figure 1).
3.
Press the other edge of the stand toward the drive until the stand snaps firmly into place.
Note:
Space the stands approximately 3–4 inches apart and approximately 2–3 inches from the edge of the drive for balance and stability.
4.
Repeat this process for the other stand.
Windows
®
Macintosh
®
!
An available OHCI-compliant FireWire port and/or USB* port
!
An available OHCI-compliant FireWire port and/or USB* port
!
Windows
98SE/Me/2000/XP
!
Mac
®
OS v9.2.2 or Mac OS X v10.2.8+
1
2
3
Quick Install Guide
WD Dual-option
™
Media Center and
Combo External Storage Products