Western Digital WDG1NC10000 User Manual (pdf)
Western Digital WDG1NC10000 - My Book World Edition Manual
 |
View all Western Digital WDG1NC10000 manuals
Add to My Manuals
Save this manual to your list of manuals |
Western Digital WDG1NC10000 manual content summary:
- Western Digital WDG1NC10000 | User Manual (pdf) - Page 1
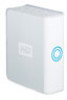
Single and Dual-drive Remote Access Storage Systems My Book™ World Edition™ User Manual - Western Digital WDG1NC10000 | User Manual (pdf) - Page 2
Your Product 3 Free Technical Support 3 Handling Precautions 3 3 Getting Started 4 Format and Configuration 4 My Book World Edition Front and Rear View 4 Power Button 4 LED Indicators 4 Power/Activity LED 5 Capacity Gauge 5 Rear View Ports 5 4 Hardware Setup 6 5 WD Anywhere Access Setup - Western Digital WDG1NC10000 | User Manual (pdf) - Page 3
7 Replacing a Drive 18 8 Troubleshooting 21 9 Appendix A - Shared Storage Manager 24 Accessing Shared Storage Manager 24 Shared and Warranty 43 Regulatory Compliance 43 Warranty Information 44 GNU General Public License ("GPL 45 WD Service and Support 46 Index 47 TABLE OF CONTENTS - ii - Western Digital WDG1NC10000 | User Manual (pdf) - Page 4
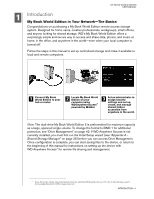
your local computer is turned off.* Follow the steps in this manual to set up centralized storage and make it available to local and remote computers. 1 Connect My Book World Edition to your hub or router. 2 Locate My Book World Edition on your computer using WD Anywhere Access™ powered by MioNet - Western Digital WDG1NC10000 | User Manual (pdf) - Page 5
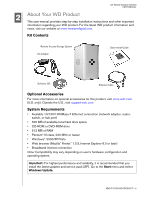
user manual provides step-by-step installation instructions and other important information regarding your WD product. For the latest WD product information and news, visit our website at www.westerndigital.com. Kit Contents Remote Access Storage System AC Adapter Quick Install Guide Software - Western Digital WDG1NC10000 | User Manual (pdf) - Page 6
used when setting up WD Anywhere Access. Serial Number: Model Number: Purchase Date: System and Software Notes: WD Anywhere Access account info: User name: Password: E-mail: Storage device name: Registering Your Product Registering your My Book device enables access to WD services such as news about - Western Digital WDG1NC10000 | User Manual (pdf) - Page 7
My Book World Edition Front and Rear View A Capacity Gauge LED (inner ring) B Power Button C Power/Activity LED (outer ring) D USB Port (for drive expansion only) E Ethernet Port F Power Port G Recovery Button H Kensington Security Slot A BB D C E F G H Power Button The power button turns - Western Digital WDG1NC10000 | User Manual (pdf) - Page 8
an open router, hub, or network switch port using an Ethernet cable. • USB 2.0 port-Connects an external USB hard drive. • Power port-Connects to the supplied power adapter and cable. Recovery Button Pressing the recovery button while powering up the device resets the admin user name and password to - Western Digital WDG1NC10000 | User Manual (pdf) - Page 9
MY BOOK WORLD EDITION USER MANUAL Kensington® Security Slot For drive security, this My Book device is equipped with a Kensington Security Slot, which supports a standard Kensington security cable (sold separately). For more information on the Kensington Security Slot and available products, visit - Western Digital WDG1NC10000 | User Manual (pdf) - Page 10
Ethernet port located on the back of the unit. 2. Connect the other end of the Ethernet cable directly into a router or network switch port. 3. Plug the AC adapter into an electrical outlet. 4. Connect the other end of the adapter into the DC power supply socket located on the back of the unit. The - Western Digital WDG1NC10000 | User Manual (pdf) - Page 11
MY BOOK WORLD EDITION USER MANUAL 5 WD Anywhere Access Setup This section contains instructions to get your My Book World Edition quickly set up and running. To use My Book World Edition, installing WD Anywhere Access is required. Note: WD Anywhere Access is a custom version of MioNet. If the - Western Digital WDG1NC10000 | User Manual (pdf) - Page 12
MY BOOK WORLD EDITION USER MANUAL 3. Click Finish. WD Anywhere Access (powered by MioNet) is initialized. 4. The WD Anywhere Access Registration Wizard starts. Click I am creating my new WD Anywhere Access account if new to MioNet, then click Next. If adding the computer to your existing account, - Western Digital WDG1NC10000 | User Manual (pdf) - Page 13
MY BOOK WORLD EDITION USER MANUAL 5. If creating a new account, fill out all fields then click Next. Note: The user name and password you enter here changes the admin user name and password of the My Book World Edition device. 6. Enter easy-to-remember names in the Computer Name (name by which WD - Western Digital WDG1NC10000 | User Manual (pdf) - Page 14
MY BOOK WORLD EDITION USER MANUAL 7. WD Anywhere Access account setup is complete. Click Finish. 8. You may now install WD Anywhere Backup Software from the WD Installer screen (click More info under the bottom Install button for further details about this software). Click Install next to the WD - Western Digital WDG1NC10000 | User Manual (pdf) - Page 15
10. Click Restart Now. MY BOOK WORLD EDITION USER MANUAL Congratulations! My Book World Edition is now installed and mapped as a drive letter on your system. Continue to section 6 to install remote access and share My Book World Edition. WD ANYWHERE ACCESS SETUP - 12 - Western Digital WDG1NC10000 | User Manual (pdf) - Page 16
MY BOOK WORLD EDITION USER MANUAL 6 Using WD Anywhere Access Signing In 1. After restarting or when starting up your computer, the WD Anywhere Access welcome screen displays. Click Sign In Now. 2. Enter the WD Anywhere Access password you created in section 5 and click OK. 3. Click OK to the e-mail - Western Digital WDG1NC10000 | User Manual (pdf) - Page 17
EDITION USER MANUAL 4. The WD Anywhere Access screen displays all connected systems and folders accessible for storage and sharing. Remote Access 1. To remotely access files in the My Book device from another location, install a WD Anywhere Access client from the software CD on the computer that - Western Digital WDG1NC10000 | User Manual (pdf) - Page 18
MY BOOK WORLD EDITION USER MANUAL 3. Enter the same username and password you assigned when you first set up and installed your My Book device. 4. Click I am adding this computer to my existing WD Anywhere Access account. USING WD ANYWHERE ACCESS - 15 - Western Digital WDG1NC10000 | User Manual (pdf) - Page 19
5. Enter a name for this new computer. MY BOOK WORLD EDITION USER MANUAL 6. A screen appears to confirm the added computer. Click Finish. 7. The main WD Anywhere Access screen appears with the newly added systems and folders that you can access. USING WD ANYWHERE ACCESS - 16 - Western Digital WDG1NC10000 | User Manual (pdf) - Page 20
to share files does not currently have a WD Anywhere Access account, click Invite new person. 3. Enter this person's email address when prompted. 4. If your designated person already has a WD Anywhere Access account, click Invite Mionet user for the software to locate this person's information. Once - Western Digital WDG1NC10000 | User Manual (pdf) - Page 21
MY BOOK WORLD EDITION USER MANUAL 5. From the Select Permissions screen, set the permission level for this user and click OK. 6. A screen displays the name of the designated person including the shared file folder name and device. 7. After successful setup, the existing Mionet user receives an alert - Western Digital WDG1NC10000 | User Manual (pdf) - Page 22
and you would like to service the device yourself, visit WD Technical Support at support.wdc.com and search for our knowledge base article 8 for detailed instructions on obtaining a replacement drive. When contacting Technical Support, have the following items ready: My Book serial number, date of - Western Digital WDG1NC10000 | User Manual (pdf) - Page 23
MY BOOK WORLD EDITION USER MANUAL 8. Pull the drive bracket tabs towards each other and gently slide . Return the entire assembly intact to WD. 10. Reconnect the drive interface/power cable. 9 10 11. Replace the cage cap and tighten the screw. 12. Carefully replace the cover by gently sliding it into - Western Digital WDG1NC10000 | User Manual (pdf) - Page 24
MY BOOK WORLD EDITION USER MANUAL 13. Reconnect the cables and power on the unit. 14. Return the replacement drive following the instructions provided in the WD knowledge base article 8. Important: Do not disassemble the drive and slider bracket assembly components. Return the entire assembly intact - Western Digital WDG1NC10000 | User Manual (pdf) - Page 25
switch or an open port on your router. • Check the IP address and your router settings-make sure that your computer and the My Book World Edition IP addresses are listed in the same subnet. Q: Why does the device not power up? A: Make sure the power cord and power supply are connected correctly and - Western Digital WDG1NC10000 | User Manual (pdf) - Page 26
directly to the computer's Ethernet port. 2. To connect to a shared folder on the My Book World Edition, right-click on the My Network Places or Network Neighborhood icon on the desktop, then click Map Network Drive... Type in the name of the My Book World Edition shared folder (e.g., \\mybook - Western Digital WDG1NC10000 | User Manual (pdf) - Page 27
MY BOOK WORLD EDITION USER MANUAL Q: How do I connect a USB external drive to the device? A: Do the following: 1. Connect and power on the USB external drive. 2. Connect one end of the USB cable to the external drive. 3. Connect the other end of the USB cable to the available USB port on the My Book - Western Digital WDG1NC10000 | User Manual (pdf) - Page 28
files. Accessing Shared Storage Manager WD Anywhere Access Installed 1. Open your browser and enter the Storage Device Name you selected in section 5. Click Go. 2. The Shared Storage Manager screen appears, displaying the device name, firmware version, drive status, and user name in the upper right - Western Digital WDG1NC10000 | User Manual (pdf) - Page 29
MY BOOK WORLD EDITION USER MANUAL Shared Storage Manager Setup (WD Anywhere Access Not Installed) 1. Open your browser and enter 'mybookworld' in the Address field. Click Go. 2. The Initial Setup wizard displays. Click Next. 3. Enter the default user name (admin) and password (123456) and click OK. - Western Digital WDG1NC10000 | User Manual (pdf) - Page 30
MY BOOK WORLD EDITION USER MANUAL 5. The Initial User & Password Setup screen displays. Click in the Admin username and Password fields to type in the new user name and password. Type in the password again in the Confirm Password field, then click Next. Important: WD recommends setting the user name - Western Digital WDG1NC10000 | User Manual (pdf) - Page 31
MY BOOK WORLD EDITION USER MANUAL 7. The Initial Setup Wizard Finished screen displays and shows a summary of settings. Click Update Settings to begin using Shared Storage Manager. General Setup 1. Click the - Western Digital WDG1NC10000 | User Manual (pdf) - Page 32
MY BOOK WORLD EDITION USER MANUAL Update Admin Username and Password 1. Click Update Admin Username and Password. 2. Click in the Admin username and Password fields to type in the new user name and password. Confirm the password in the Confirm Password field, then click Update. 3. Click the General - Western Digital WDG1NC10000 | User Manual (pdf) - Page 33
MY BOOK WORLD EDITION USER MANUAL Change Current Date and Time 1. Click Change Current Date and Time. and Workgroup Name determine how the My Book World Edition is identified on the network. Changing these settings is recommended only for advanced users, requiring a custom network configuration. 1. - Western Digital WDG1NC10000 | User Manual (pdf) - Page 34
MY BOOK WORLD EDITION USER MANUAL Configure the Network Settings This section is intended only for advanced users who require specific My Book settings. If you are not familiar with this field or are unsure about editing it, cancel the wizard. Obtain a Network Address Automatically 1. Click - Western Digital WDG1NC10000 | User Manual (pdf) - Page 35
change the My Book World Edition network settings to a specific configuration. If you are unsure about manually configuring a network, cancel this wizard. 4. Step 2 - Network Address and Subnet Settings. Set a static IP address (an address other than the one assigned to the computers on the network - Western Digital WDG1NC10000 | User Manual (pdf) - Page 36
MY BOOK WORLD EDITION USER MANUAL 5. Step 3-Gateway. The gateway address is the location of your router. Only change this value if it is not the address of your router. Click Next. 6. Click Finish. 7. Reboot your computer to update the network settings. APPENDIX A - SHARED STORAGE MANAGER - 33 - Western Digital WDG1NC10000 | User Manual (pdf) - Page 37
. When all LEDs on the device are illuminated, close the open browser. Your updated My Book World Edition is now ready to use. WD Anywhere Access Settings 1. Click WD Anywhere Access settings. 2. Click Start, Stop, or Reset. MioNet status displays after each selection. APPENDIX A - SHARED STORAGE - Western Digital WDG1NC10000 | User Manual (pdf) - Page 38
MY BOOK WORLD EDITION USER MANUAL File Sharing 1. Click File Sharing. The File Sharing screen appears, listing the shared folders accessible through the network. User Management The User Management option allows you to add or delete users of the device. It also allows the changing of user passwords - Western Digital WDG1NC10000 | User Manual (pdf) - Page 39
MY BOOK WORLD EDITION USER MANUAL 1. Click User Management. 2. Click Create User. 3. Enter the new user name in the New User Name field, then enter the new password in the Password and Confirm Password fields. 4. Set share permissions for the new user by clicking Full, Read Only, or None next to - Western Digital WDG1NC10000 | User Manual (pdf) - Page 40
MY BOOK WORLD EDITION USER MANUAL Add a Shared Folder 1. Click Add a Shared Folder. 2. Click Begin Wizard. 3. Step 1-Create Shared Folder Name. Type in the name of the shared folder in the - Western Digital WDG1NC10000 | User Manual (pdf) - Page 41
MY BOOK WORLD EDITION USER MANUAL 5. Step 3-Access Setting. A CIF share type is created. Click Next. 6. CIF: Step 4-Security Setting. Set share permissions for each user by clicking Full, Read Only, or None next to each user name. Click Next. 7. Submit Setting. Click Create Share Folder. The new - Western Digital WDG1NC10000 | User Manual (pdf) - Page 42
MY BOOK WORLD EDITION USER MANUAL Rename a Shared Folder Note: Renaming a shared folder erases the drive mappings. You will need to remap the drive after renaming it. 1. Click Rename a Shared Folder. 2. - Western Digital WDG1NC10000 | User Manual (pdf) - Page 43
only for advanced users who require specific My Book World Edition settings. If you are not familiar with this field or are unsure about editing it, cancel the wizard. 1. Click Remove a Shared Folder. Note: A shared folder cannot be removed if it or any of its files are currently open. 2. In the - Western Digital WDG1NC10000 | User Manual (pdf) - Page 44
MY BOOK WORLD EDITION USER MANUAL Update Security Settings 1. Click Update Security Settings. 2. Pick a share from the list, then click Next. 3. Reset share permissions by clicking Full Access, Read Only, or None next to each user name. 4. Click Update. APPENDIX A - SHARED STORAGE MANAGER - 41 - Western Digital WDG1NC10000 | User Manual (pdf) - Page 45
MY BOOK WORLD EDITION USER MANUAL Drive Management 1. Click Drive Management. The Drive Management screen appears, displaying the following options. Change Drive Type Use this option to change the drive from the pre-configured, default large single spanned volume for maximum capacity to a secure - Western Digital WDG1NC10000 | User Manual (pdf) - Page 46
MY BOOK WORLD EDITION USER MANUAL Format New Internal Drive If the Drive Status message in the upper right corner of Shared Storage Manager indicates that one of the drives in the device has failed, follow the instructions in "Replacing a Drive" on page 19. Then, select this option to format the new - Western Digital WDG1NC10000 | User Manual (pdf) - Page 47
BOOK WORLD EDITION USER MANUAL Appendix B - Regulatory and Warranty Regulatory Compliance FCC Class B Information This device has been tested and found to comply with the limits of a Class B digital to be supplied by a listed limited power source, double insulated, or direct plug-in power unit marked - Western Digital WDG1NC10000 | User Manual (pdf) - Page 48
(including removing or obliterating labels and opening or removing external enclosures, unless the product is on the list of limited user-serviceable products and the specific alteration is within the scope of the applicable instructions, as found at support.wdc.com), accident or mishandling while - Western Digital WDG1NC10000 | User Manual (pdf) - Page 49
USER MANUAL GNU General Public License ("GPL") Firmware incorporated into WD's My Book World Edition™ Network Hard Drive includes third party copyrighted software licensed under the GPL ("GPL Software"). In accordance with the GPL: 1) the source code for the GPL Software may be obtained at support - Western Digital WDG1NC10000 | User Manual (pdf) - Page 50
- Download installation software and drivers. • Technical Information - Access product specifications, technical tips, and the online forum. • Knowledge Base - Explore our expert knowledge base and Frequently Asked Questions. • Service Partners - Find available WD-approved service and support in - Western Digital WDG1NC10000 | User Manual (pdf) - Page 51
connecting the device 6 front and rear view 4 software setup 7 N Network settings obtain a network address automatically 30 obtain a network address manually 31 O Obtain a network address automatic 30 manual 31 Obtaining service 44 Operating system, updating 3 P Password update 28 Ports rear 5 Power - Western Digital WDG1NC10000 | User Manual (pdf) - Page 52
33 Upgrade the system firmware 33 USB external drive connections 23 User management change a user password 34 create a new user 35 delete a user 35 Username update 28 W Warranty 44 MY BOOK WORLD EDITION USER MANUAL Warranty, limited 44 WD service 46 support 46 WD Anywhere Access inviting others
-
 1
1 -
 2
2 -
 3
3 -
 4
4 -
 5
5 -
 6
6 -
 7
7 -
8
-
9
-
10
-
11
-
12
-
13
-
14
-
15
-
16
-
17
-
18
-
19
-
20
-
21
-
22
-
23
-
24
-
25
-
26
-
27
-
28
-
29
-
30
-
31
-
32
-
33
-
34
-
35
-
36
-
37
-
38
-
39
-
40
-
41
-
42
-
43
-
44
-
45
-
46
-
47
-
48
-
49
-
50
-
51
-
52
 |
 |

Single and Dual-drive
Remote Access Storage Systems
My Book
World Edition
User Manual
™
™