Westinghouse LCM 19V1 User Manual
Westinghouse LCM 19V1 - TFT LCD Monitor Manual
 |
UPC - 683728076627
View all Westinghouse LCM 19V1 manuals
Add to My Manuals
Save this manual to your list of manuals |
Westinghouse LCM 19V1 manual content summary:
- Westinghouse LCM 19V1 | User Manual - Page 1
- Westinghouse LCM 19V1 | User Manual - Page 2
LCD MONITOR 6 2. CONNECT VGA AND AUDIO CABLES 6 3. CONNECT THE POWER CABLE ...6 4. TURN THE POWER ON ...6 OSD MENU FUNCTIONS...7 OSD MENUS...8 BACKLIGHT CONTROL...9 DISPLAY MODES ...99 IMAGE PROBLEMS ...10 NO SIGNAL INPUT...10 OUT OF RANGE ...10 APPENDIX ...11 SPECIFICATIONS ...11 TROUBLESHOOTING - Westinghouse LCM 19V1 | User Manual - Page 3
sources when installing the LCD monitor. Overloading wall outlets, circuits, or extension cords can result in overheating, fire, or electric shock. Use only grounded or polarized outlets. Power Cord Protection Minimize wear on the power supply cord. The power supply cord should be routed away from - Westinghouse LCM 19V1 | User Manual - Page 4
not authorized by Westinghouse Digital. Refer all servicing and repairs to qualified service personnel. If the monitor begins to emit smoke, an abnormal noise, or a strange odor, immediately turn it off and unplug the power cord. Contact the Westinghouse Service Center. If the LCD monitor will not - Westinghouse LCM 19V1 | User Manual - Page 5
Cleaning the LCD Monitor • MAKE SURE THE LCD MONITOR IS TURNED OFF • NEVER SPRAY OR POUR LIQUID DIRECTLY ONTO or alcohol-based cleaners on the LCD screen or case. Some chemical cleaners have been reported to damage the screen and/or LCD display case. Westinghouse Digital will not be liable for - Westinghouse LCM 19V1 | User Manual - Page 6
power cords may be used. If the monitor is placed on the floor, only SJT type cord may be used. The power cord in accordance with the instructions. However, there is power supply cord and the provided shielded cables. Any unauthorized changes or modifications not expressly approved by Westinghouse - Westinghouse LCM 19V1 | User Manual - Page 7
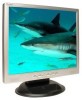
Westinghouse 19" LCD Monitor. Sleek and practical, this lightweight and wall-mountable LCD monitor delivers a crisp and clear display optimized for 1280 x 1024 display resolution. Package Contents • LCD Monitor (19") • Detachable Base Stand • Cables o DC Power Supply Adapter o AC Power Adapter Cord - Westinghouse LCM 19V1 | User Manual - Page 8
Note: The OSD menu display will disappear automatically after approximately 10 seconds, if no action is taken.) The LCD monitor has been adjusted to optimal settings before shipment. Adjustments to the monitor settings can be made using the OSD menu. Press the "Menu" keypad button to display the OSD - Westinghouse LCM 19V1 | User Manual - Page 9
OSD Menu Image Sub-Menu Brightness Contrast Clock Phase H. Position V. Position Sharpness Description and Function Adjust the brightness of the screen Adjust the contrast of the image Adjust the clock pulse of the image Adjust the focus of the image Move the image left and right on the screen Move - Westinghouse LCM 19V1 | User Manual - Page 10
Backlight Control Display Modes The monitor backlighting can be controlled by using the Turbo button on the control keypad. There are 3 modes: Economy, Text and Picture. To toggle between these modes, - Westinghouse LCM 19V1 | User Manual - Page 11
Image Problem No Signal Input If there is no source connected to the monitor, the following error message will be displayed: Out of Range If the monitor settings are not compatible with the PC or out of range of the LCD monitor, the following error message will be displayed: 10 SE-UM-1901-0502 - Westinghouse LCM 19V1 | User Manual - Page 12
Specifications Panel Size Type Optimum Resolution Response Time Contrast Ratio Maximum Brightness Viewing Angles Color Saturation Wall/Arm Mount Physical Input Signal Video Audio Speaker Output Power Regulations Power consumption DC On DC Off Lamp Life 19" Color TFT Active Matrix LCD. - Westinghouse LCM 19V1 | User Manual - Page 13
Troubleshooting No Power • Make sure the DC cord is plugged into the back of the LCD monitor. • Make sure the AC power cord is securely connected to the AC socket. • Plug another electrical device (like a radio) to the power outlet to verify that the outlet is supplying the proper voltage. No Image - Westinghouse LCM 19V1 | User Manual - Page 14
the 100 mm VESA hole pattern to secure a mounting plate to the LCD monitor. • Use professional installation to reduce the risk of injury and damage. Additional Questions • See our website at www.westinghousedigital.com. • Contact Westinghouse Digital Customer Service at (866) 287-5555 or write us at - Westinghouse LCM 19V1 | User Manual - Page 15
SE-UM-1901-0502
-
 1
1 -
 2
2 -
 3
3 -
 4
4 -
 5
5 -
 6
6 -
 7
7 -
8
-
9
-
10
-
11
-
12
-
13
-
14
-
15
 |
 |
