Whirlpool CGM2751KQ Installation Instructions
Whirlpool CGM2751KQ Manual
 |
View all Whirlpool CGM2751KQ manuals
Add to My Manuals
Save this manual to your list of manuals |
Whirlpool CGM2751KQ manual content summary:
- Whirlpool CGM2751KQ | Installation Instructions - Page 1
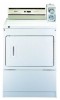
and save these instructions IMPORTANT Installer: Leave Installation Instructions with the owner. Owner: Keep Installation Instructions for future reference. Save Installation Instructions for local electrical inspector's use. www.whirlpool.com Part No, 8527795 COMMERCIAL DRYER ELECTRIC 120-volt - Whirlpool CGM2751KQ | Installation Instructions - Page 2
the weather, 7. Do nat tamper with controls, 8. Do not repair or replace any part of the appliance or attempt any servicing unless specifically recommended in the usermaintenance instructions or in published user-repair instructions that you understand and have the skillsto corry out, 9. Do not use - Whirlpool CGM2751KQ | Installation Instructions - Page 3
beffer [==] good _=] Metal flexible vent must be fully extended and supported when the dryer is in its final position, DO NOT KINK OR CRUSH THE chart, see Whirlpool Service Manual, "Exhausting Whirlpool Dryers," Part No, 603197, available from your Whirlpool parts distributor, If dryer is installed - Whirlpool CGM2751KQ | Installation Instructions - Page 4
to or greater than the CFM of all the dryers in the room, Back-draft Damper Kits, Part No, 3391910, are available from your Whirlpool dealer and should be installed in each dryer's exhaust vent to prevent exhausted air from returning into the dryers and to keep the exhaust in balance within the - Whirlpool CGM2751KQ | Installation Instructions - Page 5
for combustion air, See "Recessed area and closet installation instructions," page 12, for minimum spacing requirements, Km For ease of installation, operation and servicing (if ever needed) adequate space should be provided around the dryer, Lm A 1/8-inch NPT plugged tapping, accessible for gauge - Whirlpool CGM2751KQ | Installation Instructions - Page 6
gas shutoff valve l mTake tape off front corners of dryer, Open dryer and remove the literature and parts packages, Wipe the interior of the drum thoroughly with instructions for proper installation,) For dryers using coin slides, use adapter kit supplied with dryer, Replace the meter case service - Whirlpool CGM2751KQ | Installation Instructions - Page 7
up at the back and remove, Install moneyaccepting device, (Refer to manufaturer's instructions for proper installation,) For dryers using coin slides, use adapter kit supplied with dryer, Replace the meter case service door, Put the coin vault with lock and key the meter case opening, m Move - Whirlpool CGM2751KQ | Installation Instructions - Page 8
This dryer is manufactured with the cabinet-ground conductor connected to the NEUTRAL(center) of the wiring harness at the terminal block. If local codes do NOT permit this type of connection, use "Fourwire connection" instructions. For a grounded, cord-connected appliance -- GROUNDING INSTRUCTIONS - Whirlpool CGM2751KQ | Installation Instructions - Page 9
Tighten strain relief screws. 10. Insert tab of terminal block cover into slot of the dryer rear panel. Secure cover with hold-down screw. 4. Remove center terminal block screw. 5. Remove appliance ground wire (green with yellow stripes) from external ground connector screw. Fasten under center - Whirlpool CGM2751KQ | Installation Instructions - Page 10
to outer terminal block screws, Tighten screws, 7. Tighten strain relief screws, i*_"'_i 8. Insert tab of terminal block cover into slot of dryer rear panel, Secure cover with hold-down screw, __i _ - _,_, _._. Page 1O Where local codes permit connecting cabinet-ground conductor 4. Loosen or - Whirlpool CGM2751KQ | Installation Instructions - Page 11
the appliance harness ground wire (green with yellow \ stripes) from the external ground connector screw. Connect appliance harness ground connect direct wire to power supply, Turn power supply on, 1 • Check dryer operation (some accumulated time may be on the timer due to factory testing), - Whirlpool CGM2751KQ | Installation Instructions - Page 12
valves are set in open position, If you need assistance... The Whirlpool Consumer Interaction Center will answer any questions about operating or maintaining your dryer not covered in the Installation Instructions, The Whirlpool Consumer Interaction Center is open 24 hours a day, 7 days a week, Just - Whirlpool CGM2751KQ | Installation Instructions - Page 13
(2.5 cm) SIDE VIEW 6-3/4" (15.; (3.2 cm) BACK VIEW 27" (68.6 cm) dryer _29-I/4" (74.3 cm) _26-1/2" 35" (88.9 cm) (64.8 cm) ,,'---7 I VIEW (35.9cm) BO'ITOM EXHAUST Part No. 8527795 © 2001 Whirlpool Corporation Prepared by Whirlpool Corporation, Benton Harbor, Michigan 49022 Printed in - Whirlpool CGM2751KQ | Installation Instructions - Page 14
: Remettre les instructions d'installation au propri6taire. Propd6taire : Conserver les insiTuc-Iions d'install_ion pour consultcrlion ult6rieure. Conserver les inslTuc-Iionsd'installcrlion pour consuitallon par rinspecteur local des installations 61eclTiques. www.whirlpool.com Piece n° 8527795 - Whirlpool CGM2751KQ | Installation Instructions - Page 15
la s@cheuse est utilis_e pros d'eux, 4. Avant d'enlever la s@cheuse du service ou la jeter, enlever la porte du compartiment de s_chage, 5. Ne pas melffre d'une recommandation sp@cifique dans le guide d'utilisation et d'entretien, ou publi_e dans les instructions de r@paration par I'utilisateur que - Whirlpool CGM2751KQ | Installation Instructions - Page 16
came de minutage Dour30 ou 60 minutes Risque de choc _lectfique Interrompre I'alimentaUon _lectfique avant de changer la came, Le non-respect de cette instruction peut causer un d_=c_sou un choc _lectrique. La s_cheuse command@e par m@conisme de paiement est dot@e d'une come qui commande une p_riode - Whirlpool CGM2751KQ | Installation Instructions - Page 17
service Whirlpool, =Exhausting Whirlpool Dryers_, pierce n° 603197, qu'on peut obtenir aupr_s du distributeur de pi_ces Whirlpool et r_glements en vigueur,) Voir =Instructions d'installation dans un encostrement ou dans conduits raccord_s au conduit principal de part et d'au_e devraient _tre dispes_s - Whirlpool CGM2751KQ | Installation Instructions - Page 18
la broche de liaison ;_ la term. Ne pas utiliser un adaptateur. Ne pas utiliser un c_ble de rallonge. De non-respect de ces instructions peut causer un cl_c_, un incendie ou un choc _lectTique. liaison a la te_/ cordon "/ d'alimentation @lectrique broche de liaisonF_la term Pour obtenir des - Whirlpool CGM2751KQ | Installation Instructions - Page 19
d'introduction de pi_,_ces(pour I'installation, consulter les instructions d'installation du fabricant), Pour une s_cheuse dot_e d'un le bon fanctionnement de la s_cheuse (la minuterie peut indiquer un temps de service cumulatif du fair de tests effeclu_s _ I'usine), InsUrer les pi@ces dans - Whirlpool CGM2751KQ | Installation Instructions - Page 20
44131 _5575 Commencer... Risque du poids excessif Utiliser det_ ou plus de personnes pour d6placer et installer la s6cheuse. Le non-respect de cette instruction peut causer une bleseure au dos ou d'aube blessure. Avec la s_::heuso dens la buandede... coupe-circug avec fusible co nduiJ . n Oter la - Whirlpool CGM2751KQ | Installation Instructions - Page 21
_-.-U. seulement Utiliserun cordon d'alimentafion neuf (agr6ment UL) pour service 240 volts min., 30 A, idenfifl6 pour ufilisation avec une s6cheuse (or). Bien sewer routes les vis de connexion. Le non-respect de ces instructions peut provoquer un d_._s, un incendie ou un choc _lectrique. .Cabl ge - Whirlpool CGM2751KQ | Installation Instructions - Page 22
Circuit quatre conducteurs... Prise de courant a quaITe conducteurs (n6cessaire pour maison mobile) 4. Oter la vis de la borne cenlTale du 5. S6parer le conducteur de liaison (_ la terre de I'appareil (vert avec rayure jaune) _ t_,_ de la vis de connexion au chassis, Connecter ce conducteur - Whirlpool CGM2751KQ | Installation Instructions - Page 23
Circuit trois conducteurs... Prise de courant _ ITOiSconducteum Lorsquele code local permet le raccordement entre conducteur neutre et conducteur de liaison _ la terre de la caisse : 4. Desserrer ou enlever la vis de la 5. Connecter le conducteur neutre (blanc ou central) du cordon d'alimentation - Whirlpool CGM2751KQ | Installation Instructions - Page 24
alimentation 61ectrique, R6tablir la source d'alimentation 61ectrique, 4 • Contr61er le bon fonctionnement de la s_cheuse (la minuterie peut indiquer un temps de service cumulatif du fait de tests effectu_s 6 I'usine), Tirer le bouton de r_glage de la minuterie 6 gauche, (Le temps de fonctionnement - Whirlpool CGM2751KQ | Installation Instructions - Page 25
6galement sur I'extr_mit6 de }a canalisatlon de gaz, Avant de mlJmr rappomil du service ou de le mellm au rebut, d6monter Io porte de Io s6cheuse. la qui n'est pas trail@e dans les instructions d'installation, Le Centre d'interaction avec la clientele Whirlpool est accessible 24 heures par jour, 7 - Whirlpool CGM2751KQ | Installation Instructions - Page 26
) ¢_ I r_ CANALISATION DE GAZ 2,5 cm (I po) 10,8 cm (4 I/4 po) (14 I18 po) VUE ARRII:RE VUE LATERALE IT:VACUATION PAR LE BAS Piece n° 8527795 © 2001 Whirlpool Corporation Pr_par_ par Whirlpool Corporation, Benton Harbor, Michigan 40022 Imprim_ aux E,-U,
-
 1
1 -
 2
2 -
 3
3 -
 4
4 -
 5
5 -
 6
6 -
 7
7 -
8
-
9
-
10
-
11
-
12
-
13
-
14
-
15
-
16
-
17
-
18
-
19
-
20
-
21
-
22
-
23
-
24
-
25
-
26
 |
 |

IMPORTANT:
Read and save
these instructions
COMMERCIAL
IMPORTANT
Installer: Leave
Installation
Instructions
with the owner.
Owner:
Keep
Installation
Instructions
for
future
reference.
Save
Installation
Instructions
for local
electrical
inspector's
use.
DRYER
120-volt,
60 Hz
ELECTRIC
120/240-volt,
60 Hz
Part No, 8527795
®
COMMERCIAL
www.whirlpool.com
LAUNDRY
PRODUCTS