Whirlpool G7CE3034XC Installation Instructions
Whirlpool G7CE3034XC Manual
 |
View all Whirlpool G7CE3034XC manuals
Add to My Manuals
Save this manual to your list of manuals |
Whirlpool G7CE3034XC manual content summary:
- Whirlpool G7CE3034XC | Installation Instructions - Page 1
REQUIREMENTS 2 Tools and Parts 2 Location Requirements 2 Electrical Requirements 3 INSTALLATION INSTRUCTIONS 4 Prepare Cooktop for Installation 4 Install Cooktop 4 Make Electrical Connection 6 Attach Cooktop to Countertop 8 Complete Installation 8 EXIGENCES D'INSTALLATION 9 Outils et pi - Whirlpool G7CE3034XC | Installation Instructions - Page 2
approved. Refer to oven manufacturer's Installation Instructions for approval for built-in undercounter use and proper cutout dimensions. ■ The cooktop should be installed away from strong draft areas, such as windows, doors, fans or strong heating vents. The cooktop should be located for convenient - Whirlpool G7CE3034XC | Installation Instructions - Page 3
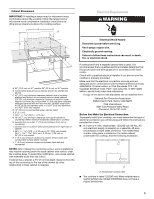
Pleasant Valley Road Cleveland, OH 44131-5575 Before You Make the Electrical Connection: To properly install your cooktop, you must determine the type of electrical connection you will be using and follow the instructions provided for it here. ■ A 3-wire or 4-wire, single phase, 120/240 volt, 60-Hz - Whirlpool G7CE3034XC | Installation Instructions - Page 4
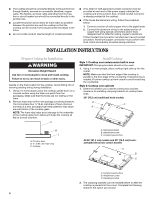
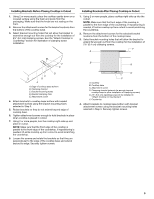
much slack as possible between the junction box and the cooktop so that the cooktop can be moved if servicing becomes necessary in the future. ■ Do not cut INSTALLATION INSTRUCTIONS Prepare Cooktop for Installation WARNING Excessive Weight Hazard Use two or more people to move and install cooktop - Whirlpool G7CE3034XC | Installation Instructions - Page 5
the bracket locations from the bottom of the cooktop base. 3. Select bracket mounting holes that will allow the bracket to extend far enough out from the cooktop for the installation of 2½" (6.4 cm) clamping screws. See the "Attach Cooktop to Countertop" section for illustration of clamping screw - Whirlpool G7CE3034XC | Installation Instructions - Page 6
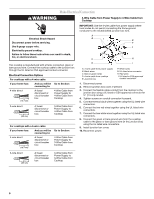
Cooktop Electrical Shock Hazard Disconnect power before servicing. Use 8 gauge copper wire. Electrically ground cooktop. Failure to follow these instructions from the cooktop cable to the green or bare ground wire (in the junction box) using the UL listed wire connectors. 9. Install junction box - Whirlpool G7CE3034XC | Installation Instructions - Page 7
together using the UL listed wire connectors. 7. Connect the green or bare and white cooktop cable wires to the white (neutral) wire in the junction box using the UL listed wire connectors. 8. Install junction box cover. 9. Reconnect power. A. 4-wire cable from power supply B. Red wires C. Green or - Whirlpool G7CE3034XC | Installation Instructions - Page 8
power. NOTE: If the cooktop does not work after turning on the power, check that a circuit breaker has not tripped or a household fuse has not blown. See "Troubleshooting" section in the Use and Care Guide for further information. If you need Assistance or Service: Please reference the "Assistance - Whirlpool G7CE3034XC | Installation Instructions - Page 9
four. Si vous ne trouvez pas cette étiquette, contactez votre marchand pour confirmer que le four est bien approuvé. Consulter les Instructions d'installation du fabricant du four pour déterminer si l'utilisation en encastrement est approuvée et pour obtenir les dimensions correctes de l'ouverture - Whirlpool G7CE3034XC | Installation Instructions - Page 10
ée à un endroit pratique dans la cuisine. ■ Utiliser les dimensions d'ouverture du plan de travail qui sont indiquées dans ces Instructions d'installation. Les dimensions données sont les espacements minimaux et fournissent un dégagement de 0" (0 cm). ■ Une source d'électricité avec liaison à la - Whirlpool G7CE3034XC | Installation Instructions - Page 11
Spécifications électriques AVERTISSEMENT Avant d'établir la connexion électrique : Pour installer la table de cuisson correctement, il faut établir le type de raccords électriques que l'on utilisera et suivre les instructions indiquées ici. Risque de choc électrique ■ L'appareil doit être - Whirlpool G7CE3034XC | Installation Instructions - Page 12
AVERTISSEMENT Risque du poids excessif Utiliser deux ou plus de personnes pour déplacer et installer la table de cuisson. Le non-respect de cette instruction peut causer une blessure au dos ou d'autre blessure. 2. Enlever le rouleau de bandes de mousse du sachet de documentation. Ce rouleau - Whirlpool G7CE3034XC | Installation Instructions - Page 13
pas sur le polystyrène. 2. Retirer les vis d'attache de la partie inférieure de la base de la table de cuisson afin de permettre l'installation des brides. 3. Sélectionner les trous de montage de la bride qui permettront à la bride de dépasser suffisamment de la table de cuisson pour - Whirlpool G7CE3034XC | Installation Instructions - Page 14
de calibre 8. Relier la table de cuisson à la terre. Le non-respect de ces instructions peut causer un décès, un incendie ou un choc électrique. Un conducteur vert ou nu de fils (homologation UL). 9. Installer le couvercle du boîtier de connexion. 10. Reconnecter la source de courant électrique. 14 - Whirlpool G7CE3034XC | Installation Instructions - Page 15
de la table de cuisson au conducteur blanc (neutre) dans le boîtier de connexion avec les connecteurs de fils (homologation UL). 8. Installer le couvercle du boîtier de connexion. 9. Reconnecter la source de courant électrique. A. Câble à 4 conducteurs depuis le point de distribution B. Conducteurs - Whirlpool G7CE3034XC | Installation Instructions - Page 16
avec les connecteurs de fils (homologation UL). 8. Installer le couvercle du boîtier de connexion. 9. service : Consulter la section "Assistance ou service" du Guide d'utilisation et d'entretien ou contacter le marchand auprès duquel la table de cuisson a été achetée. W10346695A © 2010 Whirlpool
-
 1
1 -
 2
2 -
 3
3 -
 4
4 -
 5
5 -
 6
6 -
 7
7 -
8
-
9
-
10
-
11
-
12
-
13
-
14
-
15
-
16
 |
 |
ELECTRIC COOKTOP INSTALLATION INSTRUCTIONS
INSTRUCTIONS D'INSTALLATION DE LA TABLE
DE CUISSON ÉLECTRIQUE
COOKTOP SAFETY
®
Table of Contents / Table des matières
COOKTOP SAFETY
.....................................................................
1
INSTALLATION REQUIREMENTS
..............................................
2
Tools and Parts
..........................................................................
2
Location Requirements
..............................................................
2
Electrical Requirements
.............................................................
3
INSTALLATION INSTRUCTIONS
................................................
4
Prepare Cooktop for Installation
................................................
4
Install Cooktop
...........................................................................
4
Make Electrical Connection
.......................................................
6
Attach Cooktop to Countertop
..................................................
8
Complete Installation
.................................................................
8
SÉCURITÉ DE LA TABLE DE CUISSON
....................................
9
EXIGENCES D'INSTALLATION
...................................................
9
Outils et pièces
...........................................................................
9
Exigences d’emplacement
.........................................................
9
Spécifications électriques
........................................................
11
INSTRUCTIONS D’INSTALLATION
..........................................
12
Préparation de la table de cuisson pour l’installation
..............
12
Installation de la table de cuisson
............................................
12
Raccordement électrique
.........................................................
14
Fixation de la table de cuisson au plan de travail
....................
16
Achever l’installation
................................................................
16
IMPORTANT:
Save for local electrical inspector's use.
IMPORTANT :
À conserver pour consultation par l'inspecteur local des installations électriques.
W10346695A
You can be killed or seriously injured if you don't immediately
You
can be killed or seriously injured if you don't follow
All safety messages will tell you what the potential hazard is, tell you how to reduce the chance of injury, and tell you what can
happen if the instructions are not followed.
Your safety and the safety of others are very important.
We have provided many important safety messages in this manual and on your appliance. Always read and obey all safety
messages.
This is the safety alert symbol.
This symbol alerts you to potential hazards that can kill or hurt you and others.
All safety messages will follow the safety alert symbol and either the word “DANGER” or “WARNING.”
These words mean:
follow instructions.
instructions.
DANGER
WARNING