Whirlpool GBS309PVS Dimension Guide
Whirlpool GBS309PVS - 4.1 Cubic Foot Single i Manual
 |
UPC - 883049142715
View all Whirlpool GBS309PVS manuals
Add to My Manuals
Save this manual to your list of manuals |
Whirlpool GBS309PVS manual content summary:
- Whirlpool GBS309PVS | Dimension Guide - Page 1
is for serviceability of the oven. A UL Whirlpool Corporation policy includes a continuous commitment to improve Dimensions are for planning purposes only. For complete details, see Installation our products, we reserve the right to change materials and specifications without notice. Instructions - Whirlpool GBS309PVS | Dimension Guide - Page 2
COOKTOP IMPORTANT: Observe all governing codes and ordinances. Cooktop must be approved for use over an oven. See Cooktop Installation Instructions for cutout dimensions. Center the cooktop cutout over oven cutout. To avoid damage to your cabinets, check with your builder or cabinet supplier to make - Whirlpool GBS309PVS | Dimension Guide - Page 3
: For undercounter installation, it is recommended that the junction boxes for oven and cooktop be located in the adjacent right or left cabinet. A 1" (2.5 cm) minimum diameter hole should have been drilled in the upper rear right or left corner of the side wall surface to pass the appliance cable - Whirlpool GBS309PVS | Dimension Guide - Page 4
NOTE: For undercounter installation, it is recommended that the junction box for oven be located in the adjacent right or left cabinet. A 1" (2.5 cm) minimum diameter hole should have been drilled in the upper rear right or left corner of the side wall surface to pass the appliance cable through to - Whirlpool GBS309PVS | Dimension Guide - Page 5
Notes 4 - Whirlpool GBS309PVS | Dimension Guide - Page 6
La table de cuisson doit être homologuée pour une utilisation au-dessus d'un four. Pour les dimensions de l'ouverture à découper, voir les instructions d'installation de la table de cuisson. Centrer l'ouverture à découper pour la table de cuisson par rapport à l'ouverture découpée pour le four. Pour - Whirlpool GBS309PVS | Dimension Guide - Page 7
supérieure du châssis du four et au fond de la boîte de brûleur de la table de cuisson. REMARQUE : Pour une installation sous un plan de travail, on recommande que les boîtiers de connexion pour four et table de cuisson soient situés dans le placard adjacent - Whirlpool GBS309PVS | Dimension Guide - Page 8
homologués par numéro de modèle, consulter l'étiquette sous comptoir située sur la partie supérieure du châssis du four. REMARQUE : Pour une installation sous un plan de travail, on recommande que le boîtier de connexion du four soit situé dans le placard adjacent de droite ou de - Whirlpool GBS309PVS | Dimension Guide - Page 9
W10373101A © 2011. All rights reserved. Tous droits réservés. 1/11 Printed in U.S.A. Imprimé aux É.-U.
-
 1
1 -
 2
2 -
 3
3 -
 4
4 -
 5
5 -
 6
6 -
 7
7 -
8
-
9
 |
 |
PRODUCT MODEL SERIES
PRODUCT DIMENSIONS
GBD309PV
GBS309PV
RBD305PV
RBD307PV
RBS305PV
RBS307PV
Because Whirlpool Corporation policy includes a continuous commitment to improve
our products, we reserve the right to change materials and specifications without notice.
Dimensions are for planning purposes only.
For complete details, see Installation
Instructions packed with product.
Specifications subject to change without notice.
Ref. W10192049B
09-05-08
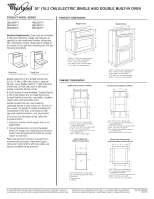
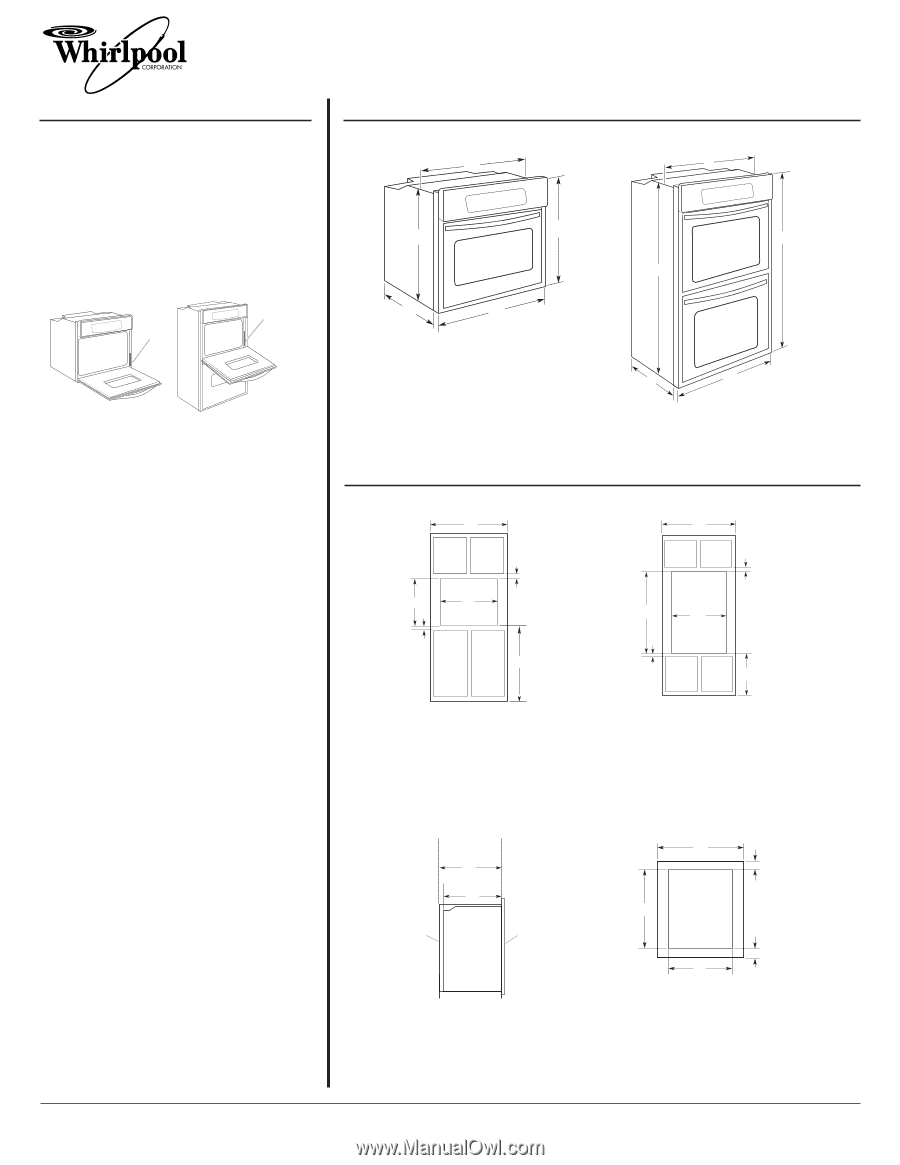
30" (76.2 CM) ELECTRIC SINGLE AND DOUBLE BUILT-IN OVEN
A. 28
⁵⁄₁₆
" (71.9 cm) max. recessed width
B.
29
" (73.7 cm) max. overall height
C. 29
³⁄₄
" (75.6 cm) overall width
D. 23" (58.4 cm) max. recessed depth
E. 27
¹⁄₂
" (69.9 cm) recessed height
A
B
C
D
E
®
CABINET DIMENSIONS
A. 28
⁵⁄₁₆
" (71.9 cm) max. recessed width
B.
51
" (129.5 cm) max. overall height
C. 29
³⁄₄
" (75.6 cm) overall width
D. 23" (58.4 cm) max. recessed depth
E. 49
⁹⁄₁₆
" (125.9 cm) recessed height
A
B
D
E
C
Single Oven
Double Oven
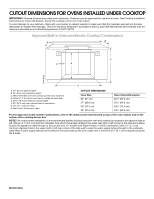
S
ingle Oven Undercounter
(without cooktop installed above)
A.
30
" (76.2 cm) min. cabinet width
B. 1
¹⁄₂
" (3.8 cm) min. top of cutout to
underside of countertop
C. 5
¹⁄₄
" (13.3 cm) bottom of cutout to floor
D. 28
¹⁄₂
" (72.4 cm) cutout width
E. 27
³⁄₄
" (70.5 cm) min. cutout height
A
B
C
D
E
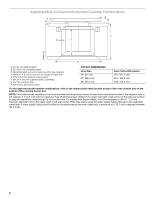
S
ingle Oven Installed in Cabinet
A.
30
" (76.2 cm) min. cabinet width
B. 1" (2.5 cm) top of cutout to bottom
of upper cabinet door
C.
32
" (81.3 cm) bottom of cutout to floor
D. 28
¹⁄₂
" (72.4 cm) cutout width
E. 1
¹⁄₂
" (3.8 cm) min. bottom of cutout to
top of cabinet door
F. 27
³⁄₄
" (70.5 cm) cutout height
A
B
D
E
F
C
t
e
n
i
b
a
C
n
i
d
e
l
l
a
t
s
n
I
s
n
e
v
O
e
l
b
u
o
D
A.
30
" (76.2 cm) min. cabinet width
B. 1" (2.5 cm) top of cutout to bottom of
upper cabinet door
C. 14
³⁄₄
" (37.5 cm) bottom of cutout to floor
D. 28
¹⁄₂
" (72.4 cm) cutout width
E. 1
¹⁄₂
" (3.8 cm) min. bottom of cutout to
top of cabinet door
F. 49
³⁄₄
" (126.4 cm) min. cutout height
A
B
C
D
E
F
n
e
v
O
e
l
b
u
o
D
r
o
e
l
g
n
i
S
-
w
e
i
V
e
d
i
S
t
e
n
i
b
a
C
A. 23
¹⁄₄
" (59.1 cm) min. cutout depth
B. 23" (58.4 cm) recessed oven depth
C. Oven front
D. Recessed oven
E. Cabinet
A
B
C
D
E
Electrical Requirements:
Oven must be connected
to the proper electrical voltage and frequency as
specified on the model/serial number rating plate.
The model/serial number rating plate is located at
the bottom of the right-hand mounting rail. See the
following illustrations.
Models rated from 7.3 to 9.6 kW at 240 volts
(5.5 to 7.2 kW at 208 volts) require a separate
40-amp circuit. Models rated at 7.2 kW and below
at 240 volts (5.4 kW and below at 208 volts)
require a separate 30-amp circuit.
A circuit breaker is recommended. Connect directly
to the circuit breaker box (or fused disconnect)
through flexible, armored or nonmetallic, sheathed
copper cable (with grounding wire).
Flexible conduit from the oven should be
connected directly to the junction box. Do not cut
the conduit. The length of conduit provided is for
serviceability of the oven. A UL-listed or CSA-
approved conduit connector must be provided.
If the house has aluminum wiring, follow the
procedure below:
1. Connect a section of solid copper wire to the
pigtail leads.
2. Connect the aluminum wiring to the added
section of copper wire using special connectors
and/or tools designed and UL-listed for joining
copper to aluminum.
Follow the electrical connector manufacturer's
recommended procedure. Aluminum/copper
connection must conform with local codes and
industry-accepted wiring practices.
Single Oven
A. Model/serial number plate
Double Oven
A. Model/serial number plate
A
A