Whirlpool GC5SHAXVS Installation Instructions
Whirlpool GC5SHAXVS - 24.6 Cubic Foot Flat Texture Coun Manual
 |
UPC - 883049124971
View all Whirlpool GC5SHAXVS manuals
Add to My Manuals
Save this manual to your list of manuals |
Whirlpool GC5SHAXVS manual content summary:
- Whirlpool GC5SHAXVS | Installation Instructions - Page 1
de l'alimentation en eau ...... 24 INSTRUCTIONS D'INSTALLATION 24 Déballage du réfrigérateur refrigerator compartment. If You Need Service Maintain the quality built into your refrigerator by calling an authorized service company. To locate an authorized service company, see the Use & Care Guide - Whirlpool GC5SHAXVS | Installation Instructions - Page 2
decorative panels from kitchen cabinets that prevent the refrigerator from being serviced. s Contact a qualified electrical installer. TOOLS NEEDED: Gather the required tools and parts before starting installation. Read and follow the instructions provided with any tools listed here. s Hand drill - Whirlpool GC5SHAXVS | Installation Instructions - Page 3
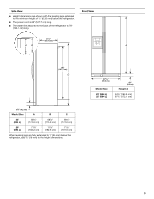
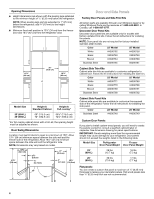
.0 cm) 25' (694 L) 71³⁄₄" (182.2 cm) 71⁷⁄₈" (182.5 cm) 71¹⁄₂" (181.6 cm) When leveling legs are fully extended to 1" (25 mm) below the refrigerator, add ³⁄₄" (19 mm) to the height dimensions. 35 90.6 cm) Model Size 23' (654 L) 25' (694 L) 3⁵⁄₈" (9.2 cm) Height A 64⁷⁄₈" (164.8 cm) 67³⁄₄" (172 - Whirlpool GC5SHAXVS | Installation Instructions - Page 4
Side Trim Kits All factory parts are available through your Whirlpool dealer or by calling Whirlpool Parts and Accessories at 1-800-442-9991. In Canada, are available to customize the exposed side of the refrigerator. Follow the kit instructions for installing the side panel. Color 23' Model 25 - Whirlpool GC5SHAXVS | Installation Instructions - Page 5
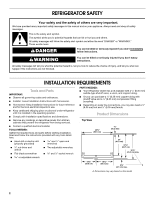
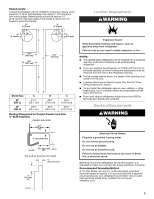
where the temperature will fall below 55°F (13°C). s Floor must support refrigerator weight (more than 600 lbs [272 kg], door panels and contents). cord. Failure to follow these instructions can result in death, fire, or electrical shock. Before you move your refrigerator into its final location, it - Whirlpool GC5SHAXVS | Installation Instructions - Page 6
operate the water dispenser and ice maker. If you have questions support and stabilize the full weight of the refrigerator. Clean Before Using After you remove all of the package materials, clean the inside of your refrigerator before using it. See the cleaning instructions in the Use & Care Guide - Whirlpool GC5SHAXVS | Installation Instructions - Page 7
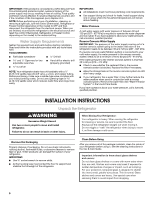
tubing when the refrigerator is pushed back against the wall. 6. Turn shutoff valve ON. 7. Check for leaks. Tighten any connections (including connections at the valve) or nuts that leak. A B C D A. Tube clamp B. Copper tubing C. Compression nut D. Valve inlet 8. The ice maker is equipped with - Whirlpool GC5SHAXVS | Installation Instructions - Page 8
gray, coiled water tubing on the rear of the refrigerator. 3. Before attaching copper tubing to refrigerator, flush at least 2 qt (1.9 L) of Guide for further instructions on the operation of your ice maker. s Allow 24 hours to produce the first batch of ice. s Discard the first three batches of ice - Whirlpool GC5SHAXVS | Installation Instructions - Page 9
after refrigerator has been installed, set controls to OFF. If refrigerator does not operate s Check that the circuit breaker is not tripped or household fuse blown. s Check that the power supply cord is plugged into a grounded 3 prong outlet. s See "Troubleshooting" in the Use & Care Guide. 9 - Whirlpool GC5SHAXVS | Installation Instructions - Page 10
servicio Para mantener la calidad de su refrigerador, llame a una compañía de servicio autorizado. Para ubicar una compañía de servicio autorizada, vea el Manual de uso y cuidado para saber a qué número tiene que llamar, llame al distribuidor en donde compró el refrigerador o fíjese en las páginas - Whirlpool GC5SHAXVS | Installation Instructions - Page 11
antes de comenzar la instalación. Lea y siga las instrucciones provistas con cualquiera de las herramientas enlistadas aquí. s Taladro manual o eléctrico (debidamente conectado a tierra) s Llaves de boca de y ¹⁄₂" s Llave para tuercas de ¹⁄₄" y broca s Dos llaves ajustables s Destornillador - Whirlpool GC5SHAXVS | Installation Instructions - Page 12
Vista frontal s La posición fija mínima respecto de la pared es de 13¼" (34 cm) desde la puerta del congelador y de 16½" (42 cm) desde la puerta del refrigerador. A 36" (91,5 cm) 13¹⁄₄" (34 cm) 16¹⁄₂" (42 cm) A 35 90,6 cm) Tamaño del modelo 23' (654 L) 25' (694 L) 3⁵⁄₈" (9,2 cm) Altura A 64 - Whirlpool GC5SHAXVS | Installation Instructions - Page 13
laterales Juegos de fábrica de paneles de puerta y adornos laterales Todas las piezas de fábrica están disponibles a través de su representante Whirlpool o llamando a Whirlpool Piezas y Accesorios al número 1-800-442-9991. En Canadá, llame al 1-800-807-6777. Juegos de paneles de puerta de decoraci - Whirlpool GC5SHAXVS | Installation Instructions - Page 14
NECESARIAS: s Destornillador de hoja plana s Broca de ¹⁄₄" s Llaves de boca de y ¹⁄₂" o dos llaves ajustables s Llave para tuercas de ¹⁄₄" s Taladro manual o eléctrico (debidamente conectado a tierra) NOTA: El distribuidor de su refrigerador tiene un juego disponible con una válvula de cierre - Whirlpool GC5SHAXVS | Installation Instructions - Page 15
usted haya quitado todos los materiales de empaque, limpie el interior de su refrigerador antes de usarlo. Vea las instrucciones de limpieza en el Manual de Uso y Cuidado. Información importante para saber acerca de los estantes y tapas de vidrio: No limpie los estantes y tapas de vidrio con agua - Whirlpool GC5SHAXVS | Installation Instructions - Page 16
tubería de agua nueva (si es necesario) HERRAMIENTAS NECESARIAS: s Destornillador de hoja plana s Broca de ¹⁄₄" s Llaves de boca de y ¹⁄₂" o s Taladro manual o eléctrico dos llaves ajustables (debidamente conectado a tierra) 1. CIERRE el suministro principal de agua. ABRA la llave de agua - Whirlpool GC5SHAXVS | Installation Instructions - Page 17
repentinos del despachador. 3. Abra la puerta del congelador y encienda la fábrica de hielo. Mueva el interruptor a la posición ON (Encendido-hacia la izquierda). Vea el Manual de Uso y Cuidado para obtener más instrucciones sobre el funcionamiento de su fábrica de hielo. 17 - Whirlpool GC5SHAXVS | Installation Instructions - Page 18
s Deje transcurrir 24 horas para la producción del primer lote de hielo. s Deshágase de los tres primeros lotes de hielo producidos. s Dependiendo de su modelo, puede ser que Ud. desee elegir la característica máxima de hielo para incrementar la producción de hielo. Cómo nivelar el refrigerador - Whirlpool GC5SHAXVS | Installation Instructions - Page 19
Manual de Uso y Cuidado. NOTA: Si se sigue construyendo después de haber instalado el refrigerador, fije los controles en OFF (Apagado). INSTRUCTIONS D'INSTALLATION Assistance ou service de service agréée. Pour obtenir le nom et le numéro d'une compagnie de service agréée, vérifier le Guide d' - Whirlpool GC5SHAXVS | Installation Instructions - Page 20
: Conserver les instructions d'installation pour consultation ultérieure et pour utilisation par l'inspecteur local des installations électriques. s Garder la pièce de carton ou de contreplaqué d'expédition sous le réfrigérateur jusqu'à son installation à l'emplacement de service. s Observer les - Whirlpool GC5SHAXVS | Installation Instructions - Page 21
Vue de face s La position du mur minimum est de 13¹⁄₄" (34 cm) de la porte du congélateur et 16¹⁄₂" (42 cm) de la porte du réfrigérateur. A 36" (91,5 cm) 13¹⁄₄" (34 cm) 16¹⁄₂" (42 cm) A 35 90,6 cm) Taille du modèle 23' (654 L) 25' (694 L) 3⁵⁄₈" (9,2 cm) Hauteur A 64⁷⁄₈" (164,8 cm) 67³⁄₄" ( - Whirlpool GC5SHAXVS | Installation Instructions - Page 22
Pièces et accessoires Whirlpool au 1-800-442-9991. Au Canada, composer le 1-800-807-6777. Trousses de panneaux de porte décoratifs Les trousses du panneau décoratif de porte sont disponibles uniquement pour les modèles avec trousses de garnitures d'origine. Suivre les instructions de la trousse pour - Whirlpool GC5SHAXVS | Installation Instructions - Page 23
adaptateur. Ne pas utiliser un câble de rallonge. Le non-respect de ces instructions peut causer un décès, un incendie ou un choc électrique. ¹⁄₂" (12,7 mm au-dessous de 55°F (13°C). s Le plancher doit supporter le poids du réfrigérateur (plus de 600 lb [272 kg], les panneaux de porte ainsi - Whirlpool GC5SHAXVS | Installation Instructions - Page 24
supporter et stabiliser le poids total du réfrigérateur. Nettoyage avant utilisation Après avoir enlevé tous les matériaux d'emballage, nettoyer l'intérieur du réfrigérateur avant de l'utiliser. Voir les instructions de nettoyage dans le Guide pour le nettoyage ou le service, veiller à protéger l - Whirlpool GC5SHAXVS | Installation Instructions - Page 25
Installation de panneaux de porte personnalisés 1. Enlever tout ruban adhésif provenant de l'emballage. 2. Enlever les garnitures des portes du réfrigérateur et du congélateur du côté charnière de chaque porte en tirant la garniture au bas de la porte d'abord. 3. Dévisser partiellement les deux vis - Whirlpool GC5SHAXVS | Installation Instructions - Page 26
pas enlever la broche de liaison à la terre. Ne pas utiliser un adaptateur. Ne pas utiliser un câble de rallonge. Le non-respect de ces instructions peut causer un décès, un incendie ou un choc électrique. 1. Brancher sur une prise à 3 alvéoles reliée à la terre. 26 - Whirlpool GC5SHAXVS | Installation Instructions - Page 27
vers la gauche). Pour plus d'instructions sur le fonctionnement de votre machine à glaçons, consulter le Guide d'utilisation et d'entretien. s IMPORTANT : Les quatre pieds de nivellement doivent toucher le plancher pour supporter et stabiliser le poids total du réfrigérateur. Enlever la grille - Whirlpool GC5SHAXVS | Installation Instructions - Page 28
le cordon d'alimentation est correctement branché sur une prise de courant à 3 alvéoles reliée à la terre. s Voir la section "Dépannage" dans le Guide d'utilisation et d'entretien. 1. Localiser le boulon d'ajustement de la hauteur sur la charnière inférieure de la porte du réfrigérateur. REMARQUE
-
 1
1 -
 2
2 -
 3
3 -
 4
4 -
 5
5 -
 6
6 -
 7
7 -
8
-
9
-
10
-
11
-
12
-
13
-
14
-
15
-
16
-
17
-
18
-
19
-
20
-
21
-
22
-
23
-
24
-
25
-
26
-
27
-
28
 |
 |

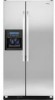
INSTALLATION INSTRUCTIONS
Counter Depth Side by Side Refrigerator
IMPORTANT:
READ AND SAVE THESE INSTRUCTIONS. INSTALLATION REQUIRES 2 OR MORE PEOPLE.
INSTRUCCIONES DE INSTALACIÓN
Refrigerador de dos puertas con profundidad de mostrador
IMPORTANTE:
LEA Y GUARDE ESTAS INSTRUCCIONES. LA INSTALACIÓN REQUIERE DE 2 O MÁS PERSONAS.
INSTRUCTIONS D’INSTALLATION
Réfrigérateur côte à côte à profondeur de comptoir
IMPORTANT
:
LIRE ET CONSERVER CES INSTRUCTIONS. L’INSTALLATION NÉCESSITE L’INTERVENTION DE 2 PERSONNES OU PLUS.
Assistance or Service
If You Have Questions
If you have questions about operating, cleaning or maintaining
your refrigerator, see the Use & Care Guide.
If You Need Service
Maintain the quality built into your refrigerator by calling an
authorized service company.
To locate an authorized service company, see the Use & Care
Guide for the number to call, phone the dealer from whom you
purchased the refrigerator, or check the yellow pages of your local
phone directory.
Keep this book and your sales slip together for future
reference. You must provide proof of purchase or installation
date for in-warranty service.
Write down the following information about your appliance to help
you obtain assistance or service if you ever need it. You will need
to know your complete model number and serial number. You can
find this information on the model and serial number label, located
on the inside wall of the refrigerator compartment.
Dealer name____________________________________________________
Serial number
__________________________________________________
Address________________________________________________________
Phone number__________________________________________________
Model number __________________________________________________
Purchase date __________________________________________________
Table of Contents / Índice / Table des matières
ASSISTANCE OR SERVICE
............................
1
REFRIGERATOR SAFETY
...............................
2
INSTALLATION REQUIREMENTS
.................
2
Tools and Parts
.............................................
2
Product Dimensions
......................................
2
Door and Side Panels
...................................
4
Location Requirements
.................................
5
Electrical Requirements
................................
5
Water Supply Requirements
.........................
6
INSTALLATION INSTRUCTIONS
...................
6
Unpack the Refrigerator
................................
6
Install Custom Door Panels
..........................
7
Install New Water Line
..................................
7
Connect Water Supply
..................................
7
Plug in Refrigerator
.......................................
8
Prepare the Water System
............................
8
Level Refrigerator
..........................................
9
Door Height Adjustment
...............................
9
Complete Installation
....................................
9
AYUDA O SERVICIO TÉCNICO
....................
10
SEGURIDAD DEL REFRIGERADOR
............
10
REQUISITOS DE INSTALACIÓN
..................
10
Piezas y herramientas
.................................
10
Medidas del producto
.................................
11
Paneles de puerta y laterales
......................
13
Requisitos de ubicación
..............................
14
Requisitos eléctricos
...................................
14
Requisitos del suministro de agua
..............
14
INSTRUCCIONES DE INSTALACIÓN
..........
15
Desempaque el refrigerador
.......................
15
Instalación de los paneles a
la medida para la puerta
.............................
15
Cómo instalar una tubería de agua nueva.. 16
Conexión del suministro de agua
...............
16
Cómo enchufar el refrigerador
....................
17
Preparación del sistema de agua
...............
17
Cómo nivelar el refrigerador
.......................
18
Cómo ajustar la altura de la puerta
.............
18
Complete la instalación
...............................
19
ASSISTANCE OU SERVICE
..........................
19
SÉCURITÉ DU RÉFRIGÉRATEUR
................
19
EXIGENCES D’INSTALLATION
....................
20
Outillage et pièces
.......................................
20
Dimensions du produit
................................
20
Panneaux latéraux et de porte
....................
22
Exigences d'emplacement
.........................
23
Spécifications électriques
...........................
23
Spécifications de l’alimentation en eau
......
24
INSTRUCTIONS D’INSTALLATION
..............
24
Déballage du réfrigérateur
..........................
24
Installation de panneaux de porte
personnalisés
..............................................
25
Installation d’une nouvelle
canalisation d’eau
.......................................
25
Raccordement à la canalisation d'eau
.......
25
Brancher le réfrigérateur
.............................
26
Préparer le système d'eau
..........................
27
Nivellement du réfrigérateur
........................
27
Ajustement de la hauteur des portes
..........
28
Achever l’installation
...................................
28
2223996A