Whirlpool GI0FSAXVY Owners Manual
Whirlpool GI0FSAXVY - 19.8 cu. ft. Refrigerator Manual
 |
UPC - 883049152615
View all Whirlpool GI0FSAXVY manuals
Add to My Manuals
Save this manual to your list of manuals |
Whirlpool GI0FSAXVY manual content summary:
- Whirlpool GI0FSAXVY | Owners Manual - Page 1
serial number, located on the inside wall of the refrigerator compartment. Table of Contents / Índice / Table des matières REFRIGERATOR SAFETY 1 INSTALLATION INSTRUCTIONS 2 REFRIGERATOR USE 8 REFRIGERATOR CARE 11 TROUBLESHOOTING 12 WATER FILTER CERTIFICATIONS 14 PERFORMANCE DATA SHEETS 15 - Whirlpool GI0FSAXVY | Owners Manual - Page 2
more people to move and install refrigerator. ■ Disconnect power before installing ice maker (on ice maker kit ready models only). ■ Use a sturdy glass when dispensing ice (on some models). ■ Do not hit the refrigerator glass doors (on some models). SAVE THESE INSTRUCTIONS Proper Disposal of Your - Whirlpool GI0FSAXVY | Owners Manual - Page 3
behind the refrigerator. If your refrigerator has an ice maker, allow extra space at the back for the water line connections. When installing your refrigerator next to to follow these instructions can result in death, fire, or electrical shock. Before you move your refrigerator into its final - Whirlpool GI0FSAXVY | Owners Manual - Page 4
and check for leaks. Install copper tubing only in areas where the household temperatures will remain above freezing. ■ For models with water filters, the disposable water filter should be replaced at least every 6 months. Water Pressure A cold water supply with water pressure of between 35 and - Whirlpool GI0FSAXVY | Owners Manual - Page 5
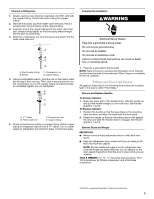
ice container. Refrigerator Doors and Drawer All graphics referenced in the following instructions are included later in this section after "Final Steps." Remove and Replace Handles To Remove Handles: 1. Grasp the lower part of the handle firmly, slide the handle up and pull the handle straight out - Whirlpool GI0FSAXVY | Owners Manual - Page 6
parts for the bottom hinge as shown in Bottom Hinge graphic. Tighten screws. Replace the refrigerator door. NOTE: Provide additional support for the refrigerator -hand side refrigerator door. 5. Reconnect the water line by pulling back the locking collar ring while firmly pushing the water line into - Whirlpool GI0FSAXVY | Owners Manual - Page 7
D A. Hinge Cover Screw B. Top Hinge Cover C. 5/16" Hex-Head Hinge Screws D. Top Hinge Bottom Hinges A B C A. Hinge Pin Cover B. Bottom Hinge C. Hinge Screws Connections A 2 B A. Wiring Plug B. Water Line Connection Drawer Front Removal Drawer Front Replacement A A. Loosen 4 Door Bracket Screws 7 - Whirlpool GI0FSAXVY | Owners Manual - Page 8
the Controls The control center is located on the front of the ice and water dispenser. Temperature Controls For your convenience, your temperature controls are preset at the factory. When you first install your refrigerator, make sure the controls are still set to the recommended set points as - Whirlpool GI0FSAXVY | Owners Manual - Page 9
either the refrigerator or freezer compartment, use the settings listed in the chart as a guide. To Filter Reset The Filter Reset control allows you to restart the water filter status tracking feature each time you replace your water filter. See "Water Filtration System." ■ Press and hold the Filter - Whirlpool GI0FSAXVY | Owners Manual - Page 10
Crisper Humidity Control You can control the amount of humidity in the moisture-sealed crisper. Depending on your model, adjust the control to any setting between FRUIT and VEGETABLES or LOW and HIGH. FRUIT/LOW (open) for best storage of fruits and vegetables with skins. VEGETABLES/HIGH (closed) for - Whirlpool GI0FSAXVY | Owners Manual - Page 11
and Ice Dispenser(s)." NOTE: The dispenser feature may be used without a water filter installed. Your water will not be filtered. If this option is chosen, replace the filter with the blue bypass cap. REFRIGERATOR CARE Cleaning WARNING Explosion Hazard Use nonflammable cleaner. Failure to do so can - Whirlpool GI0FSAXVY | Owners Manual - Page 12
warm water, wash, rinse and thoroughly dry stainless steel and painted metal exteriors. ■ To keep your stainless steel refrigerator looking like new and to remove minor scuffs or marks, it is suggested that you use the manufacturer's approved Stainless Steel Cleaner and Polish, Part Number 4396095 - Whirlpool GI0FSAXVY | Owners Manual - Page 13
an indication of low water pressure. ■ Water shutoff valve not fully open? Turn the water shutoff valve fully open. ■ Kink in the water source line? A kink in the line can reduce water flow. Straighten the water source line. ■ Water filter installed on the refrigerator? Remove filter and operate ice - Whirlpool GI0FSAXVY | Owners Manual - Page 14
water? A water filter may need to be installed to remove the minerals. ■ Water filter installed on the refrigerator? Gray or dark discoloration in ice indicates that the water filtration system needs additional flushing. Flush the water system before using a new water filter. Replace water filter - Whirlpool GI0FSAXVY | Owners Manual - Page 15
SHEETS Interior Water Filtration System Model 0.08 mg filter model UKF8001AXX-750. 2010 suggested retail price of $44.99 U.S.A./$49.95 Canada. Prices are subject to change without notice. Application Guidelines/Water Supply Parameters Water Supply Water Pressure Water Temperature Service Flow Rate - Whirlpool GI0FSAXVY | Owners Manual - Page 16
mg/L ± 10% 0.0753 mg/L 0.08 mg/L ± 10% 0.015 mg/L filter model UKF8001AXX-200. 2010 suggested retail price of $44.99 U.S.A./$49.95 Canada. Prices are subject to change without notice. Application Guidelines/Water Supply Parameters Water Supply Water Pressure Water Temperature Service Flow Rate - Whirlpool GI0FSAXVY | Owners Manual - Page 17
accordance with Whirlpool's published installation instructions. 11. Replacement parts or repair labor on major appliances with original model/serial numbers that have been removed, altered or cannot be easily determined. 12. Discoloration, rust, or oxidation of stainless steel surfaces. DISCLAIMER - Whirlpool GI0FSAXVY | Owners Manual - Page 18
cubierto en SOLUCIÓN DE PROBLEMAS, visite nuestro sitio de internet en www.whirlpool.com para obtener información adicional. Si considera que aún necesita ayuda, importante. Hemos incluido muchos mensajes importantes de seguridad en este manual y en su electrodoméstico. Lea y obedezca siempre todos - Whirlpool GI0FSAXVY | Owners Manual - Page 19
que usted haya quitado todos los materiales de empaque, limpie el interior de su refrigerador antes de usarlo. Vea las instrucciones de limpieza hay espacio adicional atrás para las conexiones de la línea de agua. Cuando instale el refrigerador próximo a una pared fija, deje un espacio mínimo de - Whirlpool GI0FSAXVY | Owners Manual - Page 20
obstruye con más facilidad. ■ Use tubería de cobre y revise si hay fugas. Instale la tubería de cobre sólo en áreas donde la temperatura vaya a permanecer por agua por ósmosis inversa IMPORTANTE: La presión del suministro de agua que sale de un sistema de ósmosis inversa y va a la válvula de entrada - Whirlpool GI0FSAXVY | Owners Manual - Page 21
se acumule el sedimento normal en la válvula. 4. Determine la longitud de la tubería de cobre que necesite. Mida desde la conexión de la parte trasera del refrigerador hasta la tubería de agua. Agregue 7 pies (2,1 m) para poder mover el refrigerador para limpiarlo. Use tubería de cobre de ¹⁄₄" (6,35 - Whirlpool GI0FSAXVY | Owners Manual - Page 22
se incluyen más adelante en esta sección después de "Pasos finales". Para quitar y volver a colocar las manijas Para quitar las manijas: 1. Tome la parte inferior de la manija con firmeza, deslice la manija hacia arriba y jálela directo fuera de la puerta. Vea las ilustraciones de Manija 1 y 2. Para - Whirlpool GI0FSAXVY | Owners Manual - Page 23
cajón. Para volver a colocar el frente del cajón 1. Deslice las guías del cajón fuera del compartimiento del congelador. Inserte los tornillos en la parte superior del frente del cajón, dentro de las ranuras que están en los soportes del cajón. Vea la ilustración Cómo volver a colocar el frente del - Whirlpool GI0FSAXVY | Owners Manual - Page 24
Cómo quitar la puerta y cambiarla Bisagras superiores A B C 1 D A. Tornillo de la cubierta de la bisagra B. Cubierta de la bisagra superior C. Tornillos de cabeza hexagonal de 5/16" de la bisagra D. Bisagra superior Bisagras inferiores A B C A. Cubierta del pasador de la bisagra B. Bisagra inferior - Whirlpool GI0FSAXVY | Owners Manual - Page 25
Uso de los controles El centro de control está ubicado en la parte delantera del despachador de agua y hielo. Controles de temperatura Para su conveniencia, los controles de temperatura vienen prefijados de fábrica. Cuando instale el refrigerador por primera vez, asegúrese de que los controles est - Whirlpool GI0FSAXVY | Owners Manual - Page 26
de agua cada vez que usted reemplace el filtro de agua. Vea "Sistema de filtración de agua". ■ Presione y sostenga el botón táctil de Filter Reset (Reposición del filtro) durante 3 segundos, hasta que se apague la luz de Order (Pedir) o Replace (Reemplazar). Preferencias del usuario El centro de - Whirlpool GI0FSAXVY | Owners Manual - Page 27
interiores y los tonos de alarma. OFF (Apagado) - Se activarán todas las luces del centro de control, las luces interiores y VEGETABLES (Vegetales) o LOW (Bajo) y HIGH (Alto). FRUIT/LOW (Fruta / Bajo - posici podrá requerir enjuague adicional. A medida que sale aire del sistema, es posible que salgan - Whirlpool GI0FSAXVY | Owners Manual - Page 28
■ El despachador distribuirá agua o hielo en cubos. ■ Deje que pasen 24 horas para que el refrigerador se enfríe y pueda enfriar el agua. Haga salir suficiente agua cada semana para mantener un suministro fresco. ■ Deje transcurrir 24 horas para la producción del primer lote de hielo. Deshágase de - Whirlpool GI0FSAXVY | Owners Manual - Page 29
, ya que pueden rayar o dañar los materiales. Limpieza del interior 1. Desenchufe el refrigerador o desconecte el suministro de energía. 2. Utilizando de energía. 2. Saque la pantalla de luz si es necesario. ■ Parte superior del compartimiento del refrigerador Apriete ambos lados de la pantalla de - Whirlpool GI0FSAXVY | Owners Manual - Page 30
que se hacen con frecuencia", para evitar posiblemente el costo de una visita de servicio técnico. En EE.UU., www.whirlpool.com En Canadá, www.whirlpool.ca Funcionamiento del refrigerador El refrigerador no funciona ADVERTENCIA Peligro de Choque Eléctrico Conecte a un contacto de pared de conexi - Whirlpool GI0FSAXVY | Owners Manual - Page 31
en un ajuste más caliente. Fíjese en la temperatura en 24 horas. Vea "Uso del (de los) control(es)". Hay acumulación de humedad en el interior NOTA: Es normal que se acumule un poco de humedad. ■ ¿Está húmeda la habitación? Esto contribuye a la acumulación de humedad. ■ ¿Se abre(n) o se deja - Whirlpool GI0FSAXVY | Owners Manual - Page 32
puertas recientemente? Asegúrese de que el conjunto de tubería/alambre del despachador de agua se haya vuelto a conectar como es debido en la parte superior de la puerta del refrigerador. Vea "Puertas y cajón del refrigerador". ■ ¿Se ha conectado un sistema de filtración de agua de ósmosis inversa - Whirlpool GI0FSAXVY | Owners Manual - Page 33
partículas I* 85% reducción 2,00 mg/L 2,0 mg/L ± 10% 0,06 mg/L 14.000.000 #/mL Por lo menos 10.000 370.000 #/mL** part a pH 6,5 Plomo: a pH 8,5 0,010 mg/L 0,010 mg/L 0,150 mg/L† 0,150 mg/L† 96,30% >99,80% Carbofurano 0,040 mg/L 0,0753 mg/L 0,08 mg/L ± 10% 0,027 mg/L 0,008 mg/L 64,60% - Whirlpool GI0FSAXVY | Owners Manual - Page 34
ón de NSF 0,010 mg/L 0,010 mg/L 2,00 mg/L 2,0 mg/L ± 10% 0,06 mg/L 14.000.000 #/mL Por lo menos 10.000 370.000 #/mL** partículas/mL Promedio - 120 lbs/pulg² (241 - 827 kPa) 33° - 100°F (1° - 38°C) 0,55 gpm (2,08 L/min.) a 60 lbs/ pulg² ■ El producto es para uso con agua fría únicamente. ■ - Whirlpool GI0FSAXVY | Owners Manual - Page 35
electrodoméstico principal un uso y mantenimiento de conformidad con las instrucciones adjuntas o provistas con el producto, Whirlpool Corporation o Whirlpool Canada LP (en lo sucesivo denominado "Whirlpool"), se hará cargo del costo de las piezas especificadas de fábrica y del trabajo de reparaci - Whirlpool GI0FSAXVY | Owners Manual - Page 36
. En Canadá, llame al 1-800-807-6777. Si necesita asistencia adicional, puede escribir a Whirlpool con sus preguntas o dudas a la dirección que aparece a continuación: En los EE.UU.: Whirlpool Brand Home Appliances Customer eXperience Center 553 Benson Road Benton Harbor, MI 49022-2692 En Canad - Whirlpool GI0FSAXVY | Owners Manual - Page 37
.com pour des informations supplémentaires. Si vous avez toujours besoin d'assistance, veuillez nous téléphoner au 1-800-253-1301. Au Canada, visitez notre site Web www.whirlpool.ca ou téléphonez-nous au 1-800-807-6777. Vous aurez besoin de vos numéros de modèle et de série situés sur la paroi - Whirlpool GI0FSAXVY | Owners Manual - Page 38
Déballage du réfrigérateur AVERTISSEMENT Risque du poids excessif Utiliser deux ou plus de personnes pour déplacer et installer le réfrigérateur. Le non-respect de cette instruction peut causer une blessure au dos ou d'autre blessure. Enlèvement des matériaux d'emballage ■ Enlever tout résidu - Whirlpool GI0FSAXVY | Owners Manual - Page 39
des commandes". Spécifications de l'alimentation en eau Rassembler les outils et pièces nécessaires avant de commencer l'installation. Lire et suivre les instructions fournies avec les outils indiqués ci-dessous. OUTILLAGE REQUIS : ■ Tournevis à lame plate ■ Tourne-écrou de ¹⁄₄" ■ Clés plates - Whirlpool GI0FSAXVY | Owners Manual - Page 40
au réfrigérateur 1. Créer une boucle de service (diamètre minimum de 2 pi [61 cm des fuites. Corriger toute fuite. Achever l'installation AVERTISSEMENT Risque de choc électrique Brancher sur un câble de rallonge. Le non-respect de ces instructions peut causer un décès, un incendie ou un choc é - Whirlpool GI0FSAXVY | Owners Manual - Page 41
la porte. Voir les illustrations de la poignée en plastique 1 et 2. Réinstallation des poignées : 1. Positionner la poignée de façon à ce que érieure. Ne pas complètement serrer les vis. Le non-respect de ces instructions peut causer un décès, un incendie ou un choc électrique. 2. Brancher sur une - Whirlpool GI0FSAXVY | Owners Manual - Page 42
les pièces amovibles dans les portes et les tiroirs; ranger les aliments dans le réfrigérateur et le congélateur. Enlèvement et réinstallation de la porte Charnières supérieures A B C 1 D A. Vis du cache de la charnière B. Cache de la charnière supérieure C. Vis de charnière à tê - Whirlpool GI0FSAXVY | Owners Manual - Page 43
, faire le réglage de l'inclinaison du réfrigérateur en suivant les instructions cidessous. ■ Avant de déplacer le réfrigérateur, soulever les vis -être plusieurs tours et tourner les deux vis de façon égale. 4. Réinstaller la grille de la base. A. Joint à charnière Utilisation des commandes Le - Whirlpool GI0FSAXVY | Owners Manual - Page 44
congélation, utiliser les réglages indiqués dans le tableau ci-dessous comme guide. Pour ajuster les réglages de température : Lorsqu'on appuie une premi section "Système de filtration de l'eau". ■ Appuyer sur la touche Filter Reset pendant 3 secondes, jusqu'à ce que le témoin lumineux Order ( - Whirlpool GI0FSAXVY | Owners Manual - Page 45
suivants : FRUIT (fruits) et VEGETABLES (légumes) ou LOW (faible) et HIGH (élevé). FRUIT (fruits)/LOW (bas) [ouvert] pour une meilleure conservation des fruits çons mais la commande demeurera à la position ON. Dépose et réinstallation du bac d'entreposage à glaçons Pour retirer le bac d'entreposage à - Whirlpool GI0FSAXVY | Owners Manual - Page 46
glaçons. Le non-respect de cette instruction peut causer des coupures. 1. Sélectionner l' 253-1301 aux É.-U. ou le 1-800-807-6777 au Canada. IMPORTANT : L'air emprisonné dans le système glaçons". REMARQUE : Le distributeur peut être utilisé sans installer de filtre à eau. L'eau ne sera pas filtrée. - Whirlpool GI0FSAXVY | Owners Manual - Page 47
un produit de nettoyage ininflammable. Le non-respect de cette instruction peut causer un décès, une explosion ou un incendie. Les produit de nettoyage, composer le 1-800-253-1301 (É.-U.) ou le 1-800-807-6777 (Canada). IMPORTANT : Ce nettoyant doit être utilisé sur les pièces en acier inoxydable - Whirlpool GI0FSAXVY | Owners Manual - Page 48
ménager ne dépassant pas 40 watts. 4. Réinstaller le(s) protège-ampoule(s) en insérant les d'un appel de service. Aux É.-U., www.whirlpool.com Au Canada, www.whirlpool.ca Fonctionnement du réfrig un câble de rallonge. Le non-respect de ces instructions peut causer un décès, un incendie ou un choc é - Whirlpool GI0FSAXVY | Owners Manual - Page 49
respect de cette instruction peut causer un décès, une explosion ou un incendie. ■ Les joints d'étanchéité sont-ils sales ou collants? du bras éjecteur avec un ustensile en plastique. ■ Un filtre à eau est-il installé sur le réfrigérateur? Enlever le filtre et faire fonctionner la machine à glaç - Whirlpool GI0FSAXVY | Owners Manual - Page 50
complètement. ■ La canalisation de la source d'eau du domicile comportet-elle une déformation? Redresser la canalisation d'eau. ■ S'agit-il d'une nouvelle installation? Rincer et remplir le système de distribution d'eau. Voir "Distributeur d'eau et de glaçons". ■ La pression de l'eau est-elle d'au - Whirlpool GI0FSAXVY | Owners Manual - Page 51
000 000 #/mL Au moins 10 000 particules/mL 0,06 mg/L 0,050625 mg/L 97,00 % 370 000 #/ à pH 8,5 Critères de réduction NSF 0,010 mg/L 0,010 mg/L Affluent moyen 0,150 mg/L† 0,150 mg ,10 % 96,30 % >99,80 % Carbofuran 0,040 mg/L 0,0753 mg/L 0,08 mg/L ± 10 % 0,027 mg/L 0,008 mg/L 64,60 % 73,45 % - Whirlpool GI0FSAXVY | Owners Manual - Page 52
85 % 14 000 000 #/mL Au moins 10 000 particules/mL 0,06 mg/L 0,050625 mg/L 97,00 % 370 000 #/mL** 196 666 à pH 8,5 Benzène Critères de réduction NSF 0,010 mg/L 0,010 mg/L 0,002 mg/L 0,002 mg/L 0,005 mg/L Affluent 33° - 100°F (1° - 38°C) 0,55 gpm (2,08 Lpm) à 60 lb/po² ■ Le produit ne doit - Whirlpool GI0FSAXVY | Owners Manual - Page 53
de services d'entretien ou de réparation Whirlpool autorisé n'est pas disponible. 10. La dépose et la réinstallation de votre gros appareil ménager si celui-ci est installé dans un endroit inaccessible ou n'est pas installé conformément aux instructions d'installation fournies par Whirlpool. 11 - Whirlpool GI0FSAXVY | Owners Manual - Page 54
assistance ou service aux É.-U., composez le 1-800-253-1301. Au Canada, composez le 1-800-807-6777. Si vous avez besoin de plus d'assistance, vous pouvez écrire à Whirlpool en soumettant toute question ou problème à l'adresse suivante : Aux États-Unis : Whirlpool Brand Home Appliances Customer
-
 1
1 -
 2
2 -
 3
3 -
 4
4 -
 5
5 -
 6
6 -
 7
7 -
8
-
9
-
10
-
11
-
12
-
13
-
14
-
15
-
16
-
17
-
18
-
19
-
20
-
21
-
22
-
23
-
24
-
25
-
26
-
27
-
28
-
29
-
30
-
31
-
32
-
33
-
34
-
35
-
36
-
37
-
38
-
39
-
40
-
41
-
42
-
43
-
44
-
45
-
46
-
47
-
48
-
49
-
50
-
51
-
52
-
53
-
54
 |
 |
THANK YOU for purchasing this high-quality product. If you should experience a problem not covered in TROUBLESHOOTING,
please visit our website at
www.whirlpool.com
for additional information. If you still need assistance, call us at 1-800-253-1301.
In Canada, visit our website at
www.whirlpool.ca
or call us at 1-800-807-6777.
You will need your model and serial number, located on the inside wall of the refrigerator compartment.
REFRIGERATOR SAFETY
Table of Contents
/
Índice / Table des matières
REFRIGERATOR SAFETY
...............................
1
INSTALLATION INSTRUCTIONS
....................
2
REFRIGERATOR USE
......................................
8
REFRIGERATOR CARE
.................................
11
TROUBLESHOOTING
....................................
12
WATER FILTER CERTIFICATIONS
...............
14
PERFORMANCE DATA SHEETS
..................
15
WARRANTY
....................................................
17
SEGURIDAD DEL REFRIGERADOR
.............
18
INSTRUCCIONES DE INSTALACIÓN
...........
19
USO DE SU REFRIGERADOR
.......................
25
CUIDADO DE SU REFRIGERADOR
.............
29
SOLUCIÓN DE PROBLEMAS
.......................
30
HOJA DE DATOS DEL RENDIMIENTO
........
33
GARANTÍA
......................................................
35
SÉCURITÉ DU RÉFRIGÉRATEUR
................
37
INSTRUCTIONS D’INSTALLATION
..............
38
UTILISATION DU RÉFRIGÉRATEUR
............
43
ENTRETIEN DU RÉFRIGÉRATEUR
..............
47
DÉPANNAGE
..................................................
48
FEUILLES DE DONNÉES
SUR LA PERFORMANCE
..............................
51
GARANTIE
......................................................
53
®
REFRIGERATOR USER INSTRUCTIONS
W10329361A
You can be killed or seriously injured if you don't immediately
You
can be killed or seriously injured if you don't follow
All safety messages will tell you what the potential hazard is, tell you how to reduce the chance of injury, and tell you what can
happen if the instructions are not followed.
Your safety and the safety of others are very important.
We have provided many important safety messages in this manual and on your appliance. Always read and obey all safety
messages.
This is the safety alert symbol.
This symbol alerts you to potential hazards that can kill or hurt you and others.
All safety messages will follow the safety alert symbol and either the word “DANGER” or “WARNING.”
These words mean:
follow instructions.
instructions.
DANGER
WARNING