Whirlpool GI7FVCXWY Owners Manual
Whirlpool GI7FVCXWY - Bottom Freezer Refrigerator Manual
 |
UPC - 883049163949
View all Whirlpool GI7FVCXWY manuals
Add to My Manuals
Save this manual to your list of manuals |
Whirlpool GI7FVCXWY manual content summary:
- Whirlpool GI7FVCXWY | Owners Manual - Page 1
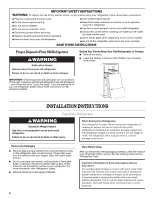
® REFRIGERATOR USER INSTRUCTIONS THANK YOU for purchasing this high-quality product. If you should experience a problem not covered in TROUBLESHOOTING, please visit our website at www.whirlpool.com for additional information. If you still need assistance, call us at 1-800-253-1301. In Canada, visit - Whirlpool GI7FVCXWY | Owners Manual - Page 2
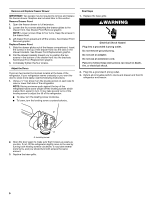
before installing ice maker (on ice maker kit ready models only). ■ Use a sturdy glass when dispensing ice (on some models). ■ Do not hit the refrigerator glass doors (on some models). SAVE THESE INSTRUCTIONS Proper Disposal of Your Old Refrigerator WARNING Suffocation Hazard Remove doors from - Whirlpool GI7FVCXWY | Owners Manual - Page 3
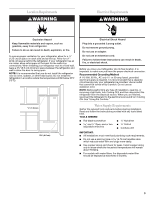
of space on each side and at the top. Allow for a 1" (2.54 cm) space behind the refrigerator. If your refrigerator has an ice maker, allow extra space at the back for the water line connections. When installing your refrigerator next to a fixed wall, leave a 3³⁄₄" (9.5 cm) minimum space between the - Whirlpool GI7FVCXWY | Owners Manual - Page 4
the water filter. See "Water Filtration System." If you have questions about your water pressure, call a licensed, qualified plumber. Connect the Water Supply Read all directions before you begin. IMPORTANT: If you turn the refrigerator on before the water line is connected, turn the ice maker OFF - Whirlpool GI7FVCXWY | Owners Manual - Page 5
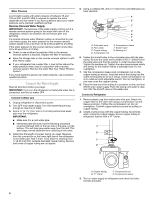
in place while you are working. 3. Align the door so that the bottom of the refrigerator door aligns evenly with the top of the freezer drawer. Tighten all screws. 4. Reconnect the wiring plug on top of the left-hand side refrigerator door. 5. Reconnect the water line by pulling back the locking - Whirlpool GI7FVCXWY | Owners Manual - Page 6
Do not use an extension cord. Failure to follow these instructions can result in death, fire, or electrical shock. 2. Plug into a grounded 3 prong outlet. 3. Return all removable parts to doors and drawer and food to refrigerator and freezer. A A. Leveling screw 2. Open the door again to make sure - Whirlpool GI7FVCXWY | Owners Manual - Page 7
A B C D A. Hinge Cover Screw B. Top Hinge Cover C. 5/16" Hex-Head Hinge Screws D. Top Hinge Bottom Hinges A B C A. Hinge Pin Cover B. Bottom Hinge C. Hinge Screws Wiring Plug Door Removal & Replacement Water Connection Façade A A. Screw 1 2 Drawer Front Removal A A. Loosen 4 Door Bracket Screws - Whirlpool GI7FVCXWY | Owners Manual - Page 8
Using the Controls The refrigerator and freezer controls are located on the dispenser panel and display screen. A ■ The preset settings should be correct for normal household usage. The controls are set correctly when milk or juice is as cold as you like and when ice - Whirlpool GI7FVCXWY | Owners Manual - Page 9
REFRIGERATOR too cold REFRIGERATOR too warm FREEZER too cold FREEZER too warm/too little ice TEMPERATURE ADJUSTMENT: REFRIGERATOR Setting 1° higher REFRIGERATOR Setting 1° lower FREEZER Setting 1° higher FREEZER the moisture-sealed crisper. Depending on your model, adjust the control to any setting - Whirlpool GI7FVCXWY | Owners Manual - Page 10
; a special light that turns on when you use the dispenser; a lock option to avoid unintentional dispensing; or an indicator that tells you when there has been a power outage. IMPORTANT: ■ After connecting the refrigerator to a water source or replacing the water filter, flush the water system. Use - Whirlpool GI7FVCXWY | Owners Manual - Page 11
dispenser lights are not working, see "Troubleshooting" for more information. Dispenser Lock The dispenser can be turned off for easy cleaning or to avoid unintentional dispensing by small children and pets. NOTE: The lock feature does not shut off power to the refrigerator, to the ice maker, or - Whirlpool GI7FVCXWY | Owners Manual - Page 12
and dispenser mechanism. ■ Do not store anything on top of the ice maker or in the ice storage bin. Water Filter Status Light The water filter status light will help you know when to change your water filter. When the water filter status display changes from "NORMAL" to "ORDER," this tells you that - Whirlpool GI7FVCXWY | Owners Manual - Page 13
power. 2. Using a clean sponge or soft cloth and a mild detergent in warm water, wash, rinse and thoroughly dry stainless steel and painted metal exteriors. ■ To keep your stainless steel refrigerator looking like new and to remove minor scuffs or marks, it is suggested that you use the manufacturer - Whirlpool GI7FVCXWY | Owners Manual - Page 14
you may hear intermittent noises from your new refrigerator that you did not notice from your old model. Below are listed some normal sounds with explanations. ■ Buzzing - heard when the water valve opens to fill the ice maker ■ Pulsating - fans/compressor adjusting to optimize performance ■ Hissing - Whirlpool GI7FVCXWY | Owners Manual - Page 15
ice recently removed? Allow 24 hours for ice maker to produce more ice. ■ Ice cube jammed in the ice maker ejector arm? Remove ice from the ejector arm with a plastic utensil. ■ Water filter installed on the refrigerator? Remove filter and operate ice maker. If ice volume improves, then the filter - Whirlpool GI7FVCXWY | Owners Manual - Page 16
and fill the water system. See "Water and Ice Dispensers." ■ Is the water pressure at least 35 psi (241 kPa)? The water pressure to the home determines the flow from the dispenser. See "Water Supply Requirements." ■ Water filter installed on the refrigerator? Remove filter and operate dispenser - Whirlpool GI7FVCXWY | Owners Manual - Page 17
the filter. For models without filter status lights, replace the filter every 6 months. Use replacement filter model UKF8001AXX-200. 2010 suggested retail price of $44.99 U.S.A./$49.95 Canada. Prices are subject to change without notice. Application Guidelines/Water Supply Parameters Water Supply - Whirlpool GI7FVCXWY | Owners Manual - Page 18
servicer is not available. 10. The removal and reinstallation of your major appliance if it is installed in an inaccessible location or is not installed in accordance with Whirlpool's published installation instructions. 11. Replacement parts or repair labor on major appliances with original model - Whirlpool GI7FVCXWY | Owners Manual - Page 19
cubierto en SOLUCIÓN DE PROBLEMAS, visite nuestro sitio de internet en www.whirlpool.com para obtener información adicional. Si considera que aún necesita ayuda, importante. Hemos incluido muchos mensajes importantes de seguridad en este manual y en su electrodoméstico. Lea y obedezca siempre todos - Whirlpool GI7FVCXWY | Owners Manual - Page 20
Cómo deshacerse adecuadamente de su refrigerador viejo ADVERTENCIA Peligro de Asfixia Remueva las puertas de su refrigerador viejo. No seguir esta instrucción puede ocasionar la muerte o daño al cerebro. Antes de tirar su viejo refrigerador o congelador: ■ Saque las puertas. ■ Deje los estantes en - Whirlpool GI7FVCXWY | Owners Manual - Page 21
NOTA: No se recomienda instalar el refrigerador cerca de un horno, radiador u otra fuente de calor. No instale el refrigerador en un lugar donde la temperatura puede ser menor de 55°F (13°C). ¹⁄₂" (1,25 cm) 3³⁄₄" (9,5 cm) Requisitos eléctricos ADVERTENCIA Peligro de Choque Eléctrico Conecte a un - Whirlpool GI7FVCXWY | Owners Manual - Page 22
Conexión del suministro de agua Lea todas las instrucciones antes de comenzar. IMPORTANTE: Si enciende el refrigerador antes de conectar la tubería de agua, APAGUE la fábrica de hielo. Conexión a la línea de agua 1. Desenchufe el refrigerador o desconecte el suministro de energía. 2. CIERRE el - Whirlpool GI7FVCXWY | Owners Manual - Page 23
Puertas y cajón del refrigerador Todas las ilustraciones a las que se hace referencia en las siguientes instrucciones se incluyen más adelante en esta sección después de "Pasos finales". Para quitar y volver a colocar las manijas 8. Desconecte la línea de agua jalando el collar de bloqueo, - Whirlpool GI7FVCXWY | Owners Manual - Page 24
, incendio o choque eléctrico. 2. Conecte a un contacto de pared de conexión a tierra de 3 terminales. 3. Vuelva a colocar todas las piezas removibles en las puertas y el cajón, y los alimentos, al refrigerador y al congelador. A A. Tornillo nivelador 3. Vuelva a colocar la rejilla de la base - Whirlpool GI7FVCXWY | Owners Manual - Page 25
Bisagras superiores A B C D Cómo quitar la puerta y cambiarla A. Tornillo de la cubierta de la bisagra B. Cubierta de la bisagra superior C. Tornillos de cabeza hexagonal de 5/16" de la bisagra D. Bisagra superior Bisagras inferiores A B C A. Cubierta del pasador de la bisagra B. Bisagra inferior - Whirlpool GI7FVCXWY | Owners Manual - Page 26
USO DE SU REFRIGERADOR Cómo abrir y cerrar las puertas El compartimiento del refrigerador tiene dos puertas. Las puertas pueden abrirse y cerrarse ya sea individualmente o a la vez. Hay una junta con bisagras verticales en la puerta izquierda del refrigerador. ■ Cuando se abre la puerta izquierda, - Whirlpool GI7FVCXWY | Owners Manual - Page 27
, luego AJUSTES, seguido por VOLUMEN. Seleccione el volumen deseado y espere 15 segundos o presione ATRÁS. NOTA: El seleccionar SILENCIAR no desactivará la Alarma de puerta entreabierta. 27 - Whirlpool GI7FVCXWY | Owners Manual - Page 28
Luminosidad de la pantalla ■ Para ajustar la luminosidad de la pantalla, presione OPCIONES, luego AJUSTES, seguido por LUMINOSIDAD. Seleccione la luminosidad deseada y espere 15 segundos o presione ATRÁS. Reajuste de fábrica ■ Para volver a fijar todos los ajustes y preferencias del sistema a las - Whirlpool GI7FVCXWY | Owners Manual - Page 29
4. Para sacar agua, presione un vaso resistente contra la almohadilla del despachador O coloque el vaso debajo del despachador de agua y presione el botón del despachador de agua. ■ El grifo gira hacia el centro para facilitar la distribución en envases grandes. Para girarlo, empuje el lado derecho - Whirlpool GI7FVCXWY | Owners Manual - Page 30
se reanudará cuando el depósito ya no esté lleno. Para apagar manualmente la fábrica de hielo, presione OPCIONES en la pantalla, seguido por ICE MAKER (Fábrica de hielo). En la pantalla siguiente, presione FÁBRICA DE HIELO nuevamente para cambiar entre ENCENDIDO y APAGADO. Cuando la fábrica de hielo - Whirlpool GI7FVCXWY | Owners Manual - Page 31
2. Utilizando una esponja o un paño suave y una solución de detergente suave y agua tibia, lave a mano, enjuague y seque a fondo las piezas removibles y las superficies interiores. 3. Enchufe el refrigerador o reconecte el suministro de energía. Limpie la pantalla táctil en el panel del despachador - Whirlpool GI7FVCXWY | Owners Manual - Page 32
que se hacen con frecuencia", para evitar posiblemente el costo de una visita de servicio técnico. En EE.UU., www.whirlpool.com En Canadá, www.whirlpool.ca El refrigerador no funciona Funcionamiento del refrigerador ■ ¿Funciona el contacto? Enchufe una lámpara para ver si funciona el contacto - Whirlpool GI7FVCXWY | Owners Manual - Page 33
Parece que el refrigerador es ruidoso El ruido del refrigerador se ha ido reduciendo a lo largo de los años. Debido a esta reducción, es posible que escuche ruidos intermitentes en su nuevo refrigerador que no había notado en el modelo viejo. A continuación se enumeran algunos sonidos normales con - Whirlpool GI7FVCXWY | Owners Manual - Page 34
■ ¿Tiene un filtro de agua instalado en el refrigerador? Saque el filtro y ponga a funcionar la fábrica de hielo. Si el volumen de hielo aumenta, el filtro puede estar obstruido o haberse instalado incorrectamente. Reemplace el filtro o vuelva a instalarlo correctamente. ■ ¿Se ha conectado un - Whirlpool GI7FVCXWY | Owners Manual - Page 35
HOJA DE DATOS DEL RENDIMIENTO Sistema interno de filtración de agua Modelo UKF8001AXX-200 Capacidad 200 galones (757 litros) Sistema probado y certificado por NSF International según la norma NSF/ANSI 42 para la reducción de cloro, sabor y olor, de partículas de clase I* y según la norma NSF/ANSI - Whirlpool GI7FVCXWY | Owners Manual - Page 36
acabado de su electrodoméstico principal, a menos que el mismo sea debido a defectos en los materiales o la mano de obra y se le informe a Whirlpool en un lapso de 30 días a partir de la fecha de compra. 6. Cualquier pérdida de comida o medicamentos debido a fallas del refrigerador o del congelador - Whirlpool GI7FVCXWY | Owners Manual - Page 37
no tiene acceso a internet y necesita ayuda para usar su producto, o si quisiera hacer una cita para obtener servicio, puede ponerse en contacto con Whirlpool, en el número que se indica a continuación. Tenga listo su número de modelo completo. Puede encontrar el número de modelo y de serie en - Whirlpool GI7FVCXWY | Owners Manual - Page 38
® INSTRUCTIONS D'UTILISATION DU RÉFRIGÉRATEUR Nous vous REMERCIONS d'avoir acheté ce produit de haute qualité. Si vous rencontrez un problème non mentionné dans la section DÉPANNAGE, veuillez visiter notre site Web www.whirlpool.com pour des informations supplémentaires. Si vous avez toujours - Whirlpool GI7FVCXWY | Owners Manual - Page 39
érateur AVERTISSEMENT Risque du poids excessif Utiliser deux ou plus de personnes pour déplacer et installer le réfrigérateur. Le non-respect de cette instruction peut causer une blessure au dos ou d'autre blessure. Enlèvement des matériaux d'emballage ■ Enlever tout résidu de ruban adhésif et de - Whirlpool GI7FVCXWY | Owners Manual - Page 40
pas enlever la broche de liaison à la terre. Ne pas utiliser un adaptateur. Ne pas utiliser un câble de rallonge. Le non-respect de ces instructions peut causer un décès, un incendie ou un choc électrique. Avant de placer le réfrigérateur à son emplacement final, il est important de vous assurer - Whirlpool GI7FVCXWY | Owners Manual - Page 41
en tirant sur le tube en cuivre. 2. Créer une boucle de service avec le tube de cuivre. Éviter les déformations en pliant le tube un adaptateur. Ne pas utiliser un câble de rallonge. Le non-respect de ces instructions peut causer un décès, un incendie ou un choc électrique. 1. Brancher sur une prise - Whirlpool GI7FVCXWY | Owners Manual - Page 42
portes. ■ Laisser les portes du réfrigérateur fermées jusqu'à ce vous soyez prêt à les soulever de la caisse. REMARQUE : Prévoir un support additionnel des portes pendant la réinstallation des charnières. La force d'attraction des aimants des portes ne suffit pas à les maintenir en place. OUTILLAGE - Whirlpool GI7FVCXWY | Owners Manual - Page 43
pas enlever la broche de liaison à la terre. Ne pas utiliser un adaptateur. Ne pas utiliser un câble de rallonge. Le non-respect de ces instructions peut causer un décès, un incendie ou un choc électrique. 2. Brancher sur une prise à 3 alvéoles reliée à la terre. 3. Réinstaller toutes les pièces - Whirlpool GI7FVCXWY | Owners Manual - Page 44
Charnières supérieures A B C D Enlèvement et réinstallation de la porte A. Vis du cache de la charnière B. Cache de la charnière supérieure C. Vis de charnière à tête hexagonale de 5/16" D. Charnière supérieure Charnières inférieures A B C A. Couvercle de l'axe de la charnière B. Charnière infé - Whirlpool GI7FVCXWY | Owners Manual - Page 45
UTILISATION DU RÉFRIGÉRATEUR Ouverture et fermeture des portes Il y a deux portes pour le compartiment de réfrigération. Les portes peuvent être ouvertes et fermées séparément ou ensemble. Il y a sur la porte de gauche du réfrigérateur un joint à charnière verticale. ■ Lors de l'ouverture de la - Whirlpool GI7FVCXWY | Owners Manual - Page 46
Commandes du congélateur S'assurer que CONGÉLATEUR est sélectionné. Les flèches vers le haut ou vers le bas sur l'écran d'affichage permettent d'ajuster la température du compartiment de congélation. La gamme de valeurs de réglage pour le congélateur va de -5°F à 5°F (-21°C à -15°C). ■ Appuyer sur - Whirlpool GI7FVCXWY | Owners Manual - Page 47
Volume sonore ■ Pour régler le volume de tous les signaux sonores du distributeur et des commandes, appuyer sur OPTIONS, puis RÉGLAGES, et enfin VOLUME. Sélectionner le volume souhaité puis attendre 15 secondes ou appuyer sur RETOUR. REMARQUE : Le fait de sélectionner SILENCE ne désactive pas l' - Whirlpool GI7FVCXWY | Owners Manual - Page 48
distribués. Cela peut entraîner un léger retard dans la distribution de glace concassée. Le bruit du broyeur de glaçons est normal et la dimension des morceaux de glace peut varier. Lorsqu'on passe du mode glace concassée au mode glaçons, quelques onces de glace concassée sont distribuées - Whirlpool GI7FVCXWY | Owners Manual - Page 49
Sélectionner le type de glace souhaité. AVERTISSEMENT Risque de coupure Utiliser un verre robuste pour prendre des glaçons. Le non-respect de cette instruction peut causer des coupures. 2. Appuyer un verre robuste contre la plaque du distributeur de glaçons OU placer le verre sous le distributeur de - Whirlpool GI7FVCXWY | Owners Manual - Page 50
Taux de production de glaçons ■ Accorder 24 heures pour produire le premier lot de glaçons. Jeter les trois premiers lots de glaçons produits. ■ La machine à glaçons devrait produire approximativement 40 lots de glaçons au cours d'une période de 24 heures. ■ Pour augmenter la production de glaçons, - Whirlpool GI7FVCXWY | Owners Manual - Page 51
ENTRETIEN DU RÉFRIGÉRATEUR Nettoyage AVERTISSEMENT Risque d'explosion Utiliser un produit de nettoyage ininflammable. Le non-respect de cette instruction peut causer un décès, une explosion ou un incendie. Les sections de réfrigération et de congélation se dégivrent automatiquement. Toutefois, - Whirlpool GI7FVCXWY | Owners Manual - Page 52
pour éviter le coût d'un appel de service. Aux É.-U., www.whirlpool.com Au Canada, www.whirlpool.ca Fonctionnement du réfrigérateur Le réfrig adaptateur. Ne pas utiliser un câble de rallonge. Le non-respect de ces instructions peut causer un décès, un incendie ou un choc électrique. ■ Le cordon d' - Whirlpool GI7FVCXWY | Owners Manual - Page 53
Température et humidité La température est trop élevée ■ S'agit-il d'une nouvelle installation? Attendre 24 heures après l'installation pour que le réfrigérateur se refroidisse complètement. ■ La/Les porte(s) est/sont-elle(s) fréquemment ouverte(s) ou laissée(s) ouverte(s)? Ceci permet à l'air chaud - Whirlpool GI7FVCXWY | Owners Manual - Page 54
Goût, odeur ou couleur grise des glaçons ■ Les raccords de plomberie sont-ils neufs? Des raccords de plomberie neufs peuvent causer une décoloration ou un mauvais goût des glaçons. ■ Les glaçons ont-ils été gardés trop longtemps? Jeter les glaçons. Laver le compartiment à glaçons. Attendre 24 heures - Whirlpool GI7FVCXWY | Owners Manual - Page 55
FEUILLE DE DONNÉES SUR LA PERFORMANCE Système de filtration d'eau intérieur Modèle UKF8001AXX-200 /Capacité : 200 gallons (757 litres) Système testé et certifié par NSF International en vertu de la norme NSF/ANSI 42 (réduction du goût et de l'odeur du chlore, et particules (classe I*)); et en vertu - Whirlpool GI7FVCXWY | Owners Manual - Page 56
où un fournisseur de services d'entretien ou de réparation Whirlpool autorisé n'est pas disponible. 10. La dépose et la réinstallation de votre gros appareil ménager si celui-ci est installé dans un endroit inaccessible ou n'est pas installé conformément aux instructions d'installation fournies par - Whirlpool GI7FVCXWY | Owners Manual - Page 57
du produit ou que vous souhaitez prendre un rendez-vous, vous pouvez contacter Whirlpool au numéro ci-dessous. Ayez votre numéro de modèle à la paroi interne du compartiment de réfrigération. Pour assistance ou service aux É.-U., composez le 1-800-253-1301. Au Canada, composez le 1-800- - Whirlpool GI7FVCXWY | Owners Manual - Page 58
rights reserved. ® Registered Trademark/TM Trademark of Whirlpool, U.S.A., Whirlpool Canada LP Licensee in Canada Printed in U.S.A. Todos los derechos reservados. ® Marca registrada/TM Marca de comercio de Whirlpool, U.S.A., usada bajo licencia de Whirlpool Canada LP en Canadá Impreso en EE.UU
-
 1
1 -
 2
2 -
 3
3 -
 4
4 -
 5
5 -
 6
6 -
 7
7 -
8
-
9
-
10
-
11
-
12
-
13
-
14
-
15
-
16
-
17
-
18
-
19
-
20
-
21
-
22
-
23
-
24
-
25
-
26
-
27
-
28
-
29
-
30
-
31
-
32
-
33
-
34
-
35
-
36
-
37
-
38
-
39
-
40
-
41
-
42
-
43
-
44
-
45
-
46
-
47
-
48
-
49
-
50
-
51
-
52
-
53
-
54
-
55
-
56
-
57
-
58
 |
 |
THANK YOU for purchasing this high-quality product. If you should experience a problem not covered in TROUBLESHOOTING,
please visit our website at
www.whirlpool.com
for additional information. If you still need assistance, call us at 1-800-253-1301.
In Canada, visit our website at
www.whirlpool.ca
or call us at 1-800-807-6777.
You will need your model and serial number, located on the inside wall of the refrigerator compartment.
REFRIGERATOR SAFETY
Table of Contents
/
Índice / Table des matières
REFRIGERATOR SAFETY
................................
1
INSTALLATION INSTRUCTIONS
.....................
2
REFRIGERATOR USE
.......................................
8
REFRIGERATOR CARE
..................................
13
TROUBLESHOOTING
.....................................
14
WATER FILTER CERTIFICATIONS
................
16
PERFORMANCE DATA SHEET
.....................
17
WARRANTY
.....................................................
18
SEGURIDAD DEL REFRIGERADOR
..............
19
INSTRUCCIONES DE INSTALACIÓN
............
20
USO DE SU REFRIGERADOR
........................
26
CUIDADO DE SU REFRIGERADOR
..............
31
SOLUCIÓN DE PROBLEMAS
........................
32
HOJA DE DATOS DEL RENDIMIENTO
.........
35
GARANTÍA
.......................................................
36
SÉCURITÉ DU RÉFRIGÉRATEUR
.................
38
INSTRUCTIONS D’INSTALLATION
...............
39
UTILISATION DU RÉFRIGÉRATEUR
.............
45
ENTRETIEN DU RÉFRIGÉRATEUR
...............
51
DÉPANNAGE
...................................................
52
FEUILLE DE DONNÉES
SUR LA PERFORMANCE
...............................
55
GARANTIE
.......................................................
56
®
REFRIGERATOR USER INSTRUCTIONS
W10322937A
You can be killed or seriously injured if you don't immediately
You
can be killed or seriously injured if you don't follow
All safety messages will tell you what the potential hazard is, tell you how to reduce the chance of injury, and tell you what can
happen if the instructions are not followed.
Your safety and the safety of others are very important.
We have provided many important safety messages in this manual and on your appliance. Always read and obey all safety
messages.
This is the safety alert symbol.
This symbol alerts you to potential hazards that can kill or hurt you and others.
All safety messages will follow the safety alert symbol and either the word “DANGER” or “WARNING.”
These words mean:
follow instructions.
instructions.
DANGER
WARNING