Whirlpool GJC3034RS Installation Guide
Whirlpool GJC3034RS - Electric Cooktop Manual
 |
UPC - 050946996974
View all Whirlpool GJC3034RS manuals
Add to My Manuals
Save this manual to your list of manuals |
Whirlpool GJC3034RS manual content summary:
- Whirlpool GJC3034RS | Installation Guide - Page 1
ELECTRIC COOKTOP INSTALLATION INSTRUCTIONS INSTRUCTIONS D'INSTALLATION DE LA TABLE DE CUISSON ÉLECTRIQUE Table of Contents / Table des matières COOKTOP SAFETY 1 INSTALLATION REQUIREMENTS 2 Tools and Parts 2 Location Requirements 2 Electrical Requirements 3 INSTALLATION INSTRUCTIONS 4 Prepare - Whirlpool GJC3034RS | Installation Guide - Page 2
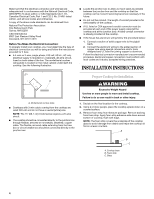
manufacturer's Installation Instructions for approval for built-in undercounter use and proper cutout dimensions. ■ When installing cooktop over an undercounter built-in oven, do not fasten cooktop to countertop with clamps. This will make the cooktop easier to remove if future servicing becomes - Whirlpool GJC3034RS | Installation Guide - Page 3
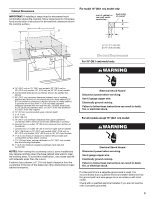
to the top of the drawer (or other obstruction) in base cabinet is required. Electrical Shock Hazard Disconnect power before servicing. Use 12 gauge copper wire. Electrically ground cooktop. Failure to follow these instructions can result in death, fire, or electrical shock. For all models except - Whirlpool GJC3034RS | Installation Guide - Page 4
joining copper to aluminum. Follow the electrical connector manufacturer's recommended procedure. Aluminum/copper connection must conform with local codes and industry accepted wiring practices. INSTALLATION INSTRUCTIONS A A. Model/serial number plate ■ Cooktops with 3-wire cable coming from the - Whirlpool GJC3034RS | Installation Guide - Page 5
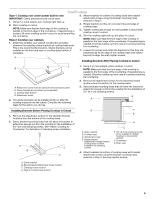
bracket mounting holes that will allow the bracket to extend far enough out from the cooktop for the installation of 2½" (6.4 cm) clamping screws. G A Installing Brackets Before Placing Cooktop in Cutout 1. Remove the attachment screws for the selected bracket locations from the bottom of the - Whirlpool GJC3034RS | Installation Guide - Page 6
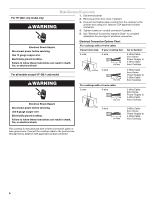
installation for your type of electrical connection. Electrical Shock Hazard Disconnect power before servicing. Use 12 gauge copper wire. Electrically ground cooktop. Failure to follow these instructions can result in death, fire, or electrical shock. For all models except 15" (38.1 cm) model - Whirlpool GJC3034RS | Installation Guide - Page 7
cable wires to the white (neutral) wire in the junction box using the UL listed wire connectors. 4. Install junction box cover. 4-Wire Cable from Home Power Supply to 3-Wire Cable from Cooktop IMPORTANT: Use the 4-wire cable from home power supply in the U.S. where local codes do not allow grounding - Whirlpool GJC3034RS | Installation Guide - Page 8
power. NOTE: If the cooktop does not work after turning on the power, check that a circuit breaker has not tripped or a household fuse has not blown. See "Troubleshooting" section in the Use and Care Guide for further information. If you need Assistance or Service: Please reference the "Assistance - Whirlpool GJC3034RS | Installation Guide - Page 9
tard en cas de nécessité de réparation. ■ Utiliser les dimensions d'ouverture du plan de travail qui sont indiquées dans ces Instructions d'installation. Les dimensions données sont les espacements minimaux et fournissent un dégagement de 0" (0 cm). ■ Une source d'électricité avec liaison à la terre - Whirlpool GJC3034RS | Installation Guide - Page 10
cm) B A C A. 22¹⁄₈" (56,1 cm) B. 16 42,1 cm) 30 77,1 cm) 36 92,3 cm) C. 2⁷⁄₈" (7,3 cm) Dimensions du placard IMPORTANT : En cas d'installation d'une hotte ou d'un ensemble hotte/micro-ondes au-dessus de la table de cuisson, suivre les instructions fournies avec la hotte ou l'ensemble hotte - Whirlpool GJC3034RS | Installation Guide - Page 11
installer la table de cuisson correctement, il faut établir le type de raccords électriques que l'on utilisera et suivre les instructions fils sont appropriés et conformes au National Electrical Code, à la norme ANSI/NFPA 70 38,1 cm) nécessite un circuit de 20 ampères. ■ La table de cuisson doit ê - Whirlpool GJC3034RS | Installation Guide - Page 12
de personnes pour déplacer et installer la table de cuisson. Le non-respect de cette instruction peut causer une blessure au dos la table de cuisson. Il s'agit de l'emplacement recommandé. Des brides de fixation peuvent être installées à l'avant et à l'arrière de la partie inférieure de la base de - Whirlpool GJC3034RS | Installation Guide - Page 13
et qu'elles dépassent de son bord. Bien serrer les vis. Installation des brides après avoir positionné la table de cuisson dans l'ouverture. 8. Relier la table de cuisson à la terre. Le non-respect de ces instructions peut causer un décès, un incendie ou un choc électrique. Un conducteur vert ou - Whirlpool GJC3034RS | Installation Guide - Page 14
aux États-Unis lorsque les codes ne permettent pas la mise à la terre par l'intermédiaire du conducteur neutre, en cas de nouvelle installation avec alimentation par un circuit secondaire (1996 NEC), dans les résidences mobiles et les véhicules récréatifs, dans les nouvelles constructions, et au - Whirlpool GJC3034RS | Installation Guide - Page 15
blanc de la table de cuisson au conducteur blanc (neutre) dans le boîtier de connexion avec les connecteurs de fils (homologation UL). 4. Installer le couvercle du boîtier de connexion. Câble à 4 conducteurs depuis le point de distribution du domicile avec câble à 3 conducteurs depuis la table de - Whirlpool GJC3034RS | Installation Guide - Page 16
de fixation (dépassant suffisamment de la base de la table de cuisson pour permettre l'installation des vis de fixation) E. Vis de fixation de 2½" (6,4 cm) F. Plan avez besoin d'assistance ou de service : Consulter la section "Assistance ou service" du Guide d'utilisation et d'entretien ou contacter
-
 1
1 -
 2
2 -
 3
3 -
 4
4 -
 5
5 -
 6
6 -
 7
7 -
8
-
9
-
10
-
11
-
12
-
13
-
14
-
15
-
16
 |
 |

ELECTRIC COOKTOP INSTALLATION INSTRUCTIONS
INSTRUCTIONS D'INSTALLATION
DE LATABLE DE CUISSON ÉLECTRIQUE
COOKTOP SAFETY
8286066B
Table of Contents / Table des matières
COOKTOP SAFETY
.............................................................
1
INSTALLATION REQUIREMENTS
.....................................
2
Tools and Parts
..................................................................
2
Location Requirements
.....................................................
2
Electrical Requirements
.....................................................
3
INSTALLATION INSTRUCTIONS
.......................................
4
Prepare Cooktop for Installation
.......................................
4
Install Cooktop
...................................................................
5
Make Electrical Connection
...............................................
6
Attach Cooktop to Countertop
..........................................
8
Complete Installation
.........................................................
8
SÉCURITÉ DE LA TABLE DE CUISSON
....................................
9
EXIGENCES D’INSTALLATION
...................................................
9
Outillage et pièces
......................................................................
9
Exigences d’emplacement
.........................................................
9
Spécifications électriques
........................................................
11
INSTRUCTIONS D’INSTALLATION
..........................................
12
Préparation de la table de cuisson pour l’installation
..............
12
Installation de la table de cuisson
............................................
12
Raccordement électrique
.........................................................
13
Fixation de la table de cuisson au plan de travail
....................
16
Achever l’installation
................................................................
16
You can be killed or seriously injured if you don't immediately
You
can be killed or seriously injured if you don't follow
All safety messages will tell you what the potential hazard is, tell you how to reduce the chance of injury, and tell you what can
happen if the instructions are not followed.
Your safety and the safety of others are very important.
We have provided many important safety messages in this manual and on your appliance. Always read and obey all safety
messages.
This is the safety alert symbol.
This symbol alerts you to potential hazards that can kill or hurt you and others.
All safety messages will follow the safety alert symbol and either the word “DANGER” or “WARNING.”
These words mean:
follow instructions.
instructions.
DANGER
WARNING
IMPORTANT:
Save for local electrical inspector's use.
Installer:
Leave installation instructions with the homeowner.
Homeowner:
Keep installation instructions for future reference.
IMPORTANT :
À conserver pour consultation par l'inspecteur local des installations électriques.
Installateur :
Remettre les instructions d'installation au propriétaire.
Propriétaire :
Conserver les instructions d'installation pour référence ultérieure.