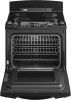
Whirlpool GR556LRKB Installation Instructions
Whirlpool GR556LRKB Manual
 |
View all Whirlpool GR556LRKB manuals
Add to My Manuals
Save this manual to your list of manuals |
Whirlpool GR556LRKB manual content summary:
- Whirlpool GR556LRKB | Installation Instructions - Page 1
future reference. Save Installation Instructions for local electrical inspector's use. www.whidpool.com Write down the model and serial numbers before installing range. Both numbers are on the model/serial rating plate, located on the oven frame behind the door. Model # Serial # Part No. 9755129 - Whirlpool GR556LRKB | Installation Instructions - Page 2
many important safety messages in this manual and on your appliance. Always read and obey all safety and tell you what can happen if the instructions are not followed. Important: Observe all governing or CSA Standard C22.1, Canadian Electrical Code, Part 1 -latest edition**, and all local codes - Whirlpool GR556LRKB | Installation Instructions - Page 3
Electrical Shock Hazard Electrically ground range. Failure to follow these instructions can result in death, fire, or electrical shock. If /NFPA 70 -- latest edition* or CSA Standard C22.1, Canadian Electrical Code, Part 1 -- latest edition** and all local codes and ordinances for the kilowatt - Whirlpool GR556LRKB | Installation Instructions - Page 4
three feet of slack in the line so that it can be moved if servicing is ever necessary. A U.L.-listed conduit connector must be provided at each the appliance. Electrical Shock Hazard Turn power supply off before connecting wires. Electrically ground range. Failure to follow these instructions can - Whirlpool GR556LRKB | Installation Instructions - Page 5
the terminal block cover. Electrical Shock Hazard Turn power supply off before connecting wires. Electrically ground range. Failure to follow these instructions can result in death, fire, or electrical shock. This range must be connected to a grounded, metallic, permanent wiring system, or - Whirlpool GR556LRKB | Installation Instructions - Page 6
cardboard bottom and shipping base under range. Remove oven racks and parts package from inside oven. :,cardboard corners • Take 4 cardsbpoaacredrs . Place corners lengthwise on the floor in back of range so corners wilt support outer side edges of range as shown. Excessive Weight Hazard Use two or - Whirlpool GR556LRKB | Installation Instructions - Page 7
foot• Reconnect the anti-tip bracket, if the range is moved. Failure to follow these instructions can result in death or serious burns to children and adults. 25" (63.5 cm appear in the clock display. Refer to Use and Care Guide for information on electronic controls. 1. or Remove cardboard hardboard - Whirlpool GR556LRKB | Installation Instructions - Page 8
_See Use and Care Guide for troubleshooting list. Note: Refer to Use and Care Guide for operating and cleaning instructions. If you need appliance. The dealer is listed in the Yellow Pages of your phone directory under "Appliances -Household -- Major -- Service and Repair." If you need service
-
 1
1 -
 2
2 -
 3
3 -
 4
4 -
 5
5 -
 6
6 -
 7
7 -
8
 |
 |

Installation Instructions
Tip Over Hazard
A child or adult can tip the range and
be killed.
Connect anti-tip bracket to rear
range
foot.
Reconnect the anti-tip bracket if the
range is moved.
Failure to
follow
these instructions
can result in death or serious burns
to children and adults.
IMPORTANT:
Readandsavethese
instructions.
IMPORTANT:
Installer:
Leave Installation
Instructions with the homeowner.
Homeowner:
Keep Installation
Instructions for future reference.
Save Installation Instructions for local
electrical inspector's use.
www.whidpool.com
Write down the model and serial numbers
before installing range.
Both numbers are on the model/serial
rating plate, located on the oven frame
behind the door.
Model
#
Serial #
Part No. 9755129