Whirlpool GS563LXSB Installation Instructions
Whirlpool GS563LXSB Manual
 |
View all Whirlpool GS563LXSB manuals
Add to My Manuals
Save this manual to your list of manuals |
Whirlpool GS563LXSB manual content summary:
- Whirlpool GS563LXSB | Installation Instructions - Page 1
3 Tools and Parts 3 Location Requirements 3 Electrical Requirements 5 Gas Supply Requirements 5 INSTALLATION INSTRUCTIONS 7 Unpack Range 7 Install Anti-Tip Bracket 7 Verify Anti-Tip Bracket Location 8 Level Range 8 Make Gas Connection 9 Electronic Ignition System 10 Replace Oven Racks and - Whirlpool GS563LXSB | Installation Instructions - Page 2
to light any appliance. • Do not touch any electrical switch. • Do not use any phone in your building. • Immediately call your gas supplier from a neighbor's phone. Follow the gas supplier's instructions. • If you cannot reach your gas supplier, call the fire department. - Installation and service - Whirlpool GS563LXSB | Installation Instructions - Page 3
Tools and Parts Gather the required tools and parts before starting installation. Read and follow the instructions provided with plywood under range if installing range over carpeting. IMPORTANT: Some cabinet and building materials are not designed to withstand the heat produced by the oven for - Whirlpool GS563LXSB | Installation Instructions - Page 4
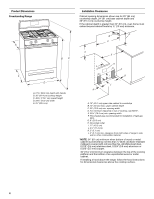
see NOTE*. E. 30¹⁄₈" (76.5 cm) min. opening width F. This shaded area recommended for installation of rigid gas pipe. G. 8" (20.3 cm) H. Grounded outlet I. 17" (43.2 cm) J. . If installing a hood above the range, follow the hood instructions for dimensional clearances above the cooktop surface. 4 - Whirlpool GS563LXSB | Installation Instructions - Page 5
. Install a shut-off valve. Securely tighten all gas connections. If connected to LP, have a qualified person make sure gas pressure does not exceed 14" (36 cm) water column. Examples of a qualified person include: licensed heating personnel, authorized gas company personnel, and authorized service - Whirlpool GS563LXSB | Installation Instructions - Page 6
gas: Minimum pressure: 11" WCP Maximum pressure: 14" WCP Contact local gas supplier if you are not sure about the inlet pressure. Burner Input Requirements Input ratings shown on the model range must be isolated from the gas supply piping system by closing its individual manual shutoff valve during - Whirlpool GS563LXSB | Installation Instructions - Page 7
INSTRUCTIONS Unpack Range WARNING Excessive Weight Hazard Use two or more people to move and install range. Failure to do so can result in back or other injury. Install Anti-Tip Bracket WARNING 1. Remove shipping materials, tape and protective film from range. Remove oven racks and parts - Whirlpool GS563LXSB | Installation Instructions - Page 8
clear white wheels in drawer guides. Remove drawer and set it aside on a protected surface. See the Use and Care Guide for the model drawer removal. To mount . 11. Continue installing your range using the following installation instructions. If range is not level, pull range forward until rear - Whirlpool GS563LXSB | Installation Instructions - Page 9
to tighten, connect the gas supply to the range. B C D A F E Complete Connection 1. Check that the gas pressure regulator shutoff valve is in the "on" position. A A. Gas pressure regulator shutoff valve 2. Open the manual shutoff valve in the gas supply line. The valve is open when the handle - Whirlpool GS563LXSB | Installation Instructions - Page 10
to the "LITE" position, the system creates a spark to light the burner. This sparking continues, as long as the control knob is turned to "LITE." When the oven control is turned to the desired setting, sparking occurs and ignites the gas. Check Operation of Cooktop Burners Standard Surface Burners - Whirlpool GS563LXSB | Installation Instructions - Page 11
supply is connected. s See "Troubleshooting" in the Use and Care Guide. 9. When the range has been on for 5 minutes, check for heat. If range is cold, turn the range off and check that the gas supply line shutoff valve is open. s If the gas supply line shutoff valve is closed, open it, then - Whirlpool GS563LXSB | Installation Instructions - Page 12
to follow these instructions can result in death or serious burns to children and adults. To Convert Gas Pressure Regulator 1. Turn the manual shutoff valve to the closed position. Unplug range or disconnect power. B A C A. To range B. Manual shutoff valve "closed" position C. Gas supply line 12 - Whirlpool GS563LXSB | Installation Instructions - Page 13
size (preset at factory for Natural gas) D. LP gas: decrease gas - decrease flame size B A. Orifice spud B. Orifice spud holder C. Screw D. Spark electrode 4. Remove the cardboard orifice spud holder located on the back of the range near the gas inlet. Gas orifice spuds are stamped with a number - Whirlpool GS563LXSB | Installation Instructions - Page 14
as distinct as the inner cone. LP gas flames have a slightly yellow tip. 3. Refer to "Complete Installation" in the "Installation Instructions" section of this manual to complete this procedure. Convert from LP Gas to Natural Gas WARNING NOTE: On models with a warming drawer, an access cover must - Whirlpool GS563LXSB | Installation Instructions - Page 15
to adjust the "LO" setting for each cooktop burner. Checking for proper cooktop, bake and broil burner flame is very important. Natural gas flames do not have yellow tips. 3. Refer to "Complete Installation" in the "Installation Instructions" section of this manual to complete this procedure. 15 - Whirlpool GS563LXSB | Installation Instructions - Page 16
le fournisseur de gaz d'un téléphone voisin. Suivre ses instructions. • À défaut de joindre votre fournisseur de gaz, appeler les pompiers. - L'installation et l'entretien doivent être effectués par un installateur qualifié, une agence de service ou le fournisseur de gaz. AVERTISSEMENT Risque de - Whirlpool GS563LXSB | Installation Instructions - Page 17
Outillage et pièces Avant d'entreprendre l'installation, rassembler tous les outils et le matériel nécessaires. Lire et suivre les instructions fournies avec les outils indiqués ici. Outillage nécessaire s Mètre-ruban s Ruban adhésif de masquage s Tournevis à lame plate s Composé d'étanch - Whirlpool GS563LXSB | Installation Instructions - Page 18
Part 280). Lorsque cette norme n'est pas applicable, l'installation doit satisfaire aux critères de la norme Standard for Manufactured Home Installations métal non protégé. En cas d'installation d'une hotte au-dessus de la cuisinière, suivre les instructions fournies avec la hotte concernant les - Whirlpool GS563LXSB | Installation Instructions - Page 19
instructions peut causer un décès, une explosion ou un incendie. Observer toutes les prescriptions des codes et règlements en vigueur. IMPORTANT : L'installation , l'installation doit satisfaire aux prescriptions de la plus récente édition du code national en vigueur : National Fuel Gas Code ANSI - Whirlpool GS563LXSB | Installation Instructions - Page 20
une canalisation de gaz rigide de ¾" (1,9 cm) jusqu'à l'emplacement d'installation de la cuisinière. L'emploi d'une canalisation de plus petit diamètre ou plus longue peut susciter une déficience du débit d'alimentation. On doit utiliser - Whirlpool GS563LXSB | Installation Instructions - Page 21
Déballage de la cuisinière AVERTISSEMENT Risque du poids excessif Utiliser deux ou plus de personnes pour déplacer et installer la cuisinière. Le non-respect de cette instruction peut causer une blessure au dos ou d'autre blessure. 1. Ôter les matériaux d'emballage, le ruban adhésif et le - Whirlpool GS563LXSB | Installation Instructions - Page 22
Retirer le tiroir et le poser sur une surface protégée. Voir le Guide d'utilisation et d'entretien pour l'enlèvement du tiroir modèle. section "Exigences d'emplacement". 11. Poursuivre l'installation de la cuisinière en utilisant les instructions d'installation suivantes. Si la cuisinière n'est - Whirlpool GS563LXSB | Installation Instructions - Page 23
pas enlever la broche de liaison à la terre. Ne pas utiliser un adaptateur. Ne pas utiliser un câble de rallonge. Le non-respect de ces instructions peut causer un décès, un incendie ou un choc électrique. 5. Brancher sur une prise à 3 alvéoles reliée à la terre. 23 - Whirlpool GS563LXSB | Installation Instructions - Page 24
un petit tournevis à lame plate pour faire tourner la vis située au centre de la tige de commande; ajuster les flammes à la taille désirée. 3. Réinstaller le bouton de commande. 4. Tester le fonctionnement du brûleur : faire passer le bouton de commande de la position "LO" (bas) à la position "HI - Whirlpool GS563LXSB | Installation Instructions - Page 25
pour l'allumage des brûleurs du four et du gril. Consulter le Guide d'utilisation et d'entretien pour le bon fonctionnement des commandes du four. de blocage 4. Appuyer sur la touche CANCEL/OFF (annulation/arrêt). 5. Réinstaller le répartiteur de flammes et la plaque de couverture du brûleur de four - Whirlpool GS563LXSB | Installation Instructions - Page 26
et pousser fermement pour fermer. Achever l'installation 1. Vérifier que toutes les pièces sont maintenant installées. S'il reste une ou le brûleur du four. Pour des instructions spécifiques concernant l'utilisation de la cuisinière, consulter le Guide d'utilisation et d'entretien. Si la cuisinière - Whirlpool GS563LXSB | Installation Instructions - Page 27
Avec un tournevis Quadrex® ou Phillips, enlever la base du brûleur. REMARQUE : Réinstaller l'une des vis à travers la table de cuisson pour qu'elle maintienne le porte- sens antihoraire puis soulever pour l'enlever. Conserver à part le gicleur du brûleur. C A D B A. Gicleur B. Porte-gicleur C. - Whirlpool GS563LXSB | Installation Instructions - Page 28
soulever légèrement l'avant du tiroir et pousser fermement pour fermer. Achever l'installation 1. Pour le raccordement correct de la cuisinière à la canalisation de gaz Voir le paragraphe "Achever l'installation" de la section "Instructions d'installation" du présent manuel pour la fin du processus - Whirlpool GS563LXSB | Installation Instructions - Page 29
cuisinière est déplacée. Le non-respect de ces instructions peut causer un décès ou des brûlures graves aux , enlever la base du brûleur. REMARQUE : Réinstaller l'une des vis à travers la table de cuisson antihoraire et soulever pour enlever le gicleur. Conserver à part le gicleur du brûleur. C A D - Whirlpool GS563LXSB | Installation Instructions - Page 30
alimenté au gaz naturel ne comportent pas de pointe jaune. 3. Voir la section "Achever l'installation" dans la section "Instructions d'installation" du présent manuel pour achever l'installation. A A. Gicleur B. Broche C. Gaz naturel : augmentation du débit de gaz augmentation de la taille des - Whirlpool GS563LXSB | Installation Instructions - Page 31
Notes 31 - Whirlpool GS563LXSB | Installation Instructions - Page 32
Bord supérieur Use this template to anchor the left rear leg of range. Utiliser ce gabarit pour ancrer le pied arrière gauche de la cuisini la bride 9762997 © 2005 Whirlpool Corporation. All rights reserved. ® Registered Trademark/TM Trademark of Whirlpool, U.S.A., Whirlpool Canada LP Licensee in
-
 1
1 -
 2
2 -
 3
3 -
 4
4 -
 5
5 -
 6
6 -
 7
7 -
8
-
9
-
10
-
11
-
12
-
13
-
14
-
15
-
16
-
17
-
18
-
19
-
20
-
21
-
22
-
23
-
24
-
25
-
26
-
27
-
28
-
29
-
30
-
31
-
32
 |
 |

INSTALLATION INSTRUCTIONS
30" (76.2 CM) FREESTANDING GAS RANGES
INSTRUCTIONS POUR L’INSTALLATION DES CUISINIÈRES
À GAZ AUTOPORTANTES DE 30" (76,2 CM)
Table of Contents
Table des mati
è
res
RANGE SAFETY
...............................................
2
INSTALLATION REQUIREMENTS
..................
3
Tools and Parts
.............................................
3
Location Requirements
.................................
3
Electrical Requirements
................................
5
Gas Supply Requirements
............................
5
INSTALLATION INSTRUCTIONS
....................
7
Unpack Range
...............................................
7
Install Anti-Tip Bracket
..................................
7
Verify Anti-Tip Bracket Location
...................
8
Level Range
...................................................
8
Make Gas Connection
..................................
9
Electronic Ignition System
..........................
10
Replace Oven Racks and
Storage or Warming Drawer
.......................
11
Complete Installation
..................................
11
GAS CONVERSIONS
.....................................
12
Convert from Natural Gas to LP Gas
..........
12
Replace Oven Racks and
Storage or Warming Drawer
.......................
13
Complete Installation
..................................
14
Convert from LP Gas to Natural Gas
..........
14
Replace Oven Racks and
Storage or Warming Drawer
.......................
15
Complete Installation
..................................
15
ANTI-TIP BRACKET TEMPLATE
.................
32
SÉCURITÉ DE LA CUISINIÈRE
.....................
16
EXIGENCES D’INSTALLATION
.....................
17
Outillage et pièces
.......................................
17
Emplacement d’installation
.........................
17
Spécifications électriques
............................
19
Spécifications de l’alimentation en gaz
.......
19
INSTRUCTIONS D’INSTALLATION
..............
21
Déballage de la cuisinière
............................
21
Installation de la bride antibasculement
......
21
Vérification de l'emplacement
de la bride antibasculement
........................
22
Mise à niveau de la cuisinière
......................
22
Raccordement à la canalisation de gaz
......
23
Système d'allumage électronique
...............
24
Réinstallation des grilles du four et du
tiroir de remisage ou du tiroir-réchaud
.......
26
Achever l’installation
....................................
26
CONVERSIONS POUR
CHANGEMENT DE GAZ
................................
26
Conversion de Gaz naturel à Propane
........
26
Réinstallation des grilles du four et du
tiroir de remisage ou du tiroir-réchaud
........
28
Achever l'installation
....................................
28
Conversion de Propane à Gaz naturel
........
29
Réinstallation des grilles du four et du
tiroir de remisage ou du tiroir-réchaud
.......
30
Achever l'installation
....................................
30
GABARIT POUR LA BRIDE
ANTIBASCULEMENT
....................................
32
IMPORTANT:
Save for local electrical inspector's use.
Installer:
Leave installation instructions with the homeowner.
Homeowner:
Keep installation instructions for future reference.
IMPORTANT :
À conserver pour consultation par l'inspecteur local des installations électriques.
Installateur :
Remettre les instructions d'installation au propriétaire.
Propriétaire :
Conserver les instructions d'installation pour référence ultérieure.
9762997