Whirlpool GW399LXUQ Installation Instructions
Whirlpool GW399LXUQ - 30" Slide-In Gas Range Manual
 |
UPC - 883049127842
View all Whirlpool GW399LXUQ manuals
Add to My Manuals
Save this manual to your list of manuals |
Whirlpool GW399LXUQ manual content summary:
- Whirlpool GW399LXUQ | Installation Instructions - Page 1
INSTALLATION INSTRUCTIONS 30" (76.2 CM) SLIDE-IN GAS RANGES INSTRUCTIONS POUR L'INSTALLATION DES CUISINIÈRES À GAZ ENCASTRABLES DE 30" (76,2 CM) Table of Contents/Table des matières RANGE SAFETY 2 INSTALLATION REQUIREMENTS 3 Tools and Parts 3 Location Requirements 3 Electrical Requirements 5 - Whirlpool GW399LXUQ | Installation Instructions - Page 2
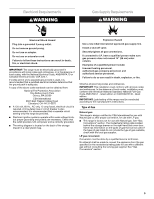
from a neighbor's phone. Follow the gas supplier's instructions. • If you cannot reach your gas supplier, call the fire department. - Installation and service must be performed by a qualified installer, service agency or the gas supplier. WARNING: Gas leaks cannot always be detected by smell - Whirlpool GW399LXUQ | Installation Instructions - Page 3
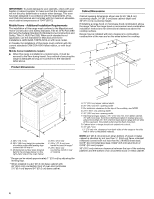
and ventilation air. ■ It is the installer's responsibility to comply with installation clearances specified on the model/serial rating plate. The model/serial rating plate is located behind the storage drawer on the right-hand side of the oven frame. ■ The range should be located for convenient use - Whirlpool GW399LXUQ | Installation Instructions - Page 4
Cabinet opening dimensions shown are for 25" (64.0 cm) countertop depth, 24" (61.0 cm) base cabinet depth and 36" (91.4 cm) countertop height. If installing a range hood or microwave hood combination above the range, follow the range hood or microwave hood combination installation instructions for - Whirlpool GW399LXUQ | Installation Instructions - Page 5
the manufacturer's instructions. Type of Gas Natural gas: This range is design-certified by CSA International for use with Natural gas or, after proper conversion, for use with LP gas. ■ This range is factory set for use with Natural gas. See "Gas Conversions" section. The model/serial rating plate - Whirlpool GW399LXUQ | Installation Instructions - Page 6
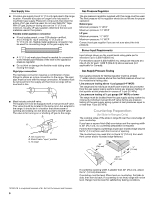
Canada). Gas Supply Pressure Testing Gas supply pressure for testing regulator must be at least 1" water column pressure above the manifold pressure shown on the model/serial rating plate. Line pressure testing above ½ psi gauge (14" WCP) The range 30" (76.2 cm), adjust the ³⁄₈" (1.0 cm) dimension. - Whirlpool GW399LXUQ | Installation Instructions - Page 7
INSTRUCTIONS Unpack Range WARNING WARNING Excessive Weight Hazard Use two or more people to move and install range. Failure to do so can result in back or other injury. 1. Remove shipping materials, tape and film from the range. Keep cardboard bottom under range. 2. Remove oven racks and parts - Whirlpool GW399LXUQ | Installation Instructions - Page 8
. Install a shut-off valve. Securely tighten all gas connections. If connected to LP, have a qualified person make sure gas pressure does not exceed 14" (36 cm) water column. Examples of a qualified person include: licensed heating personnel, authorized gas company personnel, and authorized service - Whirlpool GW399LXUQ | Installation Instructions - Page 9
-tip bracket is installed, use a flashlight and look underneath the bottom of the range. ■ Look for the anti-tip bracket securely attached to floor or wall. ■ Slide range back so rear range foot is under anti-tip bracket. Level Range 1. Place oven rack in oven. 2. Place level on oven rack and check - Whirlpool GW399LXUQ | Installation Instructions - Page 10
knob. Hold the knob stem in the low position using a pair of pliers. Use an ¹⁄₈" (3.0 mm) flat-blade screwdriver to turn the screw located in the center of the control knob stem until the flame is the proper size. A. Oven bake burner cover B. Oven bake burner cover screws 5. Press BAKE. "BAKE - Whirlpool GW399LXUQ | Installation Instructions - Page 11
the gas supply line shutoff valve is open, press the CANCEL button on the oven control panel and contact a qualified technician. If you need Assistance or Service: Please reference the "Assistance or Service" section of the Use and Care Guide or contact the dealer from whom you purchased your range - Whirlpool GW399LXUQ | Installation Instructions - Page 12
installer. To Convert Gas Pressure Regulator WARNING 1. Remove oven racks from inside the oven cavity. 2. Remove the storage drawer. See "Replace Oven Racks and Storage Drawer" section. 3. Remove the oven door. See "Oven Door" section in the Use and Care Guide for oven door removal instructions - Whirlpool GW399LXUQ | Installation Instructions - Page 13
To Convert Oven Bake Burner 1. Locate the oven orifice hood from the front of the range. 2 A. Access panel screws 9. Locate gas pressure regulator . A B A. Number 49 Natural gas oven bake burner orifice hood 3. Install the Number .0512 LP gas oven bake burner orifice hood, turning it clockwise - Whirlpool GW399LXUQ | Installation Instructions - Page 14
hood and reinstall using 2 screws. 4. Install the green Number .0430 LP gas oven broil burner orifice hood, turning it clockwise 4 or 5 turns. Do not overtighten. .0430 A A B A. Oven bake burner B. Oven bake burner orifice hood 5. Reinstall access panel and oven bake burner cover. To Convert - Whirlpool GW399LXUQ | Installation Instructions - Page 15
grates. 11. Reinstall storage drawer. See the "Replace Oven Racks and Storage Drawer" section for instructions. 12. Reinstall oven door. See the "Oven Door" section of the Use and Care Guide. 13. Complete installation. See "Make Gas Connection" and "Electronic Ignition System" sections. Checking for - Whirlpool GW399LXUQ | Installation Instructions - Page 16
back into place. Do not overtighten. To Convert Oven Bake Burner 1. Locate the oven orifice hood from the front of the range. 2 IMPORTANT: Do not remove the gas pressure regulator. 2. Using an adjustable wrench, turn the Number .0512 LP gas oven bake burner orifice hood counterclockwise to remove - Whirlpool GW399LXUQ | Installation Instructions - Page 17
Number .0430 LP gas oven broil burner orifice hood 4. Install the Number 52 Natural gas oven broil burner orifice hood, turning it clockwise 4 or 5 turns. Do not overtighten. 52 A A B A. Oven bake burner B. Oven bake burner orifice hood 5. Reinstall access panel and oven bake burner cover. To - Whirlpool GW399LXUQ | Installation Instructions - Page 18
grates. 11. Reinstall storage drawer. See the "Replace Oven Racks and Storage Drawer" section for instructions. 12. Reinstall oven door. See the "Oven Door" section of the Use and Care Guide. 13. Complete installation. See "Make Gas Connection" and "Electronic Ignition System" sections. Checking for - Whirlpool GW399LXUQ | Installation Instructions - Page 19
de gaz à partir du téléphone d'un voisin. Suivre ses instructions. • À défaut de joindre votre fournisseur de gaz, appeler les pompiers. - L'installation et l'entretien doivent être effectués par un installateur qualifié, une agence de service ou le fournisseur de gaz. AVERTISSEMENT : L'odorat ne - Whirlpool GW399LXUQ | Installation Instructions - Page 20
-respect de ces instructions peut causer un décès ou des brûlures graves aux enfants et aux adultes. EXIGENCES D'INSTALLATION Outillage et piè installation de la cuisinière doivent être scellées. ■ Respecter les dimensions indiquées pour les ouvertures à découper dans les placards. Ces dimensions - Whirlpool GW399LXUQ | Installation Instructions - Page 21
and Safety, Title 24, HUD Part 280). Lorsque cette norme n'est pas applicable, l'installation doit satisfaire aux critères de la norme Standard for Manufactured Home Installations, ANSI A225.1/NFPA 501A ou aux dispositions des codes locaux. Au Canada, l'installation de cette cuisinière doit - Whirlpool GW399LXUQ | Installation Instructions - Page 22
instructions peut causer un décès, une explosion ou un incendie. Observer toutes les prescriptions des codes et règlements en vigueur. IMPORTANT : L'installation local, l'installation doit satisfaire aux prescriptions de la plus récente édition du code national en vigueur : National Fuel Gas Code - Whirlpool GW399LXUQ | Installation Instructions - Page 23
jusqu'à l'emplacement d'installation de la cuisinière 304,8 m) au-dessus du niveau de la mer (pas applicable au Canada). Tests de pressurisation de la canalisation de gaz On doit tester le dans le plan de travail est de plus de 30" (76,2 cm), ajuster la dimension de ³⁄₈" (1 cm). Il faut que le plan - Whirlpool GW399LXUQ | Installation Instructions - Page 24
INSTRUCTIONS D'INSTALLATION Déballage de la cuisinière AVERTISSEMENT Risque du poids excessif Ceci doit être effectué alors que la cuisinière repose sur sa partie postérieure ou qu'elle est supportée par 2 pieds après avoir été replacée en position verticale. REMARQUE : Pour placer à nouveau la - Whirlpool GW399LXUQ | Installation Instructions - Page 25
une canalisation neuve d'arrivée de gaz approuvée par la CSA International. Installer un robinet d'arrêt. Bien serrer chaque organe de connexion de la gaz, et le personnel d'entretien autorisé. Le non-respect de ces instructions peut causer un décès, une explosion ou un incendie. Montage au mur - Whirlpool GW399LXUQ | Installation Instructions - Page 26
le tiroir de remisage. 4. Pour s'assurer que la bride antibasculement est bien installée : ■ Vérifier que la bride antibasculement est bien fixée au plancher ou un câble de rallonge. Le non-respect de ces instructions peut causer un décès, un incendie ou un choc électrique. 4. Brancher sur une prise à 3 - Whirlpool GW399LXUQ | Installation Instructions - Page 27
à ce stade un brûleur ne s'allume pas, tourner les boutons de commande à la position "OFF" et contacter le revendeur ou un dépanneur agréé. 3. Réinstaller le bouton de commande. 4. Tester le fonctionnement du brûleur : faire passer le bouton de commande de la position "LO" (basse) à la position "HI - Whirlpool GW399LXUQ | Installation Instructions - Page 28
te. Achever l'installation 1. Vérifier que toutes les pièces sont maintenant installées. S'il Pour des instructions spécifiques concernant l'utilisation de la cuisinière, consulter le Guide d'utilisation et de service : Veuillez consulter la section "Assistance ou service" dans le Guide d'utilisation - Whirlpool GW399LXUQ | Installation Instructions - Page 29
érieur du four. 2. Retirer le tiroir de remisage. Voir la section "Réinstallation des grilles du four et du tiroir de remisage". 3. Retirer la porte du four. Voir la section "Porte du four" du Guide d'utilisation et d'entretien pour des instructions de démontage de la porte du four. 4. À l'aide d'un - Whirlpool GW399LXUQ | Installation Instructions - Page 30
et retirer le couvercle de plastique. A B A. Gicleur du brûleur principal au gaz naturel numéro 49 3. Installer le gicleur du brûleur principal au gaz propane numéro .0512 en le tournant dans le sens horaire de numéro .0512 A. Position gaz naturel B. Position propane C. Couvercle de plastique 30 - Whirlpool GW399LXUQ | Installation Instructions - Page 31
4. Positionner le brûleur principal sur son gicleur et le fixer à l'aide de 2 vis. 4. Installer le gicleur vert du brûleur du gril au gaz propane numéro .0430 en le vissant dans le sens horaire de 4 ou 5 tours. Ne - Whirlpool GW399LXUQ | Installation Instructions - Page 32
des grilles du four et du tiroir de remisage" pour les instructions. 12. Réinstaller la porte du four. Voir la section "Porte du four" du Guide d'utilisation et d'entretien. 13. Achever l'installation. Voir les sections "Raccordement à la canalisation de gaz" et "Système d'allumage électronique - Whirlpool GW399LXUQ | Installation Instructions - Page 33
érieur du four. 2. Retirer le tiroir de remisage. Voir la section "Réinstallation des grilles du four et du tiroir de remisage". 3. Retirer la porte du four. Voir la section "Porte du four" du Guide d'utilisation et d'entretien pour des instructions de démontage de la porte du four. 4. À l'aide d'un - Whirlpool GW399LXUQ | Installation Instructions - Page 34
ûleur du gril reste suspendu à l'arrière du four pendant le remplacement du gicleur. A A. Gicleur du brûleur principal au gaz propane numéro .0512 3. Installer le gicleur du brûleur principal au gaz naturel numéro 49 en le tournant dans le sens horaire de 4 ou 5 tours. Ne pas serrer - Whirlpool GW399LXUQ | Installation Instructions - Page 35
des grilles du four et du tiroir de remisage" pour les instructions. 12. Réinstaller la porte du four. Voir la section "Porte du four" dans le Guide d'utilisation et d'entretien. 13. Achever l'installation. Voir les sections "Raccordement à la canalisation de gaz" et "Système d'allumage électronique - Whirlpool GW399LXUQ | Installation Instructions - Page 36
8113P681-60B © 2008. All rights reserved. Tous droits réservés. 4/08 Printed in U.S.A. Imprimé aux É.-U.
-
 1
1 -
 2
2 -
 3
3 -
 4
4 -
 5
5 -
 6
6 -
 7
7 -
8
-
9
-
10
-
11
-
12
-
13
-
14
-
15
-
16
-
17
-
18
-
19
-
20
-
21
-
22
-
23
-
24
-
25
-
26
-
27
-
28
-
29
-
30
-
31
-
32
-
33
-
34
-
35
-
36
 |
 |

INSTALLATION INSTRUCTIONS
30" (76.2 CM) SLIDE-IN GAS RANGES
INSTRUCTIONS POUR L’INSTALLATION DES CUISINIÈRES
À GAZ ENCASTRABLES DE 30" (76,2 CM)
Table of Contents/Table des matières
RANGE SAFETY
........................................................................................
2
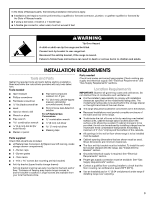
INSTALLATION REQUIREMENTS
..........................................................
3
Tools and Parts
......................................................................................
3
Location Requirements
..........................................................................
3
Electrical Requirements
.........................................................................
5
Gas Supply Requirements
.....................................................................
5
Countertop Preparation
.........................................................................
6
INSTALLATION INSTRUCTIONS
............................................................
7
Unpack Range
.......................................................................................
7
Adjust Leveling Legs
..............................................................................
7
Install Anti-Tip Bracket
...........................................................................
7
Make Gas Connection
...........................................................................
8
Verify Anti-Tip Bracket Location
............................................................
9
Level Range
...........................................................................................
9
Electronic Ignition System
.....................................................................
9
Replace Oven Racks and Storage Drawer
..........................................
11
Complete Installation
...........................................................................
11
GAS CONVERSIONS
..............................................................................
12
LP Gas Conversion
..............................................................................
12
Natural Gas Conversion
.......................................................................
15
SÉCURITÉ DE LA CUISINIÈRE
..............................................................
19
EXIGENCES D'INSTALLATION
..............................................................
20
Outillage et pièces
................................................................................
20
Exigences d'emplacement
...................................................................
20
Spécifications électriques
.....................................................................
22
Spécifications de l’alimentation en gaz
................................................
22
Préparation du plan de travail
..............................................................
23
INSTRUCTIONS D'INSTALLATION
.......................................................
24
Déballage de la cuisinière
.....................................................................
24
Réglage des pieds de nivellement
.......................................................
24
Installation de la bride antibasculement
...............................................
24
Raccordement au gaz
..........................................................................
25
Vérification de l'emplacement de la bride antibasculement
................
26
Réglage de l'aplomb de la cuisinière
...................................................
26
Système d'allumage électronique
........................................................
27
Réinstallation des grilles du four et du tiroir de remisage
....................
28
Achever l’installation
.............................................................................
28
CONVERSIONS POUR CHANGEMENT DE GAZ
.................................
29
Conversion pour l'alimentation au propane
.........................................
29
Conversion pour l'alimentation au gaz naturel
.....................................
32
IMPORTANT:
Installer:
Leave installation instructions with the homeowner.
Homeowner:
Keep installation instructions for future reference.
IMPORTANT :
Installateur :
Remettre les instructions d'installation au propriétaire.
Propriétaire :
Conserver les instructions d'installation pour référence ultérieure.
8113P681-60B