Whirlpool LER3622PQ Owners Manual
Whirlpool LER3622PQ - 3.4 cu. Ft. Electric Dryer Manual
 |
UPC - 050946958712
View all Whirlpool LER3622PQ manuals
Add to My Manuals
Save this manual to your list of manuals |
Whirlpool LER3622PQ manual content summary:
- Whirlpool LER3622PQ | Owners Manual - Page 1
® 240-VOLT ELECTRIC COMPACT DRYER Use & Care Guide For questions about features, operation/performance, parts, accessories or service, call: 1-800-253-1301. or visit our website at...www.whirlpool.com Table of Contents 2 W10151595A - Whirlpool LER3622PQ | Owners Manual - Page 2
SAFETY 2 INSTALLATION INSTRUCTIONS 3 Tools and Parts 3 Location Requirements 3 Electrical Requirements 5 Electrical Connection 6 Venting Requirements 11 Plan Vent System 12 Install Vent System 12 Install Leveling Legs 13 Connect Vent 13 Level Dryer 13 Complete Installation 13 DRYER USE - Whirlpool LER3622PQ | Owners Manual - Page 3
Do not install or store the dryer where it will be exposed to the weather. ■ Do not tamper with controls. ■ Do not repair or replace any part of the dryer or attempt any servicing unless specifically recommended in this Use and Care Guide or in published user-repair instructions that you understand - Whirlpool LER3622PQ | Owners Manual - Page 4
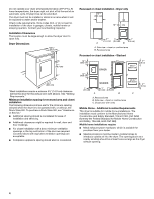
are for the minimum spacing allowed when the dryer is to be operated with, or without, the Stack Stand Kit. To purchase a Stack Stand Kit, see "Assistance or Service." ■ Additional spacing should be considered for ease of installation and servicing. ■ Additional clearances might be required for wall - Whirlpool LER3622PQ | Owners Manual - Page 5
electrical supply (or 3 or 4 wire, 120/208 volt electrical supply, if specified on the serial/rating Electrical Connection To properly install your dryer, you must determine the type of electrical connection you will be using and follow the instructions gauge copper wires and match a 4-wire receptacle - Whirlpool LER3622PQ | Owners Manual - Page 6
cord. Use a UL listed strain relief. Disconnect power before making electrical connections. Connect neutral wire (white or center wire) to center location E. Neutral ground wire F. Hole below terminal block opening 3. Install strain relief. Style 1: Power supply cord strain relief ■ Remove the - Whirlpool LER3622PQ | Owners Manual - Page 7
strain relief. The strain relief should have a tight fit with the dryer cabinet and be in a horizontal position. Do not further tighten strain relief screw. Tighten screw. 4. Now complete installation following instructions for your type of electrical connection: 4-wire (recommended) 3-wire (if - Whirlpool LER3622PQ | Owners Manual - Page 8
screw. A B C Direct wire cable must have 5 ft (1.52 m) of extra length so dryer can be moved if needed. Strip 5" (12.7 cm) of outer covering from end of cable cover into slot of dryer rear panel. Secure cover with hold-down screw. 7. You have completed your electrical connections. Now go to - Whirlpool LER3622PQ | Owners Manual - Page 9
Tighten screws. 5. Tighten strain relief screws. 6. Insert tab of terminal block cover into slot of dryer rear panel. Secure cover with hold-down screw. 7. You have completed your electrical connections. Now go to "Venting Requirements." 3-wire connection: Power Supply Cord Use where local codes - Whirlpool LER3622PQ | Owners Manual - Page 10
Tighten screws. 4. Tighten strain relief screw. 5. Insert tab of terminal block cover into slot of dryer rear panel. Secure cover with hold-down screw. 6. You have completed your electrical connections. Now go to "Venting Requirements." Optional 3-wire connection Use for direct wire or power supply - Whirlpool LER3622PQ | Owners Manual - Page 11
install flexible metal vent in enclosed walls, ceilings or floors. Elbows 45° elbows provide better airflow than 90° elbows. Fire Hazard Use a heavy metal vent. Do not use a plastic vent. Do not use a metal foil vent. Failure to follow these instructions ■ Review Vent system supported when the dryer - Whirlpool LER3622PQ | Owners Manual - Page 12
are available for purchase. For information on ordering, see "Assistance or Service." ■ Over-the-Top Installation: Part Number 4396028 ■ Periscope Installation (for use with dryer vent to wall vent mismatch): Part Number 4396037 - for mismatch of 0" (0 cm) to 18" (45.72 cm) Part Number 4396011 - Whirlpool LER3622PQ | Owners Manual - Page 13
. 2. Move dryer into its final location. Do not crush or kink vent. 3. (On gas models) Check that dryer's final location. Be sure the vent is not crushed or kinked. 5. Check that the dryer is on a level surface. 6. For power supply cord installation, plug into an outlet. For direct wire installation - Whirlpool LER3622PQ | Owners Manual - Page 14
can result in death or fire. WARNING: To reduce the risk of fire, electric shock, or injury to persons, read the IMPORTANT SAFETY INSTRUCTIONS before operating this appliance. Before using your dryer, wipe the dryer drum with a damp cloth to remove dust from storing and shipping. 1. Clean the - Whirlpool LER3622PQ | Owners Manual - Page 15
desired, add a fabric softener sheet. Follow package instructions. ■ Remove the load from the dryer as soon as tumbling stops to reduce wrinkling. vapors, such as gasoline, away from dryer. Place dryer at least 18 inches (46 cm) above the floor for a garage installation. Failure to do so can result - Whirlpool LER3622PQ | Owners Manual - Page 16
screen body and cover with a clean towel. Replace in dryer. Cleaning the Dryer Interior To clean dryer drum 1. Make a paste with powdered laundry detergent and very warm water. Electrical Shock Hazard Disconnect power before servicing. Replace all parts and panels before operating. Failure to do - Whirlpool LER3622PQ | Owners Manual - Page 17
TROUBLESHOOTING First try the solutions suggested here or visit our website and reference FAQs (Frequently Asked Questions) to possibly avoid the cost of a service call... In U.S.A. www.whirlpool.com/help - In Canada www.whirlpool.ca Dryer Operation Dryer will not run ■ Has a household fuse blown, - Whirlpool LER3622PQ | Owners Manual - Page 18
have ventilation openings at the top and bottom of the door. The front of the dryer requires a minimum of 1" (2.5 cm) of airspace, and the rear of the dryer requires a 3" (7.6 cm). See the Installation Instructions. ■ Has an air dry modifier been selected? Select the right temperature for the types - Whirlpool LER3622PQ | Owners Manual - Page 19
Before calling for assistance or service, please check "Troubleshooting." It may save you the cost of a service call. If you still need help, follow the instructions below. When calling, please know the purchase date and the complete model and serial number of your appliance. This information - Whirlpool LER3622PQ | Owners Manual - Page 20
applies. If you need service, first see the "Troubleshooting" section of the Use & Care Guide. After checking "Troubleshooting," additional help can be found by checking the "Assistance or Service" section or by calling Whirlpool. In the U.S.A., call 1-800-253-1301. In Canada, call 1-800-807-6777
-
 1
1 -
 2
2 -
 3
3 -
 4
4 -
 5
5 -
 6
6 -
 7
7 -
8
-
9
-
10
-
11
-
12
-
13
-
14
-
15
-
16
-
17
-
18
-
19
-
20
 |
 |

240-VOLT ELECTRIC
COMPACT DRYER
Use & Care Guide
For questions about features, operation/performance,
parts, accessories or service, call:
1-800-253-1301
.
or visit our website at...
www.whirlpool.com
Table of Contents
.................................................
2
W10151595A
®