Whirlpool LER4634PT Installation Instructions
Whirlpool LER4634PT Manual
 |
View all Whirlpool LER4634PT manuals
Add to My Manuals
Save this manual to your list of manuals |
Whirlpool LER4634PT manual content summary:
- Whirlpool LER4634PT | Installation Instructions - Page 1
/ Índice DRYER SAFETY 1 INSTALLATION INSTRUCTIONS 2 Tools and Parts 2 Location manual and on your appliance. Always read and obey all safety messages. This is the safety alert symbol. This symbol alerts you to potential hazards that can kill or hurt you and others. All safety messages will - Whirlpool LER4634PT | Installation Instructions - Page 2
" before purchasing parts. Mobile home installations require metal exhaust system hardware available for purchase from the dealer from whom you purchased your dryer. For further information, please reference the "Service or Assistance" section of your "Dryer User Instructions." Location Requirements - Whirlpool LER4634PT | Installation Instructions - Page 3
Title 24 CFR, Part 3280 (formerly the Federal Standard for Mobile Home Construction and Safety, Title 24, HUD Part 280). Mobile home Connection To properly install your dryer, you must determine the type of electrical connection you will be using and follow the instructions provided for it here. - Whirlpool LER4634PT | Installation Instructions - Page 4
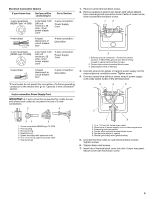
the strain relief. The strain relief should have a tight fit with the dryer cabinet and be in a horizontal position. 5 6 1. Terminal block cover 6. Hole below terminal block opening 4. Now complete installation following instructions for your type of electrical connection: 4-wire (recommended) 3- - Whirlpool LER4634PT | Installation Instructions - Page 5
And you will be connecting to: Go to Section 4-wire receptacle (NEMA Type 14-30R) A UL listed, 120/ 240 volt minimum, 30 amp., dryer power supply . 2 6 1 1. Remove center terminal block screw. 2. Remove appliance ground wire (green with yellow stripes) from external ground connector screw - Whirlpool LER4634PT | Installation Instructions - Page 6
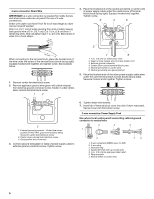
3-wire connections. Direct wire cable must have 5 ft (1.52 m) of extra length so dryer can be moved if needed. Strip 5 in. (12.7 cm) of outer covering from example below. 1. Remove center terminal block screw. 2. Remove appliance ground wire (green with yellow stripes) from external ground - Whirlpool LER4634PT | Installation Instructions - Page 7
to neutral wire. Direct wire cable must have 5 ft (1.52 m) of extra length so dryer can be moved if needed. Strip 3¹⁄₂ in. (8.9 cm) of outer covering from end screw. 2. Remove appliance ground wire (green with yellow stripes) from external ground connector screw. Connect appliance ground wire and the - Whirlpool LER4634PT | Installation Instructions - Page 8
. DURASAFE™ vent products can be purchased from your dealer or by calling Whirlpool Parts and Accessories. For more information, see the "Assistance or Service" section of your "Dryer User Instructions." s Do not exhaust the dryer into any gas vent, chimney, wall, ceiling, or a concealed space of - Whirlpool LER4634PT | Installation Instructions - Page 9
Service or Assistance" section of your "Dryer User Instructions." s Over-The-Top Installation: Part Number 4396028 s Periscope Installation (For use with dryer vent to wall vent mismatch): Part elbows you will need and the type of vent (rigid or flexible metal) and hood that you will use. Terminate - Whirlpool LER4634PT | Installation Instructions - Page 10
to exhaust hood with 4 in. (10.2 cm) clamp. 4. Run vent to dryer location. Use the straightest path possible. See "Determine Vent Length." Avoid 90º turns. top screws in cabinet are in large part of hinge slot. Pull door forward off screws. Set door on top of dryer. Remove top screws from cabinet. - Whirlpool LER4634PT | Installation Instructions - Page 11
were just removed. 7. Attach door hinges to door so large part of hinge slot is at bottom of hinge. 10. Remove door heat, contact a qualified technician. NOTE: You may notice a burning odor when the dryer is first heated. This odor is common when the heating element is first used. The odor will - Whirlpool LER4634PT | Installation Instructions - Page 12
SEGURIDAD DE LA SECADORA Su seguridad y la seguridad de los demás es muy importante. Hemos incluido muchos mensajes importantes de seguridad en este manual y en su electrodoméstico. Lea y obedezca siempre todos los mensajes de seguridad. Este es el símbolo de advertencia de seguridad. Este símbolo - Whirlpool LER4634PT | Installation Instructions - Page 13
reducir la transferencia de ruido. s Para la instalación en clóset, con una puerta, se requieren aberturas de ventilación mínimas en la parte superior e inferior de la puerta. Se aceptan puertas tipo persianas con aberturas de ventilación equivalentes. s También se debe considerar espacio adicional - Whirlpool LER4634PT | Installation Instructions - Page 14
Conexión eléctrica Para instalar su secadora adecuadamente, usted debe determinar el tipo de conexión eléctrica que va a usar y seguir las instrucciones que aquí se proveen para el caso. s Si los códigos locales no permiten la conexión de un conector para conexión a tierra del equipo al alambre - Whirlpool LER4634PT | Installation Instructions - Page 15
Conexión eléctrica Cable de suministro eléctrico Cable directo ADVERTENCIA ADVERTENCIA Peligro de Incendio Use un cable de suministro eléctrico nuevo de 30 amperes con aprobación UL. Use un protector de cables con aprobación UL. Desconecte el suministro eléctrico antes de hacer las conexiones - Whirlpool LER4634PT | Installation Instructions - Page 16
Opciones para la conexión eléctrica Si su casa tiene: Y usted va a conectar con: Vaya a la sección Un contacto de 4 hilos (Tipo NEMA 1430r) Un cordón de suministro eléctrico para secadora, aprobado de UL, de 120/240 voltios mínimo y 30 amperios* Conexión de 4 hilos: Cordón de suministro elé - Whirlpool LER4634PT | Installation Instructions - Page 17
Conexión de 4 hilos: Cable directo IMPORTANTE: Se necesita una conexión de alambre de cuatro hilos para las casas rodantes y para los casos en que los códigos locales no permitan el uso de conexiones de 3 hilos. El cable de conexión directa debe tener 5 pies (1,52 m) extra de largo para poder mover - Whirlpool LER4634PT | Installation Instructions - Page 18
Conexión de 3 hilos: Cable de suministro eléctrico Uso cuando los códigos locales permitan la conexión del conductor de tierra del gabinete al hilo neutro: 2 4 5 1 3 76 1. Contacto de 3 hilos (NEMA tipo 10-30R) 2. Enchufe de 3 hilos 3. Terminal de conexión a neutro 4. Bornes de horquilla con - Whirlpool LER4634PT | Installation Instructions - Page 19
3. Coloque los extremos enganchados de los otros hilos del cable de suministro eléctrico debajo de los tornillos exteriores del bloque de terminal (con los ganchos mirando hacia la derecha). Apriete y junte los extremos enganchados. Apriete los tornillos. 6. Conecte un hilo de tierra de cobre - Whirlpool LER4634PT | Installation Instructions - Page 20
™ pueden comprarse en su distribuidor o llamando a Piezas y Accesorios Whirlpool. Para obtener más información tome como referencia la sección "Ayuda picas de escape Las instalaciones típicas tienen la ventilación en la parte posterior de la secadora. La ventilación inadecuada puede ocasionar la - Whirlpool LER4634PT | Installation Instructions - Page 21
espacios limitados. Tome como referencia la sección "Ayuda o servicio técnico" de sus "Instrucciones para el usuario de la secadora". s Instalación en la parte superior: Pieza número 4396028 s Instalación de periscopio (Para usar si hay desacoplo entre el ducto de escape de la pared y el conducto de - Whirlpool LER4634PT | Installation Instructions - Page 22
. Coloque el cartón debajo de todo el borde posterior de la secadora. Vea la ilustración. 2. Sujete con firmeza el cuerpo de la secadora (no la parte superior o el panel de la consola). Recueste la secadora, con cuidado, en el cartón. 3. Examine las patas niveladoras. Localice la marca en forma de - Whirlpool LER4634PT | Installation Instructions - Page 23
(no extraiga) los tornillos superiores de las bisagras del lado del gabinete. 3. Levante la puerta hasta que los tornillos inferiores del gabinete estén en la parte grande de la ranura de la bisagra. Tire de la puerta hacia adelante para separarla de los tornillos. Coloque la puerta (con el lado de - Whirlpool LER4634PT | Installation Instructions - Page 24
Deslice la puerta hacia arriba para que los tornillos estén en la parte de abajo de las ranuras. Apriete los tornillos. Introduzca y apriete los Whirlpool Corporation. Benton Harbor, Michigan 49022 TM DURASAFE is a trademark of Whirlpool, U.S.A. TM DURASAFE es una marca de comercio de Whirlpool,
-
 1
1 -
 2
2 -
 3
3 -
 4
4 -
 5
5 -
 6
6 -
 7
7 -
8
-
9
-
10
-
11
-
12
-
13
-
14
-
15
-
16
-
17
-
18
-
19
-
20
-
21
-
22
-
23
-
24
 |
 |

29 IN. (73.7 CM) ELECTRIC DRYER INSTALLATION
INSTRUCTIONS
INSTRUCCIONES DE INSTALACIÓN PARA LA SECADORA
ELÉCTRICA DE 29 PULG. (73,7 CM)
DRYER SAFETY
Table of Contents / Índice
DRYER SAFETY
...............................................
1
INSTALLATION INSTRUCTIONS
....................
2
Tools and Parts
.............................................
2
Location Requirements
................................
2
Electrical Requirements
................................
3
Electrical Connection
....................................
4
Venting Requirements
...................................
8
Plan Vent System
..........................................
8
Install Vent System
......................................
10
Install Leveling Legs
....................................
10
Level Dryer
...................................................
10
Connect Vent
...............................................
10
Reverse Door Swing
....................................
10
Complete Installation
..................................
11
SEGURIDAD DE LA SECADORA
.................
12
INSTRUCCIONES DE INSTALACIÓN
..........
12
Herramientas y piezas
.................................
12
Requisitos de localización
.........................
12
Requisitos eléctricos
...................................
13
Conexión eléctrica
......................................
15
Requisitos de ventilación
............................
19
Planificación del sistema de ventilación
.....
20
Instalación del sistema de ventilación
........
22
Instalación de las patas niveladoras
...........
22
Nivelación de la secadora
...........................
22
Conexión del ducto de escape
...................
22
Cómo invertir el cierre de la puerta
.............
23
Complete la instalación
...............................
24
You can be killed or seriously injured if you don't immediately
You
can be killed or seriously injured if you don't follow
All safety messages will tell you what the potential hazard is, tell you how to reduce the chance of injury, and tell you what can
happen if the instructions are not followed.
Your safety and the safety of others are very important.
We have provided many important safety messages in this manual and on your appliance. Always read and obey all safety
messages.
This is the safety alert symbol.
This symbol alerts you to potential hazards that can kill or hurt you and others.
All safety messages will follow the safety alert symbol and either the word “DANGER” or “WARNING.”
These words mean:
follow instructions.
instructions.
DANGER
WARNING
8535829