Whirlpool LTE5243DQ Installation Instructions
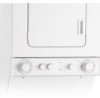
Whirlpool LTE5243DQ - Stack Washer Electric Dryer Manual
 |
UPC - 050946532578
View all Whirlpool LTE5243DQ manuals
Add to My Manuals
Save this manual to your list of manuals |
Whirlpool LTE5243DQ manual content summary:
- Whirlpool LTE5243DQ | Installation Instructions - Page 1
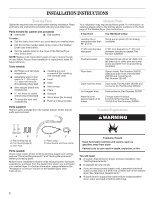
WASHER/DRYER INSTALLATION INSTRUCTIONS Table of Contents WASHER/DRYER SAFETY 1 INSTALLATION INSTRUCTIONS 2 Tools and Parts 2 Alternate Parts 2 Location Requirements 2 Drain System 3 Electrical Requirements 4 Electrical Connection 5 Venting Requirements 10 Install Leveling Legs 11 Remove - Whirlpool LTE5243DQ | Installation Instructions - Page 2
installation. See "Venting Requirements." A separate 30-amp circuit. If you are using a power supply cord, a grounded electrical outlet located within 2 ft (610 mm) of either side of the washer/ dryer. See "Electrical Requirements." A sturdy floor to support the washer/dryer weight (washer/ dryer - Whirlpool LTE5243DQ | Installation Instructions - Page 3
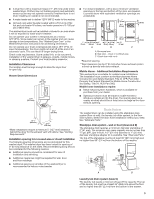
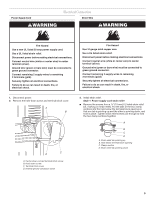
A. Recessed area B. Side view - closet or confined area C. Closet door with vents 3" (76 mm) *Required spacing **Rear clearance may be 0" (0 mm) when house exhaust system is lined up directly with dryer exhaust. Mobile Home - Additional Installation Requirements This washer/dryer is suitable for - Whirlpool LTE5243DQ | Installation Instructions - Page 4
ground path is adequate. Electrical Connection To properly install your washer/dryer, you must determine the type of electrical connection you will be using and follow the instructions provided for it here. This dryer is manufactured ready to install with a 3-wire electrical supply connection. The - Whirlpool LTE5243DQ | Installation Instructions - Page 5
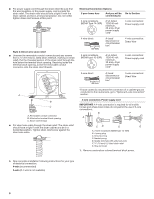
result in death, fire, or electrical shock. 1. Disconnect power. 2. Remove the hold-down screw and terminal block cover. A B D C A. Center silver-colored terminal block screw B. Hold-down screw C. Terminal block cover D. Internal ground conductor screw 3. Install strain relief. Style 1: Power - Whirlpool LTE5243DQ | Installation Instructions - Page 6
fused disconnect or circuit breaker box* 4-wire connection: Direct Wire 3-wire receptacle (NEMA type 10-30R) A UL listed, 120/240-volt minimum, 30-amp, dryer use of Remove center silver-colored terminal block screw. 4. Now complete installation following instructions for your type of electrical - Whirlpool LTE5243DQ | Installation Instructions - Page 7
the use of 3-wire connections. Direct wire cable must have 5 ft (1.52 m) of extra length so washer/dryer 1. Remove center silver-colored terminal block screw. 2. Remove neutral dryer rear panel. Secure cover with hold-down screw. 7. You have completed your electrical connection. Now go to "Venting - Whirlpool LTE5243DQ | Installation Instructions - Page 8
B 3-wire connection: Power supply cord Use where local codes permit connecting cabinet-ground or center wire) 1. Loosen or remove center silver-colored terminal block screw. dryer rear panel. Secure cover with hold-down screw. 7. You have completed your electrical connection. Now go to "Venting - Whirlpool LTE5243DQ | Installation Instructions - Page 9
dryer rear panel. Secure cover with hold-down screw. 6. You have completed your electrical connection. Now go to "Venting Requirements." Optional 3-wire connection Use for direct wire or power supply cord where local codes do not permit connecting cabinet-ground conductor to neutral wire. 1. Remove - Whirlpool LTE5243DQ | Installation Instructions - Page 10
can be purchased from your dealer or by calling Whirlpool Parts and Accessories. For more information, see the "Assistance or Service" section of the Washer/Dryer User Instructions. Good Better Clamps Use clamps to seal all joints. Exhaust vent must not be connected or secured with screws or - Whirlpool LTE5243DQ | Installation Instructions - Page 11
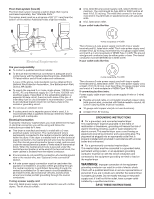
stand the washer/dryer upright. Remove Foam Packing 1. Open the washer lid. The latch under the dryer will keep the lid open. 2. Pull the foam packing ring out of the washer. Install Leveling Legs WARNING Excessive Weight Hazard Use two or more people to move and install washer/dryer. Failure to - Whirlpool LTE5243DQ | Installation Instructions - Page 12
hose on the bottom of the laundry tub. For use with floor drain Do not install the drain hose form onto the corrugated drain hose. You may need additional parts. See Floor drain under "Tools and Parts." Connect Inlet Hoses 1. Insert a new flat washer into each end of the inlet hoses (not provided - Whirlpool LTE5243DQ | Installation Instructions - Page 13
or flexible metal vent C. Clamps D. Wall E. Elbow F. Clamps G. Elbow H. Exhaust hood Optional exhaust installations This washer/dryer can be converted to exhaust out the right or left side. To convert the washer/dryer, use Side Exhaust Kit Part Number 279823. If your washer/dryer was previously - Whirlpool LTE5243DQ | Installation Instructions - Page 14
are available for purchase. Please reference the "Assistance or Service" section of the Washer/Dryer User Instructions. Over-the-Top Installation: Part Number 4396028 Periscope Installation (For use with dryer vent to wall vent mismatch): Part Number 4396037 - 0" (0 mm) to 18" (457 mm) mismatch - Whirlpool LTE5243DQ | Installation Instructions - Page 15
on the washer/dryer. 10. Read the Washer/Dryer User Instructions. 11. Wipe the dryer drum interior thoroughly with a damp cloth to remove any dust. 12. To test the washer, measure 1⁄2 the normal recommended amount of detergent and pour it into the washer. Close the lid. Select the REGULAR cycle and - Whirlpool LTE5243DQ | Installation Instructions - Page 16
W10222387A © 2008. All rights reserved. Benton Harbor, Michigan 49022 TM DURASAFE is a trademark of Whirlpool, U.S.A. 10/08 Printed in U.S.A.
-
 1
1 -
 2
2 -
 3
3 -
 4
4 -
 5
5 -
 6
6 -
 7
7 -
8
-
9
-
10
-
11
-
12
-
13
-
14
-
15
-
16
 |
 |
24" (69 CM) ELECTRIC WASHER/DRYER
INSTALLATION INSTRUCTIONS
WASHER/DRYER SAFETY
Table of Contents
WASHER/DRYER SAFETY
..............................
1
INSTALLATION INSTRUCTIONS
....................
2
Tools and Parts
.............................................
2
Alternate Parts
...............................................
2
Location Requirements
................................
2
Drain System
.................................................
3
Electrical Requirements
................................
4
Electrical Connection
....................................
5
Venting Requirements
.................................
10
Install Leveling Legs
....................................
11
Remove Foam Packing
...............................
11
Connect Drain Hose
....................................
11
Connect Inlet Hoses
....................................
12
Secure Drain Hose
......................................
13
Plan Vent System
........................................
13
Install Vent System
......................................
15
Level Washer/Dryer
.....................................
15
Connect Vent
...............................................
15
Complete Installation
..................................
15
You can be killed or seriously injured if you don't immediately
You
can be killed or seriously injured if you don't follow
All safety messages will tell you what the potential hazard is, tell you how to reduce the chance of injury, and tell you what can
happen if the instructions are not followed.
Your safety and the safety of others are very important.
We have provided many important safety messages in this manual and on your appliance. Always read and obey all safety
messages.
This is the safety alert symbol.
This symbol alerts you to potential hazards that can kill or hurt you and others.
All safety messages will follow the safety alert symbol and either the word “DANGER” or “WARNING.”
These words mean:
follow instructions.
instructions.
DANGER
WARNING
W10222387A