Whirlpool RBD245PRB Installation Instructions
Whirlpool RBD245PRB - 24 Inch Double Electric Wall Oven Manual
 |
UPC - 883049010700
View all Whirlpool RBD245PRB manuals
Add to My Manuals
Save this manual to your list of manuals |
Whirlpool RBD245PRB manual content summary:
- Whirlpool RBD245PRB | Installation Instructions - Page 1
24" (61 CM) Table of Contents / Table des matières BUILT-IN OVEN SAFETY 2 INSTALLATION REQUIREMENTS 3 Tools and Parts 3 Location Requirements 3 Electrical Requirements 5 INSTALLATION INSTRUCTIONS 5 Prepare Built-In Oven 5 Make Electrical Connection 6 Install Oven 7 Complete Installation - Whirlpool RBD245PRB | Installation Instructions - Page 2
IN OVEN SAFETY Your safety and the safety of others are very important. We have provided many important safety messages in this manual and if you don't immediately follow instructions. WARNING You can be killed or seriously injured if you don't follow instructions. All safety messages will tell - Whirlpool RBD245PRB | Installation Instructions - Page 3
tape ■ Hand or electric drill (for wall cabinet installations) ■ 1" (25 mm) drill bit (for wall cabinet installations) ■ Level Parts needed ■ UL listed or CSA approved conduit connector ■ UL listed wire connectors Parts supplied ■ # 8-14 x 1" screws - single oven (2), double oven (4) ■ Bottom vent - Whirlpool RBD245PRB | Installation Instructions - Page 4
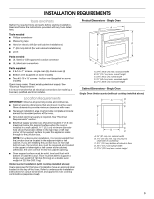
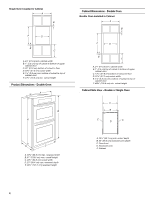
height Product Dimensions - Double Oven A B E Cabinet Dimensions - Double Oven Double Oven Installed in Cabinet A B F D E C A. 24" (61 cabinet door F. 49³⁄₄" (126.4 cm) min. cutout height Cabinet Side View - Double or Single Oven A B E C D D C A. 22³⁄₈" (56.8 cm) max. recessed width B. - Whirlpool RBD245PRB | Installation Instructions - Page 5
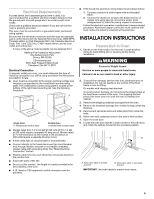
install your oven, you must determine the type of electrical connection you will be using and follow the instructions provided for it here. ■ Oven must be connected to the proper electrical voltage and frequency as specified on the model/serial number rating plate. The model/serial number rating - Whirlpool RBD245PRB | Installation Instructions - Page 6
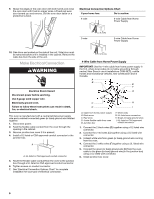
removed before unit is installed in the cabinet. Remove the cable ties from the side of the unit. Make Electrical Connection WARNING Electrical Shock Hazard Disconnect power before servicing. Use 8 gauge solid copper wire. Electrically ground oven. Failure to follow these instructions can result in - Whirlpool RBD245PRB | Installation Instructions - Page 7
x 1" screws (2 for single oven, 4 for double oven) provided. Insert the screws through holes in mounting rails. Do not overtighten screws. A B A. Mounting rail B. Insert screw. 6. On some models, the oven vent is taped to the side of the oven. See the following instructions to install. ■ Insert the - Whirlpool RBD245PRB | Installation Instructions - Page 8
Service" section of the Use and Care Guide or contact the dealer from whom you purchased your oven. Complete Installation 1. Check that all parts are now installed. If there is an extra part ■ Electrical supply is connected. ■ See "Troubleshooting" section in the Use and Care Guide. 4. When oven has - Whirlpool RBD245PRB | Installation Instructions - Page 9
: DANGER Risque possible de décès ou de blessure grave si vous ne suivez pas immédiatement les instructions. AVERTISSEMENT Risque possible de décès ou de blessure grave si vous ne suivez pas les instructions. Tous les messages de sécurité vous diront quel est le danger potentiel et vous disent - Whirlpool RBD245PRB | Installation Instructions - Page 10
installée au-dessus) : Les fours homologués pour ce type d'installation comportent une étiquette d'homologation placée sur le dessus. Voir les instructions d'installation du plan de travail au sujet des dimensions surface de support lorsque le four est installé dans C A. Largeur placard 24" (61 cm) - Whirlpool RBD245PRB | Installation Instructions - Page 11
de placard 1¹⁄₂" (3,8 cm) min. F. Hauteur ouverture 27³⁄₄" (70,5 cm) min. Dimensions du produit - Four double A B E Dimensions du placard - Four double Four double installé dans un placard A B F D E C A. Largeur placard 24" (61 cm) min. B. Distance entre sommet de l'ouverture et porte de - Whirlpool RBD245PRB | Installation Instructions - Page 12
Electrical Code Installer instructions INSTRUCTIONS D'INSTALLATION Préparation du four encastré 1. Choisir l'emplacement final pour l'installation pendant de 30 A. installation installés pour l'expédition : Pour éviter d'endommager le produit, ne pas enlever les pieds install installation à part les - Whirlpool RBD245PRB | Installation Instructions - Page 13
la porte. Conserver la porte du four à part sur une surface protégée. Risque de choc é à la terre. Le non-respect de ces instructions peut causer un décès, un incendie ou un éant, enlever le couvercle du boîtier de connexion. 4. Installer un connecteur de conduit (homologation UL ou CSA) sur le - Whirlpool RBD245PRB | Installation Instructions - Page 14
aux États-Unis lorsque les codes ne permettent pas la mise à la terre par l'intermédiaire du conducteur neutre, en cas de nouvelle installation avec alimentation par un circuit secondaire (1996 NEC), dans les résidences mobiles et les véhicules récréatifs, dans les nouvelles constructions, et au - Whirlpool RBD245PRB | Installation Instructions - Page 15
du placard. 6. Sur certains modèles, l'évent du four est immobilisé avec du ruban adhésif sur le côté du four. Pour l'installation, procéder selon les instructions suivantes. ■ Insérer les onglets de l'évent (B) dans les ouvertures (A) du châssis du four. ■ Fixer solidement l'évent sur le four - Whirlpool RBD245PRB | Installation Instructions - Page 16
service" du Guide d'utilisation et d'entretien ou contacter le marchand qui vous a vendu le four. Achever l'installation 1. Vérifier que toutes les pièces sont maintenant install devrait indiquer "PF". 2. Appuyer sur UPPER OVEN (four supérieur) ou LOWER OVEN (four inférieur) pour sélectionner le
-
 1
1 -
 2
2 -
 3
3 -
 4
4 -
 5
5 -
 6
6 -
 7
7 -
8
-
9
-
10
-
11
-
12
-
13
-
14
-
15
-
16
 |
 |

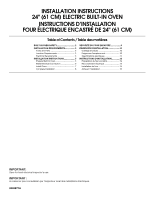
INSTALLATION INSTRUCTIONS
24" (61 CM) ELECTRIC BUILT-IN OVEN
INSTRUCTIONS D’INSTALLATION
FOUR ÉLECTRIQUE ENCASTRÉ DE 24" (61 CM)
Table of Contents / Table des matières
BUILT-IN OVEN SAFETY
.................................
2
INSTALLATION REQUIREMENTS
..................
3
Tools and Parts
.............................................
3
Location Requirements
.................................
3
Electrical Requirements
................................
5
INSTALLATION INSTRUCTIONS
....................
5
Prepare Built-In Oven
....................................
5
Make Electrical Connection
..........................
6
Install Oven
....................................................
7
Complete Installation
....................................
8
SÉCURITÉ DU FOUR ENCASTRÉ
..................
9
EXIGENCES D'INSTALLATION
.....................
10
Outillage et pièces
.......................................
10
Exigences d'emplacement
..........................
10
Spécifications électriques
............................
12
INSTRUCTIONS D'INSTALLATION
...............
12
Préparation du four encastré
.......................
12
Raccordement électrique
............................
13
Installation du four
.......................................
15
Achever l'installation
....................................
16
8303871A
IMPORTANT:
Save for local electrical inspector's use.
IMPORTANT :
À conserver pour consultation par l'inspecteur local des installations électriques.