Whirlpool RBD275PVB Installation Instructions
Whirlpool RBD275PVB - 27 Inch Double Electric Wall Oven Manual
 |
UPC - 883049142616
View all Whirlpool RBD275PVB manuals
Add to My Manuals
Save this manual to your list of manuals |
Whirlpool RBD275PVB manual content summary:
- Whirlpool RBD275PVB | Installation Instructions - Page 1
Table of Contents/Table des matières BUILT-IN OVEN SAFETY 2 INSTALLATION REQUIREMENTS 2 Tools and Parts 2 Location Requirements 2 Electrical Requirements 4 INSTALLATION INSTRUCTIONS 5 Prepare Built-In Oven 5 Remove Oven Door 5 Remove Oven Trim 5 Make Electrical Connection 5 Install Oven - Whirlpool RBD275PVB | Installation Instructions - Page 2
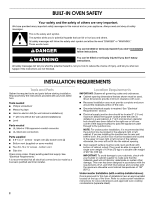
manual and on your appliance. instructions are not followed. INSTALLATION REQUIREMENTS Tools and Parts Gather the required tools and parts before starting installation. Read and follow the instructions dimensions that are shown must be used. Given dimensions support surface to pass the appliance - Whirlpool RBD275PVB | Installation Instructions - Page 3
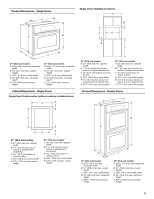
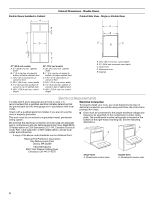
D. 28¹⁄₂" (72.4 cm) cutout width E. 1¹⁄₂" (3.8 cm) min. bottom of cutout to top of cabinet door F. 27³⁄₄" (70.5 cm) cutout height Product Dimensions - Double Ovens A E D C 27" (68.6 cm) models A. 27" (68.6 cm) min. cabinet width B. 1¹⁄₂" (3.8 cm) min. top of cutout to underside of countertop - Whirlpool RBD275PVB | Installation Instructions - Page 4
Double Ovens Installed in Cabinet A B Cabinet Dimensions - Double Ovens Cabinet Side View - Single or Double Oven edition or CSA Standards C22.1-94, Canadian Electrical Code, Part 1 and C22.2 No. O-M91-latest edition, you will be using and follow the instructions provided for it here. ■ Oven must - Whirlpool RBD275PVB | Installation Instructions - Page 5
inside the bag containing literature. 5. Remove and set aside racks and other parts from inside the oven. 6. Move oven and cardboard close to the oven's Disconnect power before servicing. Use 8 gauge solid copper wire. Electrically ground oven. Failure to follow these instructions can result in - Whirlpool RBD275PVB | Installation Instructions - Page 6
3. Remove junction box cover, if it is present. 4. Install a UL listed or CSA approved conduit connector to the junction box. A A. UL listed or CSA approved conduit connector 5. Route the flexible conduit from the oven to the junction box through a UL listed or CSA approved conduit connector. 6. - Whirlpool RBD275PVB | Installation Instructions - Page 7
against outside edges. A. Mounting rail B. Insert screw. 6. On some models, the oven vent is taped to the side of the oven. See the following instructions to install. ■ Insert the vent tabs (B) into slots (A) in the oven frame. ■ With one # 8-18 x ³⁄₈" screw (C) for each side of the vent, fasten - Whirlpool RBD275PVB | Installation Instructions - Page 8
Service" section of the Use and Care Guide or contact the dealer from whom you purchased your oven. Complete Installation 1. Check that all parts are now installed. If there is an extra part supply is connected. ■ See "Troubleshooting" section in the Use and Care Guide. 4. When oven has been on - Whirlpool RBD275PVB | Installation Instructions - Page 9
cas de non-respect des instructions. EXIGENCES D'INSTALLATION Outillage et pièces dimensions indiquées pour les ouvertures à découper dans les placards. Ces dimensions dans l'angle arrière gauche ou droit de la surface de support pour le passage du câble d'alimentation de l'appareil jusqu'au - Whirlpool RBD275PVB | Installation Instructions - Page 10
-dessus) : Les fours homologués pour ce type d'installation comportent une étiquette d'homologation placée sur le dessus. Voir les instructions d'installation du plan de travail au sujet des dimensions de l'ouverture à réaliser et des combinaisons approuvées four/table de cuisson (document distinct - Whirlpool RBD275PVB | Installation Instructions - Page 11
Dimensions du placard - Fours doubles Fours doubles installés dans un placard A B F D E C Modèles de 27" ( correctement, il faut établir le type de raccords électriques que l'on utilisera et suivre les instructions indiquées ici. ■ Le four doit être alimenté par une source d'électricité appropri - Whirlpool RBD275PVB | Installation Instructions - Page 12
pour déplacer et installer le four. Le non-respect de cette instruction peut causer une blessure au dos ou d'autre blessure. 2. Pour le matériel à l'intérieur du sachet de documentation. 5. Enlever et conserver à part les grilles et autres composants qu'on trouve à l'intérieur du four. 6. Approcher - Whirlpool RBD275PVB | Installation Instructions - Page 13
de courant électrique avant l'entretien. Utiliser du fil en cuivre rigide de calibre 8. Relier le four à la terre. Le non-respect de ces instructions peut causer un décès, un incendie ou un choc électrique. Le câblage d'alimentation de ce four comporte un conducteur neutre (blanc) et un conducteur - Whirlpool RBD275PVB | Installation Instructions - Page 14
du four AVERTISSEMENT Risque du poids excessif Utiliser deux ou plus de personnes pour déplacer et installer le four. Le non-respect de cette instruction peut causer une blessure au dos ou d'autre blessure. 1. À l'aide de 2 personnes ou plus, soulever partiellement le four pour l'introduire dans - Whirlpool RBD275PVB | Installation Instructions - Page 15
s'allumera brièvement et "PF" devrait s'afficher. 18. Si le tableau d'affichage ne s'allume pas, consulter la section "Assistance ou service" du Guide d'utilisation et d'entretien ou contacter le marchand qui vous a vendu le four. Achever l'installation 1. Vérifier que toutes les pièces sont - Whirlpool RBD275PVB | Installation Instructions - Page 16
W10192049A © 2008 Whirlpool Corporation. All rights reserved. Tous droits réservés. 4/08 Printed in U.S.A. Imprimé aux É.-U.
-
 1
1 -
 2
2 -
 3
3 -
 4
4 -
 5
5 -
 6
6 -
 7
7 -
8
-
9
-
10
-
11
-
12
-
13
-
14
-
15
-
16
 |
 |

INSTALLATION INSTRUCTIONS
27" (68.6 CM) AND 30" (76.2 CM) ELECTRIC SINGLE
AND DOUBLE BUILT-IN OVEN
INSTRUCTIONS D’INSTALLATION
FOUR ÉLECTRIQUE ENCASTRÉ DE 27" (68,6 CM) ET 30"
(76,2 CM) - SIMPLE ET DOUBLE
Table of Contents/Table des matières
BUILT-IN OVEN SAFETY
.........................................................................
2
INSTALLATION REQUIREMENTS
..........................................................
2
Tools and Parts
......................................................................................
2
Location Requirements
..........................................................................
2
Electrical Requirements
.........................................................................
4
INSTALLATION INSTRUCTIONS
............................................................
5
Prepare Built-In Oven
............................................................................
5
Remove Oven Door
...............................................................................
5
Remove Oven Trim
................................................................................
5
Make Electrical Connection
...................................................................
5
Install Oven
............................................................................................
7
Complete Installation
.............................................................................
8
SÉCURITÉ DU FOUR ENCASTRÉ
...........................................................
9
EXIGENCES D'INSTALLATION
................................................................
9
Outillage et pièces
..................................................................................
9
Exigences d'emplacement
.....................................................................
9
Spécifications électriques
.....................................................................
11
INSTRUCTIONS D'INSTALLATION
.......................................................
12
Préparation du four encastré
................................................................
12
Dépose de la porte du four
...................................................................
12
Dépose des garnitures du four
.............................................................
13
Raccordement électrique
.....................................................................
13
Installation du four
................................................................................
14
Achever l'installation
.............................................................................
15
IMPORTANT:
Save for local electrical inspector's use.
IMPORTANT :
À conserver pour consultation par l'inspecteur local des installations électriques.
W10192049A