Whirlpool RBD305PRB Installation Instructions
Whirlpool RBD305PRB Manual
 |
View all Whirlpool RBD305PRB manuals
Add to My Manuals
Save this manual to your list of manuals |
Whirlpool RBD305PRB manual content summary:
- Whirlpool RBD305PRB | Installation Instructions - Page 1
É 30" (76 CM) - SIMPLE ET DOUBLE Table of Contents / Table des matières OVEN SAFETY 2 INSTALLATION REQUIREMENTS 2 Tools and Parts 2 Location Requirements 2 Electrical Requirements 4 INSTALLATION INSTRUCTIONS 5 Prepare Oven for Installation 5 Remove Oven Trim 5 Make Electrical Connection - Whirlpool RBD305PRB | Installation Instructions - Page 2
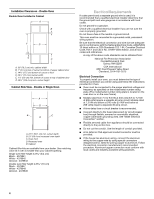
or a double oven weight of 245 lbs (111.1 kg). Undercounter Installation (with cooktop installed above): Ovens approved for this type of installation have an approval label located on the top of the oven. Refer to undercounter installation instructions for cutout dimensions and approved oven cooktop - Whirlpool RBD305PRB | Installation Instructions - Page 3
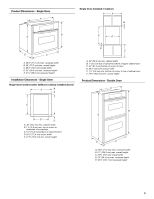
E. 27¹⁄₂" (69.9 cm) recessed height Installation Clearances - Single Oven Single Oven Undercounter (without cooktop installed above) A B E C A. 30" top of cabinet door F. 27³⁄₄" (70.5 cm) min. cutout height Product Dimensions - Double Oven A E D C A. 30" (76.2 cm) min. cabinet width B. - Whirlpool RBD305PRB | Installation Instructions - Page 4
Installation Clearances - Double Oven Double Oven Installed in Cabinet A B F D E C A. 30" (76.2 cm) min. cabinet width B. 1" (2.5 properly install your oven, you must determine the type of electrical connection you will be using and follow the instructions provided for it here. s Oven must be - Whirlpool RBD305PRB | Installation Instructions - Page 5
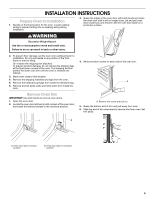
INSTALLATION INSTRUCTIONS Prepare Oven for Installation 1. Decide on the final location for the oven. Locate existing wiring to prevent drilling into or severing wiring during installation. 3. Grasp the edges of the oven door with both hands and close the oven door until it will no longer close. - Whirlpool RBD305PRB | Installation Instructions - Page 6
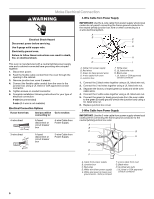
cover if present. 4. Connect the flexible cable conduit from the oven to the junction box using a UL listed or CSA approved conduit connector. 5. Tighten screws on conduit connector. 6. Complete installation following instructions for your type of electrical connection: 4-wire (recommended) 3-wire - Whirlpool RBD305PRB | Installation Instructions - Page 7
Install junction box cover. 5. Reconnect power. Install Oven 5. Securely fasten oven to cabinet using the screws (2 for single oven, 4 for double oven the oven vent is taped to the side of the oven. See following instructions to install. a). Insert the vent tabs (B) into slots (A) in the oven frame - Whirlpool RBD305PRB | Installation Instructions - Page 8
See "Troubleshooting" section in the Use and Care Guide. 4. When oven has been on for 2 minutes, feel for heat. If you do not feel heat or if an "F" followed by a number appears in the display, turn off the oven and contact a qualified technician. 5. Press OFF/CANCEL. Check Operation of Double Oven - Whirlpool RBD305PRB | Installation Instructions - Page 9
) pour un four double. Installation sous un plan de travail (avec table de cuisson installée au-dessus) : Les fours homologués pour ce type d'installation comportent une étiquette d'homologation placée sur le dessus. Voir les instructions d'installation du plan de travail au sujet des dimensions de - Whirlpool RBD305PRB | Installation Instructions - Page 10
Dimensions du produit - Four simple A Four simple installé dans un placard A B B E F D D C A. Largeur d'encastrement 28 porte du placard supérieur F. Hauteur de l'ouverture 27³⁄₄" (70,5 cm) min. Dimensions du produit - Four double A E D C A. Largeur du placard 30" (76,2 cm) min. B. 1¹⁄₂" - Whirlpool RBD305PRB | Installation Instructions - Page 11
cm) min. Vue en coupe du placard - pour four double ou simple A B E C D A. Profondeur de l'ouverture kit de couleur assortie si les dimensions du four sont inférieures à installer le four correctement, il faut établir le type de raccords électriques que l'on utilisera et suivre les instructions - Whirlpool RBD305PRB | Installation Instructions - Page 12
part sur une surface protégée. AVERTISSEMENT Risque du poids excessif Utiliser deux ou plus de personnes pour déplacer et installer le four. Le non-respect de cette instruction dans l'espace d'installation entre les placards. 3. Approcher le four de son emplacement de service final. 4. Enlever - Whirlpool RBD305PRB | Installation Instructions - Page 13
calibre 8. Relier le four à la terre. Le non-respect de ces instructions peut causer un décès, un incendie ou un choc électrique. Le câblage lectrique. 2. Placer le câble blindé flexible depuis le four jusqu'à l'espace d'installation dans le placard. 3. Le cas échéant, enlever le couvercle du boî - Whirlpool RBD305PRB | Installation Instructions - Page 14
double). Insérer les vis à travers les trous des rails de montage. Ne pas serrer excessivement les vis. A B A. Rail de montage B. Insérer la vis 6. Sur certains modèles, l'évent du four est immobilisé avec du ruban adhésif sur le côté du four. Pour l'installation, procéder selon les instructions - Whirlpool RBD305PRB | Installation Instructions - Page 15
ou LOWER OVEN (four inférieur) pour sélectionner le four à tester. 3. Répéter les étapes 2 à 5 dans "Vérification du fonctionnement du four simple". Pour le réglage de l'horloge et d'autres fonctions du four, voir le Guide d'utilisation et d'entretien. Si vous avez besoin d'assistance ou de service - Whirlpool RBD305PRB | Installation Instructions - Page 16
8303647 © 2005 Whirlpool Corporation. All rights reserved. Tous droits réservés. 4/05 Printed in U.S.A. Imprimé aux É.-U.
-
 1
1 -
 2
2 -
 3
3 -
 4
4 -
 5
5 -
 6
6 -
 7
7 -
8
-
9
-
10
-
11
-
12
-
13
-
14
-
15
-
16
 |
 |

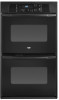
INSTALLATION INSTRUCTIONS
30" (76 CM) ELECTRIC SINGLE AND DOUBLE
BUILT-IN OVEN
INSTRUCTIONS D’INSTALLATION
FOUR ÉLECTRIQUE ENCASTRÉ 30" (76 CM) -
SIMPLE ET DOUBLE
Table of Contents / Table des matières
OVEN SAFETY
..................................................
2
INSTALLATION REQUIREMENTS
..................
2
Tools and Parts
.............................................
2
Location Requirements
.................................
2
Electrical Requirements
................................
4
INSTALLATION INSTRUCTIONS
....................
5
Prepare Oven for Installation
........................
5
Remove Oven Trim
.......................................
5
Make Electrical Connection
..........................
6
Install Oven
....................................................
7
Complete Installation
....................................
8
SÉCURITÉ DU FOUR
.......................................
9
EXIGENCES D'INSTALLATION
.......................
9
Outillage et pièces
.........................................
9
Exigences d'emplacement
............................
9
Spécifications électriques
............................
11
INSTRUCTIONS D'INSTALLATION
...............
12
Préparation du four pour l'installation
.........
12
Dépose des garnitures du four
....................
12
Raccordement électrique
............................
13
Installation du four
.......................................
14
Achever l'installation
....................................
15
IMPORTANT:
Installer:
Leave installation instructions with the homeowner.
Homeowner:
Keep installation instructions for future reference.
Save installation instructions for local electrical inspector's use.
IMPORTANT :
Installateur :
Remettre les instructions d'installation au propriétaire.
Propriétaire :
Conserver les instructions d'installation pour référence ultérieure.
Conserver les instructions d'installation pour consultation par l'inspecteur local des installations électriques.
8303647