Whirlpool RF263LXT Owners Manual
Whirlpool RF263LXT - 30 in. Ing Electric Range Manual
 |
UPC - 883049059167
View all Whirlpool RF263LXT manuals
Add to My Manuals
Save this manual to your list of manuals |
Whirlpool RF263LXT manual content summary:
- Whirlpool RF263LXT | Owners Manual - Page 1
GUIDE 4 COOKTOP USE 5 OVEN USE 6 Electronic Oven Controls 6 Aluminum Foil 6 Positioning Racks and Bakeware 6 Oven Vent 7 Baking and Roasting 7 Broiling 7 Timed Cooking (on some models 7 RANGE CARE 8 Self-Cleaning Cycle (on some models 8 General Cleaning 9 Oven Light 10 TROUBLESHOOTING - Whirlpool RF263LXT | Owners Manual - Page 2
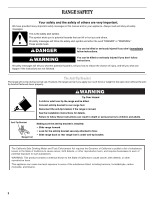
instructions are not followed. The Anti-Tip Bracket The range will not tip during normal use. However, the range can tip if you apply too much force or weight to the open door or other reproductive harm. This appliance can cause low-level exposure to some of the substances listed, including benzene, - Whirlpool RF263LXT | Owners Manual - Page 3
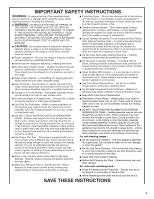
. ■ User Servicing - Do not repair or replace any part of the range unless specifically recommended in the manual. All other servicing should be referred to a qualified technician. ■ Storage in or on the Range - Flammable materials should not be stored in an oven or near surface units. ■ Do Not Use - Whirlpool RF263LXT | Owners Manual - Page 4
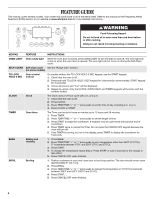
FEATURE GUIDE This manual covers several models. Your model may have some or all of the items listed. Refer to this manual or the Frequently Asked Questions (FAQs) section of our website at www.whirlpool.com for more detailed instructions. WARNING Food Poisoning Hazard Do not let food sit in oven - Whirlpool RF263LXT | Owners Manual - Page 5
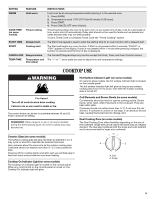
HI and LO. Push in and turn to setting. REMEMBER: When range is in use or (on some models) during the Self-Cleaning cycle, the entire cooktop area may become hot. Coil Elements and Burner Bowls (on some models) Coil elements should be level for optimal cooking results. Burner bowls, when clean - Whirlpool RF263LXT | Owners Manual - Page 6
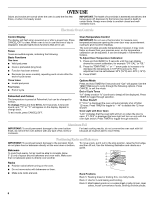
or cookware. For best cooking results, do not cover entire oven rack with foil because air must be able to move freely. Positioning Racks and Bakeware IMPORTANT: To avoid permanent damage to the porcelain finish, do not place food or bakeware directly on the oven door or bottom. Bakeware To - Whirlpool RF263LXT | Owners Manual - Page 7
the element. A. Oven vent (ceramic glass model) A. Oven vent (coil element model) Baking and Roasting ACCUBAKE® Temperature Management System (on some models) The ACCUBAKE® system electronically regulates the oven heat levels during preheat and bake to maintain a precise temperature range for - Whirlpool RF263LXT | Owners Manual - Page 8
able to move freely. Depending on your model, see "Oven Vent" section. Do not clean, rub, damage or move the oven door gasket. Prepare Range ■ Remove the broiler pan, grid, cookware and bakeware, all cooking utensils, oven racks and aluminum foil and, on some models, the temperature probe from the - Whirlpool RF263LXT | Owners Manual - Page 9
cleaning, make sure all controls are off and the oven and cooktop are cool. Always follow label instructions on cleaning products. For additional information, you can visit the Frequently Asked Questions (FAQs) section of our website at www.whirlpool.com. Soap, water and a soft cloth or sponge are - Whirlpool RF263LXT | Owners Manual - Page 10
SURFACE UNDER COOKTOP (on some models) The coil cooktop will lift up to provide easy access for cleaning beneath. Lift the cooktop by both front corners until the support locks into place. Cleaning Method: ■ Steel-wool pad To avoid damage to the range, do not remove the cooktop. OVEN RACKS Cleaning - Whirlpool RF263LXT | Owners Manual - Page 11
too brown on the bottom? Move rack to higher position in the oven. ■ Are pie crust edges browning early? Use aluminum foil to cover the edge of the crust and/or reduce baking temperature. Canning Unit Kit (coil element models) Order Part Number 242905 Cooktop Care Kit (includes cleaner, protectant - Whirlpool RF263LXT | Owners Manual - Page 12
major appliance is operated and maintained according to instructions attached to or furnished with the product, Whirlpool Corporation or Whirlpool Canada LP (hereafter "Whirlpool") will pay for Factory Specified Parts and repair labor to correct defects in materials or workmanship. Service must be
-
 1
1 -
 2
2 -
 3
3 -
 4
4 -
 5
5 -
 6
6 -
 7
7 -
8
-
9
-
10
-
11
-
12
 |
 |
THANK YOU for purchasing this high-quality product. If you should experience a problem not covered in TROUBLESHOOTING,
please visit our website at
www.whirlpool.com
for additional information. If you still need assistance, call us at 1-800-253-1301.
You will need your model and serial number located on the oven frame behind the storage drawer panel.
Para obtener acceso a “Instrucciones para el usuario de la estufa eléctrica” en español, o para obtener información adicional acerca
de su producto, visite:
www.whirlpool.com
Tenga listo su número de modelo completo. Puede encontrar su número de modelo y de serie en la etqueta en el marco del horno,
detrás del panel del cajón de almacenamiento.
®
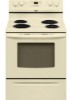
ELECTRIC RANGE
USER INSTRUCTIONS
Table of Contents
RANGE SAFETY
.......................................................................................
2
The Anti-Tip Bracket
.............................................................................
2
FEATURE GUIDE
.....................................................................................
4
COOKTOP USE
........................................................................................
5
OVEN USE
................................................................................................
6
Electronic Oven Controls
......................................................................
6
Aluminum Foil
........................................................................................
6
Positioning Racks and Bakeware
.........................................................
6
Oven Vent
..............................................................................................
7
Baking and Roasting
.............................................................................
7
Broiling
..................................................................................................
7
Timed Cooking (on some models)
........................................................
7
RANGE CARE
...........................................................................................
8
Self-Cleaning Cycle (on some models)
................................................
8
General Cleaning
...................................................................................
9
Oven Light
...........................................................................................
10
TROUBLESHOOTING
............................................................................
10
ACCESSORIES
......................................................................................
11
WARRANTY
............................................................................................
12
W10200356B