Whirlpool RF362LXSS Use and Care Guide
Whirlpool RF362LXSS Manual
 |
View all Whirlpool RF362LXSS manuals
Add to My Manuals
Save this manual to your list of manuals |
Whirlpool RF362LXSS manual content summary:
- Whirlpool RF362LXSS | Use and Care Guide - Page 1
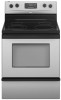
® ELECTRIC RANGE Use & Care Guide For questions about features, operation/performance, parts, accessories or service, call: 1-800-253-1301 or visit our website at...www.whirlpool.com Table of Contents ...2 To the installer: Please leave this instruction book with the unit. To the consumer: Please - Whirlpool RF362LXSS | Use and Care Guide - Page 2
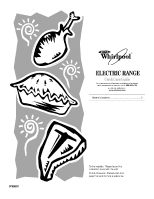
TABLE OF CONTENTS RANGE SAFETY ...3 The Anti-Tip Bracket ...3 PARTS AND FEATURES...5 COOKTOP USE ...8 Cooktop Controls RANGE CARE ...24 Self-Cleaning Cycle...24 General Cleaning...26 Oven Light ...28 Oven Door ...28 Storage Drawer ...28 Warming Drawer ...29 TROUBLESHOOTING ...30 ASSISTANCE OR SERVICE - Whirlpool RF362LXSS | Use and Care Guide - Page 3
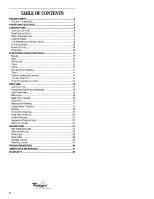
to the open door without having the anti-tip bracket fastened down properly. WARNING Tip Over Hazard A child or adult can tip the range and be killed. Connect anti-tip bracket to rear range foot. Reconnect the anti-tip bracket, if the range is moved. See the installation instructions for details - Whirlpool RF362LXSS | Use and Care Guide - Page 4
Proper Apparel - Loose-fitting or hanging garments should never be worn while using the range. s User Servicing - Do not repair or replace any part of the range unless specifically recommended in the manual. All other servicing should be referred to a qualified technician. s Storage in or on the - Whirlpool RF362LXSS | Use and Care Guide - Page 5
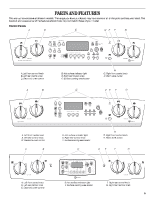
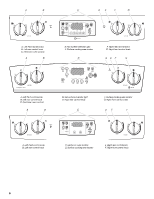
AND FEATURES This manual covers several different models. The range you have purchased may have some or all of the parts and features listed. The location and appearance of the features shown here may not match those of your model. Control Panels A B C D E F G H A. Left front control knob B. Left - Whirlpool RF362LXSS | Use and Care Guide - Page 6
A B C D E F G A. Left front control knob B. Left rear control knob C. Electronic oven control D. Hot surface indicator light E. Surface cooking area locator F. Right rear control knob G. Right front control knob A B C D E F G A. Left front control knob B. Left rear control knob C. - Whirlpool RF362LXSS | Use and Care Guide - Page 7
I. Console panel J. Warm zone element (on some models) K. Automatic oven light switch L. Broil element (not shown) M. Gasket N. Bake element (hidden on some models) O. Self-clean latch Parts and Features not shown Coil elements (on some models) Oven door window Oven light Broiler pan and grid (on - Whirlpool RF362LXSS | Use and Care Guide - Page 8
in and turn knob to vertical (off) when finished. Warm Zone Element (on some ceramic glass models) s Warm Zone Element (on some models) REMEMBER: When range is in use or (on some models) during the Self-Cleaning cycle, the entire cooktop area may become hot. WARNING Food Poisoning Hazard Do - Whirlpool RF362LXSS | Use and Care Guide - Page 9
not allow objects that could melt, such as plastic or aluminum foil, to touch any part of the entire cooktop. Do not use the cooktop as a cutting board. Coil Elements and Burner Bowls (on some models) Coil elements should be level for optimal cooking results. Burner bowls, when clean, reflect heat - Whirlpool RF362LXSS | Use and Care Guide - Page 10
models, the installation of a Canning Unit Kit is recommended. If a kit is not installed, the life of the coil element will be shortened. See "Assistance or Service" for ordering instructions chart as a guide for cookware cooktop from both sides while pressing the support rods back to unlock them. 2. - Whirlpool RF362LXSS | Use and Care Guide - Page 11
ELECTRONIC OVEN CONTROLS Style 1 - Electronic Oven Control (on some models) A B C D E F BROIL CHOICE CONVECT BAKE WARM REVIEW PROGRAM 1 2 3 4 SET TIMER PM AM MIN HR SEC MIN STEP DELAY FC COOK TIME ON WARM DRAWER DOOR LOCKED START TIME STOP TIME P O N M L F. Timer set/off G. - Whirlpool RF362LXSS | Use and Care Guide - Page 12
B. Clock C. Oven display D. Start E. Cancel/off F F. Temperature/time G. Oven settings H. Control lockout I. Auto clean (on some models) J. Timer A B C D E K J I A. Oven light B. Start time C. Oven display D. Clock E. Timer set/off F. Off/cancel H G F G. Start H. Temperature/time - Whirlpool RF362LXSS | Use and Care Guide - Page 13
. If the Start pad is not pressed within 5 seconds after pressing a function pad, the "START?" or "?" indicator light will appear on the display (on some models). If the Start pad is not pressed within 5 minutes after pressing a function pad, the oven display will return to the time of day mode and - Whirlpool RF362LXSS | Use and Care Guide - Page 14
on display. Control Lockout or Lockout (on some models) Control Lockout or Lockout shuts down the control temperature because opening the oven door may cause burner cycling to warmer by the displayed amount. Use the following chart as a guide. ADJUSTMENT °F (ADJUSTMENT °C) 10°F (5°C) 20°F (10°C) 30 - Whirlpool RF362LXSS | Use and Care Guide - Page 15
finish, do not place food or bakeware directly on the oven door or bottom. Convection baking or roasting Convection baking Convection baking 2 cm) of space around bakeware and oven walls. Use the following chart as a guide. NUMBER OF PAN(S) 1 POSITION ON RACK Do not position racks with bakeware on - Whirlpool RF362LXSS | Use and Care Guide - Page 16
chart as a guide. BAKEWARE/ RESULTS one may be ordered. See "Assistance or Service" section to order. Ask for Part Number 4396927. s To Use Racks: 1. crusts s Follow manufacturer's instructions. s May need to reduce rack section Meat Thermometer On models without a temperature probe, use - Whirlpool RF362LXSS | Use and Care Guide - Page 17
soda and eggs. Baking and Roasting ACCUBAKE® Temperature Management System (on some models) The ACCUBAKE® system electronically regulates the oven heat levels during preheat and bake to maintain a precise temperature range for optimal cooking results. The bake and broil elements cycle on and off - Whirlpool RF362LXSS | Use and Care Guide - Page 18
broiler pan and grid (provided on some models). It is designed to drain juices and ordered. See "Assistance or Service" section to order. Ask for Part Number 4396923. s BROILING place it in the center of the oven rack. Close the door to the broil stop position to ensure proper broiling temperature. - Whirlpool RF362LXSS | Use and Care Guide - Page 19
by only opening the oven door when necessary. Choose cookie sheets Meats, Casseroles or Frozen). The following instructions are applicable for each preset. 2. Press temperature other than the preset convection temperature. The convection bake range can be set between 170°F and 500°F (75°C and - Whirlpool RF362LXSS | Use and Care Guide - Page 20
fan circulates the hot air. If the oven door is opened during convection baking or roasting, the fan will turn off immediately. 160°F (71°C) 170°F (77°C) *Do not stuff poultry when convection roasting. Hold Warm Feature (on some models) 20-25 25-30 30-35 20-25 300°F (150°C) 140°F (60°C) 160°F (71°C) 170 - Whirlpool RF362LXSS | Use and Care Guide - Page 21
75°C). The warm range is 170°F-200°F (75°C-93°C). 3. Press START. 4. Press OFF/CANCEL when finished. Timed Cooking (on some models) WARNING Food Poisoning will sound every minute thereafter. 8. Press OFF/CANCEL or open the oven door to stop reminder tones and remove "End" from display. The time of - Whirlpool RF362LXSS | Use and Care Guide - Page 22
enabled, reminder tones will sound every minute. 6. Open and close the oven door to clear the display and/or stop reminder tones. Before setting, make sure " will appear on the display. 9. Press OFF/CANCEL or open the oven door to clear the display. To Set a Delayed Timed Cook: Before setting, make - Whirlpool RF362LXSS | Use and Care Guide - Page 23
up to 4 cooking functions within the sequence. Warming Drawer (on some models) WARNING Food Poisoning Hazard Do not let food sit for more than one with soap and water. See "General Cleaning" section. To Review/Modify Programmed Sequence: If program steps are partially or completely programmed - Whirlpool RF362LXSS | Use and Care Guide - Page 24
RANGE CARE Self-Cleaning Cycle (on some models during Self-Cleaning cycle. Failure to follow these instructions can result in burns. IMPORTANT: The health or move the oven door gasket. The door gasket is essential for a good seal. Styles 2 & 3 - Electronic Oven Control (on some models) The oven is - Whirlpool RF362LXSS | Use and Care Guide - Page 25
oven will automatically turn on. When the cycle is complete and the oven cools, DOOR LOCKED indicator light will turn off. 5. Press OFF/CANCEL to clear the oven display. Style 4 - Electronic Oven Control (on some models) 1. Press AUTO CLEAN to set the clean time to Quick Clean (2 hours 30 minutes - Whirlpool RF362LXSS | Use and Care Guide - Page 26
oven temperature is too high, the door will remain locked. It will not . Always follow label instructions on cleaning products. Soap models) Cleaning Method: Rub in direction of grain to avoid damaging. s Stainless Steel Cleaner & Polish Part Number 31464 (not included): See "Assistance or Service - Whirlpool RF362LXSS | Use and Care Guide - Page 27
product label instructions. Porcelain enamel only s Dishwasher s s Porcelain enamel only Dishwasher Do not clean in the Self-Cleaning cycle. Gas Grate and Drip Pan Cleaner Part Number 31617 (not included): See "Assistance or Service" section to order. STORAGE DRAWER (on some models) Make sure - Whirlpool RF362LXSS | Use and Care Guide - Page 28
removing, make sure drawer is cool and empty. Oven Door For normal range use, it is not suggested to remove the oven door. However, if removal is necessary, make sure the oven is off and cool. Then, follow these instructions. The oven door is heavy. To Remove: 1. Pull the storage drawer straight - Whirlpool RF362LXSS | Use and Care Guide - Page 29
Warming Drawer (on some models) Remove all items from inside the warming drawer, and allow triangle-shaped tabs on both sides of the drawer. To Replace: 1. Align the drawer glides with the receiving guides. A A. Tab 2. Push drawer in all the way. 3. Gently open and close the drawer to ensure it - Whirlpool RF362LXSS | Use and Care Guide - Page 30
s Is the oven door open? Close the oven door all the way. Has the function been entered? See "Self-Cleaning Cycle" section. On some models, has a delay See the Installation Instructions. s s s s s s s s s s s Is the appliance level? Level the appliance. See the Installation Instructions. Is the - Whirlpool RF362LXSS | Use and Care Guide - Page 31
Before calling for assistance or service, please check "Troubleshooting." It may save you the cost of a service call. If you still need help, follow the instructions below. When calling, please know the purchase date and the complete model and serial number of your appliance. This information - Whirlpool RF362LXSS | Use and Care Guide - Page 32
pay for FSP® replacement parts and repair labor to correct defects in materials or workmanship. Service must be provided by a Whirlpool designated service company. ITEMS WHIRLPOOL WILL NOT PAY FOR 1. Service calls to correct the installation of your major appliance, to instruct you how to use your
-
 1
1 -
 2
2 -
 3
3 -
 4
4 -
 5
5 -
 6
6 -
 7
7 -
8
-
9
-
10
-
11
-
12
-
13
-
14
-
15
-
16
-
17
-
18
-
19
-
20
-
21
-
22
-
23
-
24
-
25
-
26
-
27
-
28
-
29
-
30
-
31
-
32
 |
 |
ELECTRIC RANGE
Use&CareGuide
For questions about features, operation/performance,
parts, accessories or service, call:
1-800-253-1301
or visit our website at...
www.whirlpool.com
Table of Contents
.................................................
2
9763001
®
To the installer: Please leave this
instruction book with the unit.
To the consumer: Please read and
keep this book for future reference.