Whirlpool RS696PXGB Use and Care Guide
Whirlpool RS696PXGB Manual
 |
View all Whirlpool RS696PXGB manuals
Add to My Manuals
Save this manual to your list of manuals |
Whirlpool RS696PXGB manual content summary:
- Whirlpool RS696PXGB | Use and Care Guide - Page 1
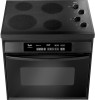
38 Caring for Your Range 44 Troubleshooting............52 Requesting Assistance or Service 54 Index 55 Warranty 56 1-800-253-1301 Call our Consumer Assistance Center with questions or comments. SELF-CLEANING AND STANDARD-CLEANING ELECTRIC DROP-IN RANGES MODELS RS610PXG RS675PXG RS696PXG 3191537 - Whirlpool RS696PXGB | Use and Care Guide - Page 2
Note to You Thank you for buying a WHIRLPOOL® appliance. The Whirlpool Brand is committed to designing quality products that consistently perform for you to make your life easier. To ensure that you enjoy years of trouble-free operation, we developed this Use and Care Guide. It is full of valuable - Whirlpool RS696PXGB | Use and Care Guide - Page 3
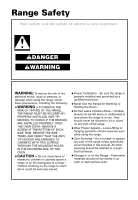
repair or replace any part of the range unless specifically recommended in the manual. All other servicing should be referred to a qualified technician. • Storage in or on the Range - Flammable materials should not be stored in an oven or near surface units. - SAVE THESE INSTRUCTIONS - continued - Whirlpool RS696PXGB | Use and Care Guide - Page 4
RANGE SAFETY IMPORTANT SAFETY INSTRUCTIONS bottoms, except as suggested in the manual. Improper installation of these liners may utensils are suitable for range-top service without breaking due to Let hot air or steam escape before removing or replacing food. • Do Not Heat Unopened Food Containers - Whirlpool RS696PXGB | Use and Care Guide - Page 5
RANGE SAFETY IMPORTANT SAFETY INSTRUCTIONS • DO NOT TOUCH HEATING ELEMENTS OR INTERIOR SURFACES OF liner protective coating of any kind should be used in or around any part of the oven. • Clean Only Parts Listed in Manual. • Before Self-Cleaning the Oven - Remove broiler pan and other utensils - Whirlpool RS696PXGB | Use and Care Guide - Page 6
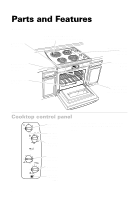
Parts and Features (Models RS610PXG and RS675PXG) Oven vent (p. 37) Plug-in coil element with one-piece chrome reflector bowl (pp. OFF CANCEL Cooktop control panel (pp. 6, 8) Oven control panel (p. 14) Model and serial number plate (on mounting rail) Cooktop control panel Left rear control knob - Whirlpool RS696PXGB | Use and Care Guide - Page 7
PARTS AND FEATURES (Model RS696PXG) Oven vent (p. 37) CLEANTOP® ceramic glass cooktop (pp. 9, 47) Broil Surface cooking area (p. 9) Cooktop control panel (pp. 7, 8) Oven Control Panel (p. 14) Model and serial number plate (on mounting rail) Cooktop control panel NOTE: Oven cooling fan remains - Whirlpool RS696PXGB | Use and Care Guide - Page 8
Using Your Range wWARNING Fire Hazard Turn off all controls when done cooking. shows which surface cooking area is turned on by that knob. (Models RS610PXG and RS675PXG) (Model RS696PXG) Power on indicator light (Models RS610PXG and RS675PXG) The Power On Indicator Light on the cooktop surface - Whirlpool RS696PXGB | Use and Care Guide - Page 9
RANGE Until you get used to the settings, use the following as a guide. For best glass cooktop (Model RS696PXG) Cooking on the ceramic glass cooktop is similar to cooking on coil elements. There difficult to remove or could leave permanent marks. • Dropping a heavy or hard object on the cooktop could - Whirlpool RS696PXGB | Use and Care Guide - Page 10
RANGE in a pressure canner. • On coil element models, keep your reflector bowls clean so coil elements. This can also damage the cooktop. If you plan to use the cooktop for canning, we recommend the installation of a Canning Kit. Order the kit (Part No. 242905) from your dealer or authorized service - Whirlpool RS696PXGB | Use and Care Guide - Page 11
RANGE Characteristics of cookware materials The pan material affects how fast heat transfers from the surface cooking area through the pan material and how evenly heat spreads over the pan bottom. Choose pans that provide the best settings. • Follow manufacturer's instructions. Copper • Heats very - Whirlpool RS696PXGB | Use and Care Guide - Page 12
RANGE arrange the racks on the 2nd and 4th rack guides. Two sheets of cookies may be baked if sheets time. Increase baking time, if necessary. • For best results allow 2 inches of space around each pan pans in the oven for even heat to reach all parts of the oven. This results in better baking. Where - Whirlpool RS696PXGB | Use and Care Guide - Page 13
RANGE Bakeware choices Baking performance is affected by the type of bakeware used. Use the bakeware size recommended in the recipe. BAKEWARE TYPE Light colored aluminum Dark aluminum and other bakeware with dark, dull, and/or non-stick finish Ovenproof glassware, ceramic glass, or ceramic BEST - Whirlpool RS696PXGB | Use and Care Guide - Page 14
RANGE HR MIN START ENTER 5 SEC OFF CANCEL Manual oven light pad (p. 51) Oven setting . 16, (pp. 16, Auto Clean - Models 24, 27) (pp. 26-37) 17) 17) RS675PXG and RS696PXG - pp. 39, 40) Start/ enter pad , your electricity was off for a while. Reset the clock. • The clock displays the time - Whirlpool RS696PXGB | Use and Care Guide - Page 15
USING YOUR RANGE Command pads The command pads tell the oven what to do and in what order. Some command pads have an Indicator Light. The Indicator Light - Whirlpool RS696PXGB | Use and Care Guide - Page 16
USING YOUR RANGE Setting the clock ELECTRONIC OVEN CONTROL BAKE CUSTOM BROIL CLOCK TIMER TIMER SET OFF CLOCK LIGHT TEMP COOK TIME DELAY START TIME and hold CLOCK for 5 seconds. To display the clock time again, press and hold CLOCK for 5 seconds. You should not have to reset the time. 16 - Whirlpool RS696PXGB | Use and Care Guide - Page 17
USING YOUR RANGE Using the electronic Minute Timer The Minute Timer does not start or stop the oven. It works like a kitchen timer. It can be set in - Whirlpool RS696PXGB | Use and Care Guide - Page 18
USING YOUR RANGE 4. Turn off Minute Timer. To cancel the Minute Timer: Press TIMER OFF. PRESS TIMER OFF YOU SEE PRESS TIMER OFF (time of day) YOU SEE ( - Whirlpool RS696PXGB | Use and Care Guide - Page 19
USING YOUR RANGE Baking/roasting 1. Position racks. For more information, see "Positioning racks and pans" in "Using the Oven" earlier in this section. ELECTRONIC OVEN CONTROL BAKE CUSTOM - Whirlpool RS696PXGB | Use and Care Guide - Page 20
USING YOUR RANGE Roasting meats and poultry • For even cooking, place the meat on a (in min and sec) 5 min 45 sec 7 min 30 sec 11 min As the countdown ends, the set temperature replaces "PrE" on the display. You will also hear a 1-second tone. NOTES: • You can change the temperature setting any - Whirlpool RS696PXGB | Use and Care Guide - Page 21
USING YOUR RANGE Saving energy • To avoid loss of heat, open the oven door as little as possible. • Use a timer to keep track of cooking time. • Plan your - Whirlpool RS696PXGB | Use and Care Guide - Page 22
USING YOUR RANGE 3. Enter the adjustment. PRESS START ENTER 5 SEC YOU SEE (time of will sound CUSTOM and the temperatures will be disBROIL played in °C. To switch back to °F, repeat the instructions above. NOTE: The temperature display will not be shown when switching from °F to °C and back. The - Whirlpool RS696PXGB | Use and Care Guide - Page 23
from the broil element. See "Broiling guidelines" later in this section. 2. Put food on broiler pan and place in center of oven rack. USING YOUR RANGE OFF CANCEL CUSTOM BROIL 3. Close door. NOTE: Do not keep the door open as on other electric ovens. Unlike other electric ovens, the broil element - Whirlpool RS696PXGB | Use and Care Guide - Page 24
USING YOUR RANGE 6. When broiling is done, turn off oven. PRESS OFF CANCEL To custom broil at a lower temperature: • If food is cooking too fast, press CUSTOM BROIL - Whirlpool RS696PXGB | Use and Care Guide - Page 25
RANGE positions are numbered from the bottom (1) to the top (5). For best results, place food 3 inches or more from the broil element. MEAT thick steaks 3⁄4-1" thick APPROXIMATE TIME (MINUTES) SIDE 1 SIDE 2 14-15 15-16 18-19 13-14 20-22 8-10 5-7 14-17 7-8 8-9 9-10 7-8 10-11 4-5 3-4 8-9 17- - Whirlpool RS696PXGB | Use and Care Guide - Page 26
USING YOUR RANGE Using the electronic MEALTIMER™ control The electronic MEALTIMER control for starting and stopping baking/roasting automatically. Read this section carefully to choose which method(s) is best for you. Before using the electronic MEALTIMER control, make sure the clock is set to the - Whirlpool RS696PXGB | Use and Care Guide - Page 27
USING YOUR RANGE 3. Set temperature (optional). Do this step if you want to set a temperature other than 350°F. Press s to raise the temperature or t to lower the temperature - Whirlpool RS696PXGB | Use and Care Guide - Page 28
USING YOUR RANGE 7. When baking/roasting is done: The oven will turn off automatically and beep 4 times. You will also hear four 1-second tones every minute (unless they - Whirlpool RS696PXGB | Use and Care Guide - Page 29
USING YOUR RANGE 3. Set temperature (optional). Do this step if you want to set a temperature other than 350°F. Press v to raise the temperature or w to lower the temperature - Whirlpool RS696PXGB | Use and Care Guide - Page 30
USING YOUR RANGE 7. When baking/roasting is done: The oven will turn off automatically and beep 4 times. You will also hear four 1-second tones every minute (unless they - Whirlpool RS696PXGB | Use and Care Guide - Page 31
USING YOUR RANGE 4. Press COOK TIME. PRESS COOK TIME YOU SEE F BAKE COOK TIME 5. Set cook time. Press the "up" (s) or "down" (t) pad(s) until the correct time shows - Whirlpool RS696PXGB | Use and Care Guide - Page 32
USING YOUR RANGE 9. When start time is reached: A 1-second tone will sound. The display will count down the baking/ roasting time in hours and minutes (if cook time - Whirlpool RS696PXGB | Use and Care Guide - Page 33
USING YOUR RANGE 3. Set temperature (optional). Do this step if you want to set a temperature other than 350°F. Press s to raise the temperature or t to lower the temperature - Whirlpool RS696PXGB | Use and Care Guide - Page 34
USING YOUR RANGE 8. Complete entry. NOTES: • You can change the temperature or time settings any time after pressing START/ENTER by repeating Steps 2 through 7. • The display will show " - Whirlpool RS696PXGB | Use and Care Guide - Page 35
USING YOUR RANGE 2. Choose Bake setting. PRESS BAKE YOU SEE F BAKE 3. Set temperature (optional). Do this step if you want to set a temperature other than 350°F. Press s to - Whirlpool RS696PXGB | Use and Care Guide - Page 36
USING YOUR RANGE 7. Set stop time. PRESS Press the "up" (s) or "down" (t) pad(s) until the correct time shows on the display. HR MIN Example at right shows a desired - Whirlpool RS696PXGB | Use and Care Guide - Page 37
USING YOUR RANGE 11. Turn off oven. NOTE: You can do this step any time to cancel the MEALTIMER™ control setting. PRESS OFF CANCEL YOU SEE (time of - Whirlpool RS696PXGB | Use and Care Guide - Page 38
the Self-Cleaning Cycle (MODELS RS675PXG AND RS696PXG) wWARNING Burn Hazard Do not touch the oven during the Self-Cleaning cycle. Keep children away from oven during Self-Cleaning cycle. Do not use commercial oven cleaners in your oven. Failure to follow these instructions can result in burns, or - Whirlpool RS696PXGB | Use and Care Guide - Page 39
oven takes longer and results in more smoke than usual. • Do not block the vent during the Self- Cleaning cycle. Air must move freely for best cleaning results. • Do not leave plastic utensils on the cook- top. They may melt. • Do not leave any foil in the oven during the Self - Whirlpool RS696PXGB | Use and Care Guide - Page 40
USING THE SELF-CLEANING CYCLE 3. Start oven. PRESS START ENTER 5 SEC YOU SEE HEAT ON TIMED CLEAN TIME 4. After Self-Cleaning cycle starts: LOCKED lights up on the display. The door cannot be opened when LOCKED is on. 5. After Self-Cleaning cycle ends: YOU SEE HEAT TIMED ON LOCKED CLEAN - Whirlpool RS696PXGB | Use and Care Guide - Page 41
USING THE SELF-CLEANING CYCLE 2. Set cleaning time (optional). If you want a Self-Cleaning cycle longer or shorter than 31⁄2 hours, use the Hour pad to set the desired cleaning time. Press the "up" (v) or "down" (w) pad(s) until a time between 21⁄2-41⁄2 hours shows on the display. • Use 21⁄2 hours - Whirlpool RS696PXGB | Use and Care Guide - Page 42
USING THE SELF-CLEANING CYCLE 7. After Self-Cleaning cycle ends: NOTES: • The stop time will be the start time plus the cleaning time. • The fan may stay on after the Self- Cleaning cycle ends, until the oven cools down. YOU SEE LOCKED (example for 7:00 stop time) YOU SEE CLEAN 8. After the oven - Whirlpool RS696PXGB | Use and Care Guide - Page 43
USING THE SELF-CLEANING CYCLE How the cycle works The Self-Cleaning cycle uses very high heat to burn away soil and grease. During the cycle, the oven gets much hotter than it does for normal baking or broiling. This high heat breaks up the soil or grease and burns it away. Your oven is preset for - Whirlpool RS696PXGB | Use and Care Guide - Page 44
the range is cool. Refer to instructions on all cleaning products before using them to clean your range. PART CLEANING METHOD SPECIAL INSTRUCTIONS the model and serial plate; too much scrubbing could remove the numbers. Ceramic glass cooktop (Model RS696PXG) Coil Elements (Models RS610PXG - Whirlpool RS696PXGB | Use and Care Guide - Page 45
CARING FOR YOUR RANGE Cleaning chart (cont.) PART CLEANING METHOD SPECIAL INSTRUCTIONS Chrome reflector bowls* (Models RS610PXG and RS675PXG) • Light to moderate soil • Soap and water • Non-abrasive plastic scrubbing pad • Wash, rinse and dry with soft cloth. • Dishwasher • Heavy to - Whirlpool RS696PXGB | Use and Care Guide - Page 46
CARING FOR YOUR RANGE Cleaning chart (cont.) PART CLEANING METHOD SPECIAL INSTRUCTIONS Oven cavity (Models RS675PXG and RS696PXG) • Food on 2nd and 4th rack guides. Racks will discolor and become harder to slide. After cleaning, apply vegetable oil to rack guides for easier sliding. Broiler pan - Whirlpool RS696PXGB | Use and Care Guide - Page 47
RANGE Cleaning the ceramic glass cooktop (Model RS696PXG) Your cooktop is designed for easy care. It has been prepolished at the factory for improved protection and easier cleaning. Foods spilled directly on the cooktop will not burn off as on open-coil Creme (Part No. 3184477), call 1-800-253-1301. - Whirlpool RS696PXGB | Use and Care Guide - Page 48
BAKE OFF CARING FOR YOUR RANGE Coil elements and reflector bowls (Models RS610PXG and RS675PXG) Removing 1. Make sure all coil elements are off and cool before removing coil elements and reflector bowls. 2. Push in the edge of the coil element, opposite the receptacle. Then lift it just enough to - Whirlpool RS696PXGB | Use and Care Guide - Page 49
CARING FOR YOUR RANGE Coil elements and reflector bowls (cont.) (Models RS610PXG and RS675PXG) Replacing 1. Make sure all coil elements are off and cool before replacing coil elements and reflector bowls. 2. Line up openings in the reflector bowl with the coil element receptacle. BAKE OFF 3. Hold - Whirlpool RS696PXGB | Use and Care Guide - Page 50
CARING FOR YOUR RANGE Removing the oven door For normal use of your oven, you do not need to remove the door. However, if you have to remove the door follow the instructions in this section. The oven door is heavy. Use both hands to remove and replace the door. Do not lift and - Whirlpool RS696PXGB | Use and Care Guide - Page 51
CARING FOR YOUR RANGE The oven lights The oven lights will come on when you open the oven door. To turn the lights on when the oven door is closed, press the Oven Light pad on the control panel. LIGHT NOTE: Make sure oven is cool before replacing a light bulb. To replace an oven - Whirlpool RS696PXGB | Use and Care Guide - Page 52
with the proper voltage? (See Installation Instructions.) w Have you blown a household fuse or tripped a circuit breaker? Other possible problems and their causes: PROBLEM The oven will not operate The surface cooking areas will not operate (Models RS610PXG and RS675PXG) The control knob(s) will - Whirlpool RS696PXGB | Use and Care Guide - Page 53
TROUBLESHOOTING PROBLEM baked items • Check that the range is level. • Bake in center been a power failure. Reset the clock. (See " service. (See the "Requesting Assistance or Service" section on page 54.) If none of these items was causing your problem, see the "Requesting Assistance or Service - Whirlpool RS696PXGB | Use and Care Guide - Page 54
or Service To avoid unnecessary service calls, please check the "Troubleshooting" section. It may save you the cost of a service call. If you still need help, follow the instructions below. If you need assistance or service Call the Whirlpool Consumer Assistance • Accessory and repair parts sales - Whirlpool RS696PXGB | Use and Care Guide - Page 55
Control 15 Self-cleaning cycle 40, 41 MODEL AND SERIAL NUMBER 2 OVEN TEMPERATURE Adjusting 21 Setting 19, 24, 27, 29, 30, 33, 35 OVEN VENT 37 PANS 12 PARTS 6, 7 RACKS 12 REMOVING THE OVEN DOOR 50 ROASTING Aluminum foil 13 Bakeware choices 13 Pans 12 Racks 12 Setting cycle 19 SAFETY - Whirlpool RS696PXGB | Use and Care Guide - Page 56
units will not burn out. WHIRLPOOL WILL NOT PAY FOR A. Service calls to: 1. Correct the installation of your range. 2. Instruct you how to use your range. 3. Replace house fuses or correct house wiring. 4. Replace owner-accessible light bulbs. B. Repairs when your range is used in other than
-
 1
1 -
 2
2 -
 3
3 -
 4
4 -
 5
5 -
 6
6 -
 7
7 -
8
-
9
-
10
-
11
-
12
-
13
-
14
-
15
-
16
-
17
-
18
-
19
-
20
-
21
-
22
-
23
-
24
-
25
-
26
-
27
-
28
-
29
-
30
-
31
-
32
-
33
-
34
-
35
-
36
-
37
-
38
-
39
-
40
-
41
-
42
-
43
-
44
-
45
-
46
-
47
-
48
-
49
-
50
-
51
-
52
-
53
-
54
-
55
-
56
 |
 |
SELF-CLEANING AND STANDARD-CLEANING
ELECTRIC DROP-IN RANGES
MODELS RS610PXG
RS675PXG
RS696PXG
Use And Care
G
U
I
D
E
3191537
A Note to You
..................
2
Range Safety
...................
3
Parts and Features
.........
6
Using Your Range
...........
8
Using the
Self-Cleaning Cycle
......
38
Caring for
Your Range
....................
44
Troubleshooting
............
52
Requesting
Assistance
or Service
......................
54
Index
..............................
55
Warranty
........................
56
1-800-253-1301
Call our Consumer Assistance Center
with questions or comments.