Whirlpool SF114PXSB Installation Instructions
Whirlpool SF114PXSB Manual
 |
View all Whirlpool SF114PXSB manuals
Add to My Manuals
Save this manual to your list of manuals |
Whirlpool SF114PXSB manual content summary:
- Whirlpool SF114PXSB | Installation Instructions - Page 1
INSTALLATION INSTRUCTIONS 30" (76.2 CM) FREESTANDING GAS RANGE with standard clean oven Table of Contents 2 IMPORTANT: Save for local electrical inspector's use. W10032050 - Whirlpool SF114PXSB | Installation Instructions - Page 2
2 INSTALLATION REQUIREMENTS 4 Tools and Parts 4 Location Requirements 4 Electrical Requirements 6 Gas Supply Requirements 6 INSTALLATION INSTRUCTIONS 8 Unpack Range 8 Install Anti-Tip Bracket 8 Verify Anti-Tip Bracket Location 9 Level Range 9 Make Gas Connection 9 Check Operation 10 - Whirlpool SF114PXSB | Installation Instructions - Page 3
light any appliance. • Do not touch any electrical switch. • Do not use any phone in your building. • Immediately call your gas supplier from a neighbor's phone. Follow the gas supplier's instructions. • If you cannot reach your gas supplier, call the fire department. - Installation and service must - Whirlpool SF114PXSB | Installation Instructions - Page 4
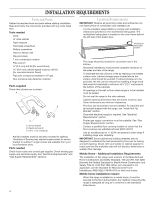
compound resistant to LP gas ■ Non-corrosive leak-detection sollution Parts supplied Check that all parts are included. A B model/serial rating plate. The model/serial rating plate is located on the oven frame behind the left side of the broiler door. Model/serial rating plate location ■ The range - Whirlpool SF114PXSB | Installation Instructions - Page 5
24" (61 cm), the oven frame must extend beyond cabinet for tall backguard models 18" ( This shaded area recommended for installation of gas pipe. 24" (61.0 cm) 10 range hood or microwave hood combination above the range, follow the range hood or microwave hood combination installation instructions - Whirlpool SF114PXSB | Installation Instructions - Page 6
be done by a qualified service technician. No attempt shall be made to convert the appliance from the gas specified on the model/serial rating plate for use with a different gas without consulting the serving gas supplier. See "Gas Conversions" section. Gas Supply Line ■ Provide a gas supply line of - Whirlpool SF114PXSB | Installation Instructions - Page 7
metal appliance connector may be used for connecting range to the gas supply line. Burner Input Requirements Input ratings shown on the model/serial appliance must be isolated from the gas supply piping system by closing its individual manual shutoff valve during any pressure testing of the gas - Whirlpool SF114PXSB | Installation Instructions - Page 8
cardboard bottom under range. Remove oven racks and parts package from inside oven. 3. Take 4 cardboard corners from the carton. Stack one cardboard corner on top of another. Repeat with the other 2 corners. Place them lengthwise on the floor behind the range to support the range when it is laid - Whirlpool SF114PXSB | Installation Instructions - Page 9
instructions. Level Range 1. Place rack in oven. 2. Place level on rack and check levelness of the range, first side to side; then front to back. B C A D E F G A. Pressure regulator connection fitting B. 90˚ elbow C. Black iron pipe D. Union E. Nipple F. Manual shutoff valve G. ¹⁄₂" to ³⁄₄" gas - Whirlpool SF114PXSB | Installation Instructions - Page 10
oven control is turned to the desired setting, a hot surface ignitor heats to a bright orange and ignites the gas manual shutoff valve in the gas supply line. The valve is "open" when the handle is parallel to the gas extension cord. Failure to follow these instructions can result in death, fire, or - Whirlpool SF114PXSB | Installation Instructions - Page 11
into a grounded 3 prong outlet. ■ Electrical supply is connected. ■ See "Troubleshooting" in your Use and Care Guide. ■ When the range has been on for 5 minutes, feel for heat. If you do not feel heat, turn the range off and check to see that the gas supply line shutoff valve is open. ■ If the - Whirlpool SF114PXSB | Installation Instructions - Page 12
the range is moved. Failure to follow these instructions can result in death or serious burns to children and adults. 6. Reinstall the cap. A. Cap To Convert Surface Burners 1. Remove burner grate, burner caps, and burners. A To Convert Gas Pressure Regulator 1. Ensure that the manual shutoff - Whirlpool SF114PXSB | Installation Instructions - Page 13
wrench. 4. Install LP gas orifice spuds. NOTE: Depending on model, the range cooktop may be equipped with 4 standard burners or 3 standard burners and 1 power burner. Spud size/location remain the same. To Convert Oven Burner 1. Open oven door and remove oven racks, oven tray, flame spreader and - Whirlpool SF114PXSB | Installation Instructions - Page 14
range is moved. Failure to follow these instructions can result in death or serious burns to children and adults. 6. Reinstall the cap. A. Cap To Convert Surface Burners 1. Remove burner grates, burner caps, and burners. A To Convert Gas Pressure Regulator B 1. Ensure that the manual shutoff - Whirlpool SF114PXSB | Installation Instructions - Page 15
keep with bag containing literature. 7. Reinstall oven burner. 8. Reinstall oven racks, oven tray and flame spreader. Complete Conversion 1. Refer to the "Make Gas Connection" section for properly connecting the range to the gas supply. 2. Turn the gas manual shutoff valve to the "open" position - Whirlpool SF114PXSB | Installation Instructions - Page 16
W10032050 ©2006 Whirlpool Corporation All rights reserved. Printed in Mexico 07/2006
-
 1
1 -
 2
2 -
 3
3 -
 4
4 -
 5
5 -
 6
6 -
 7
7 -
8
-
9
-
10
-
11
-
12
-
13
-
14
-
15
-
16
 |
 |

IMPORTANT:
Save for local electrical inspector’s use.
INSTALLATION INSTRUCTIONS
30" (76.2 CM) FREESTANDING GAS RANGE
with standard clean oven
W10032050
Table of Contents
..................................................
2