Whirlpool WDE101LVQ Installation Instructions
Whirlpool WDE101LVQ - DROP-IN RANGES STANDARD CLEAN Manual
 |
UPC - 883049148014
View all Whirlpool WDE101LVQ manuals
Add to My Manuals
Save this manual to your list of manuals |
Whirlpool WDE101LVQ manual content summary:
- Whirlpool WDE101LVQ | Installation Instructions - Page 1
INSTALLATION INSTRUCTIONS DROP-IN ELECTRIC RANGE Table of Contents RANGE SAFETY 2 INSTALLATION REQUIREMENTS 3 Tools and Parts 3 Location Requirements 3 Electrical Requirements 4 Countertop Preparation 5 INSTALLATION INSTRUCTIONS 5 Unpack Range 5 Install Anti-Tip Bracket 5 Adjust Leveling - Whirlpool WDE101LVQ | Installation Instructions - Page 2
RANGE SAFETY Your safety and the safety of others are very important. We have provided many important safety messages in this manual and on your appliance don't immediately follow instructions. WARNING You can be killed or seriously injured if you don't follow instructions. All safety messages - Whirlpool WDE101LVQ | Installation Instructions - Page 3
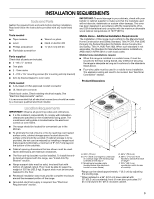
. Any method of securing the range is adequate as long as it conforms to the standards listed above. ■ Four-wire cable must be used in a mobile home installation. The appliance wiring will need to be revised. See "Electrical Connection" section. Product Dimensions A Location Requirements IMPORTANT - Whirlpool WDE101LVQ | Installation Instructions - Page 4
, you must determine the type of electrical connection you will be using and follow the instructions provided for it here. ■ Range must be connected to the proper electrical voltage and frequency as specified on the model/serial number rating plate. The model/serial number rating plate is located - Whirlpool WDE101LVQ | Installation Instructions - Page 5
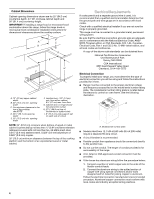
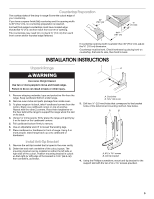
If countertop opening width is greater than 30" (76.2 cm), adjust the ³⁄₈" (1.0 cm) dimension. Countertop must be level. Check levelness by placing level on countertop, first side to side, then front to back. INSTALLATION INSTRUCTIONS Unpack Range A WARNING Excessive Weight Hazard B Use two or - Whirlpool WDE101LVQ | Installation Instructions - Page 6
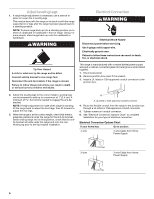
. Using 2 or more people, stand range back up onto the cardboard or hardboard. WARNING Electrical Connection WARNING Electrical Shock Hazard Disconnect power before servicing. Use 8 gauge solid copper wire. Electrically ground oven. Failure to follow these instructions can result in death, fire, or - Whirlpool WDE101LVQ | Installation Instructions - Page 7
the 2 black wires (C) together using a UL listed wire connector. 2. Connect the 2 white wires (D) and the green (or bare) ground wire (of the range cable) using a UL listed wire connector. 3. Connect the 2 red wires (G) together using a UL listed wire connector. 4. Install junction box cover. Verify - Whirlpool WDE101LVQ | Installation Instructions - Page 8
Use and Care Guide for specific instruction on range operation. If range does not operate, check the following: ■ Household fuse is intact and tight; or circuit breaker has not tripped. ■ Electrical supply is connected. ■ See "Troubleshooting" in the Use and Care Guide. When the range has been on
-
 1
1 -
 2
2 -
 3
3 -
 4
4 -
 5
5 -
 6
6 -
 7
7 -
8
 |
 |

INSTALLATION INSTRUCTIONS
DROP-IN ELECTRIC RANGE
Table of Contents
RANGE SAFETY
.............................................................................
2
INSTALLATION REQUIREMENTS
................................................
3
Tools and Parts
............................................................................
3
Location Requirements
................................................................
3
Electrical Requirements
...............................................................
4
Countertop Preparation
...............................................................
5
INSTALLATION INSTRUCTIONS
..................................................
5
Unpack Range
..............................................................................
5
Install Anti-Tip Bracket
.................................................................
5
Adjust Leveling Legs
....................................................................
6
Electrical Connection
...................................................................
6
Verify Anti-Tip Bracket Location
..................................................
7
Level Range
..................................................................................
7
Install Lower Trim
.........................................................................
8
Complete Installation
....................................................................
8
Moving the Range
........................................................................
8
IMPORTANT:
Save for local electrical inspector's use.
8101P747-60