Whirlpool WED4800XQ Installation Instructions
Whirlpool WED4800XQ Manual
 |
UPC - 883049200057
View all Whirlpool WED4800XQ manuals
Add to My Manuals
Save this manual to your list of manuals |
Whirlpool WED4800XQ manual content summary:
- Whirlpool WED4800XQ | Installation Instructions - Page 1
Dryer Installation Instructions 29" Wide Models - U.S.A. Only Para obtener acceso al manual de uso y cuidado en español, o para obtener información adicional acerca de su producto, visite: www.whirlpool Dryer 15 Complete Installation Checklist 15 Reverse Door Swing (Optional 16 Troubleshooting - Whirlpool WED4800XQ | Installation Instructions - Page 2
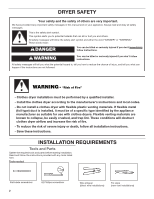
DRYER SAFETY Your safety and the safety of others are very important. We have provided many important safety messages in this manual and on your appliance. Always read and obey all safety messages. This is the safety alert symbol. This symbol alerts you to potential hazards that can kill or hurt - Whirlpool WED4800XQ | Installation Instructions - Page 3
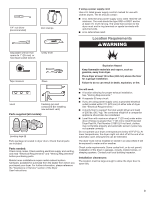
Requirements" before purchasing parts. Mobile home installations require metal exhaust system hardware, available for purchase from the dealer from whom you purchased your dryer. For further information, please reference the "Assistance or Service" section of the Dryer User Instructions. You will - Whirlpool WED4800XQ | Installation Instructions - Page 4
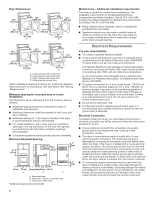
Part 3280 (formerly the Federal Standard for Mobile Home Construction and Safety, Title 24, HUD Part installation and servicing. ■■ acceptable. ■■ Companion appliance spacing should also be dryer, you must determine the type of electrical connection you will be using and follow the instructions - Whirlpool WED4800XQ | Installation Instructions - Page 5
120/240 volt minimum. The cord should be type SRD or SRDT and be at least 4 ft. (1.22 m) long. The wires that connect to the dryer must end in ring terminals or spade terminals with upturned ends. ■■ A UL listed strain relief. If your outlet looks like this: Then choose a 4-wire power - Whirlpool WED4800XQ | Installation Instructions - Page 6
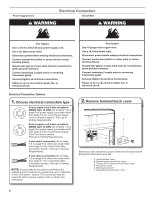
Power Supply Cord Electrical Connection Direct Wire WARNING WARNING Fire Hazard use a new ul listed 30 amp power supply cord. use a ul listed strain relief. Disconnect power before making electrical connections. Connect neutral wire (white or center wire) to center terminal (silver). Ground wire - Whirlpool WED4800XQ | Installation Instructions - Page 7
Be sure that the wire insulation on the power supply cord is inside the strain relief. The strain relief should have a tight fit with the dryer cabinet and be in a horizontal position. Do not further tighten strain relief screws at this point. For 3-wire Power Supply Cord Connection, see page 8. For - Whirlpool WED4800XQ | Installation Instructions - Page 8
screw B Connect remaining wires to outer terminal block screws. Tighten screws. Finally, reinsert tab of terminal block cover into slot of dryer rear panel. Secure cover with hold-down screw. Now, go to Venting Requirements. Remove center, silver-colored terminal block screw (B). 4. Connect - Whirlpool WED4800XQ | Installation Instructions - Page 9
onto the strain relief threads (C). 2. Attach direct wire cable to strain relief (127 5" mm) Direct wire cable must have 5 ft. (1.52 m) of extra length so dryer may be moved if needed. Strip 5" (127 mm) of outer covering from end of cable, leaving bare ground wire at 5" (127 mm). Cut 11/2" (38 - Whirlpool WED4800XQ | Installation Instructions - Page 10
block (B). Squeeze hooked ends together and tighten screw. 7. Connect ground wire A (893m½m" ) Direct wire cable must have 5 ft. (1.52 m) of extra length so dryer may be moved if needed. Strip 31/2" (89 mm) of outer covering from end of cable. Strip insulation back 1" (25 mm). If using 3-wire cable - Whirlpool WED4800XQ | Installation Instructions - Page 11
block screws (hooks facing right). Squeeze hooked ends together and tighten screws. Finally, reinsert tab of terminal block cover into slot of dryer rear panel. Secure cover with hold-down screw. Now, go to Venting Requirements. Optional 3-wire Connection You must verify with a qualified electrician - Whirlpool WED4800XQ | Installation Instructions - Page 12
instructions can result in death or fire. WARNING: To reduce the risk of fire, this dryer MUST BE EXHAUSTED OUTDOORS. IMPORTANT: Observe all governing codes and ordinances. Dryer supported in final dryer vents. Review Vent problems and health problems. See "Venting Kits" for more information. 12 - Whirlpool WED4800XQ | Installation Instructions - Page 13
. Two close-clearance installations are shown. Refer to the manufacturer's instructions. A A. Dryer B. Elbow C. Wall D. Exhaust hood C D E F G call 1-800-807-6777 or visit us at www.whirlpoolparts.ca. Part Number Descriptions 8171587RP 0-5" Metal vent periscope 4396037RP 0"-18" Metal vent - Whirlpool WED4800XQ | Installation Instructions - Page 14
metal 27 ft. (8.2 m) 21 ft. (6.4 m) Vent must fit over the exhaust hood. Secure vent to exhaust hood with 4" (102 mm) clamp. Run vent to dryer location using straightest path possible. Avoid 90° turns. Use clamps to seal all joints. Do not use duct tape, screws, or other fastening devices that - Whirlpool WED4800XQ | Installation Instructions - Page 15
them. Complete Installation Checklist q Check that all parts are now installed. If there is an extra part, go back through steps to see what was Read "Dryer Use" in your Use and Care Guide. q Set the dryer on a full heat cycle (not an air cycle) for 20 minutes and start the dryer. If the dryer will - Whirlpool WED4800XQ | Installation Instructions - Page 16
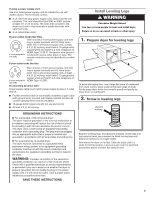
screw driver is helpful. Large Side-Swing Door 1. Place towel on dryer Lift door until top screws in cabinet are in large part of hinge slot. Pull door forward off screws. Set door on top of dryer. Remove top screws from dryer cabinet. 4. Remove and transfer hinge hole plugs Place towel on top - Whirlpool WED4800XQ | Installation Instructions - Page 17
with door catch. If needed, slide door catch left or right within slot to adjust alignment. Super Wide Side-Swing Door 1. Place towel on dryer Lift door until top screws in dryer cabinet are in large part of hinge slot. Pull door forward off screws. Set door (handle side up) on top of - Whirlpool WED4800XQ | Installation Instructions - Page 18
separate from hinge screws as they are diferent sizes. Holding door over towel on dryer, grasp sides of outer door and lift to separate it from inner door. removed. Insert 4 door screws. 7. Flip door over Reattach door hinges to dryer door so that the larger hole is at the bottom of the hinge. 9. - Whirlpool WED4800XQ | Installation Instructions - Page 19
dryer cabinet. Transfer plugs into hinge holes on opposite side of dryer cabinet. 11. Insert screws in hinge holes on dryer into the bottom holes on left side of dryer cabinet. Tighten screws halfway. Position door so large Troubleshooting See the Use and Care Guide or visit our website and - Whirlpool WED4800XQ | Installation Instructions - Page 20
W10096987A W10097001A-SP 2©Al0l2r0ig1h0tsWrehsirelprvoeodl Corporation. ® Registered Trademark/TM Trademark of Whirlpool, U.S.A. 2/10 Printed in U.S.A.
-
 1
1 -
 2
2 -
 3
3 -
 4
4 -
 5
5 -
 6
6 -
 7
7 -
8
-
9
-
10
-
11
-
12
-
13
-
14
-
15
-
16
-
17
-
18
-
19
-
20
 |
 |

W10096987A
W10097001A-SP
DRYER SAFETY
.........................................................................
2
INSTALLATION REQUIREMENTS
.............................................
2
Tools and Parts
......................................................................
2
Location Requirements
.........................................................
3
Electrical Requirements
........................................................
4
Install Leveling Legs
..............................................................
5
Electrical Connection
............................................................
6
VENTING
...................................................................................
12
Venting Requirements
.........................................................
12
Plan Vent System
.................................................................
13
Venting Kits
..........................................................................
13
Install Vent System
..............................................................
14
Connect Vent
........................................................................
15
Level Dryer
...........................................................................
15
Complete Installation Checklist
.........................................
15
Reverse Door Swing (Optional)
..........................................
16
Troubleshooting
...................................................................
19
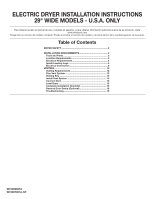
ELECTRIC DRYER INSTALLATION INSTRUCTIONS
29" WIDE MODELS - U.S.A. ONLY
Para obtener acceso al manual de uso y cuidado en español, o para obtener información adicional acerca de su producto, visite:
www.whirlpool.com
Tenga listo su número de modelo completo. Puede encontrar el número de modelo y de serie dentro de la cavidad superior de la puerta.
Table of Contents