Whirlpool WED4890XQ Owners Manual
Whirlpool WED4890XQ Manual
 |
View all Whirlpool WED4890XQ manuals
Add to My Manuals
Save this manual to your list of manuals |
Whirlpool WED4890XQ manual content summary:
- Whirlpool WED4890XQ | Owners Manual - Page 1
AIR FLOW 4 USE ACCUDRY™/AUTOMATIC DRY CYCLES FOR BETTER FABRIC CARE AND ENERGY SAVINGS.......4 CONTROL PANEL & FEATURES 5 CYCLE GUIDE 6 USING YOUR DRYER 7 DRYER CARE 9 TROUBLESHOOTING 11 WARRANTY 13 ASSISTANCE OR SERVICE BACK COVER SÉCURITÉ DE LA SÉCHEUSE 14 VÉRIFICATION D'UNE CIRCULATION - Whirlpool WED4890XQ | Owners Manual - Page 2
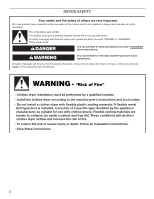
DRYER SAFETY 2 - Whirlpool WED4890XQ | Owners Manual - Page 3
3 - Whirlpool WED4890XQ | Owners Manual - Page 4
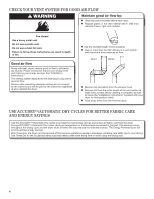
require good air flow to efficiently dry laundry. Proper venting will reduce your drying times and improve your energy savings. See "Installation Instructions." The venting system attached to the dryer plays a big role in good air flow. Service calls caused by improper venting are not covered by the - Whirlpool WED4890XQ | Owners Manual - Page 5
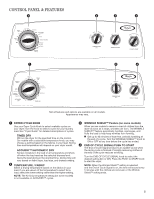
START Not all features and options are available on all models. Appearance may vary. 1 DRYER CYCLE KNOB Use your Dryer Cycle Knob to select available cycles on your dryer. Turn the knob to select a cycle for your laundry load. See "Cycle Guide" for detailed descriptions of cycles. TIMED DRY Will - Whirlpool WED4890XQ | Owners Manual - Page 6
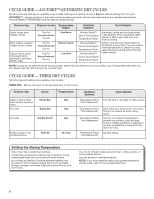
. If loads seem drier than you like, select Less Dry next time you dry a similar load. CYCLE GUIDE - TIMED DRY CYCLES Not all cycles and settings are available on all models. TIMED DRY - Will run the dryer for the specified time on the control. Items to dry: Cycle: Large or heavy items such as - Whirlpool WED4890XQ | Owners Manual - Page 7
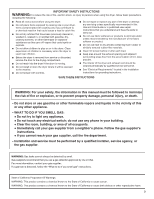
the risk of fire, electric shock, or injury to persons, read the IMPORTANT SAFETY INSTRUCTIONS before operating this dryer. Before using your dryer, wipe the dryer drum with a damp cloth to remove dust from storing and shipping. 1. Clean the lint screen 2. Load the dryer Clean the lint screen - Whirlpool WED4890XQ | Owners Manual - Page 8
ENERGY PREFERRED, or Less Dry automatically adjusts the dryness level at which the dryer will shut off. Once a dry level is set, it cannot be changed without stopping the cycle. ACCUDRY™/AUTOMATIC DRY cycles give the best feature (on some models) n Get up SOignnal PUSH TO START Turn the END OF - Whirlpool WED4890XQ | Owners Manual - Page 9
to your dryer and will not stain future loads of clothes. Dry these items inside out to avoid drum staining. Removing accumulated lint From Inside the Dryer Cabinet Lint should be removed every 2 years, or more often, depending on dryer usage. Cleaning should be done by a qualified servicer. From - Whirlpool WED4890XQ | Owners Manual - Page 10
Screen." Moving Care For power supply cord-connected dryers: 1. Unplug the power supply cord. 2. Make sure leveling legs are secure in dryer base. 3. Use tape to secure dryer door. Changing the drum light (on some models) 1. Unplug dryer or disconnect power. 2. Open the dryer door. Locate the light - Whirlpool WED4890XQ | Owners Manual - Page 11
open. Incorrect power supply. The dryer may vibrate if not properly installed. See "Installation Instructions". When balled up, the load will bounce, causing the dryer to vibrate. Separate the load items and restart the dryer. The drum may be turning, but you may not have heat. Electric dryers use - Whirlpool WED4890XQ | Owners Manual - Page 12
TROUBLESHOOTING cont. First try the solutions suggested here or visit our website and reference FAQs (Frequently Asked Questions) to possibly avoid the cost of a service call...In U.S.A. http://www.whirlpool.com/help - In Canada www.whirlpool.ca If you experience Possible Causes Solution Cycle - Whirlpool WED4890XQ | Owners Manual - Page 13
of your major appliance, to instruct you on how to use your major appliance, to replace or repair house fuses, or to correct house wiring or plumbing. 3. Service calls to repair or replace appliance light bulbs, air filters or water filters. Consumable parts are excluded from warranty coverage - Whirlpool WED4890XQ | Owners Manual - Page 14
SÉCURITÉ DE LA SÉCHEUSE 14 - Whirlpool WED4890XQ | Owners Manual - Page 15
15 - Whirlpool WED4890XQ | Owners Manual - Page 16
durées de séchage et accroît les économies d'énergie. Voir les Instructions d'installation. Le système d'évacuation fixé à la sécheuse joue la charge atteint le degré de séchage sélectionné. Le programme Energy Preferred (éconergique) entraînera des économies d'énergie optimales. Avec l'option - Whirlpool WED4890XQ | Owners Manual - Page 17
Cool Down OFF ACCUDRY sensor dryer Jeans Very Dry ENERGY PREFERRED OFF Delicate WP_WEGD4900XW Less Dry à la charge de linge. Voir "Guide de programmes" pour des descriptions de programmes un programme. 4 Signal de fin de programme/PUSH to START Le signal de fin de programme émet un signal sonore - Whirlpool WED4890XQ | Owners Manual - Page 18
Energy Preferred Less Dry Very Dry Energy Preferred Less Dry Very Dry Energy Preferred Less Dry High Heavy (élevé-lourd) Medium Casual (Moyen-tout-aller) Low l'on sèche une charge semblable. GUIDE DE PROGRAMMES - SÉCHAGE MINUTÉ Certains la chaleur. Sécher sur une corde à linge les tissus doublés ou - Whirlpool WED4890XQ | Owners Manual - Page 19
UTILISATION DE LA SÉCHEUSE AVERTISSEMENT : Pour réduire le risque d'incendie, de choc électrique ou de blessures à autrui, lire les IMPORTANTES INSTRUCTIONS DE SÉCURITÉ avant de faire fonctionner cette sécheuse. Avant d'utiliser la sécheuse, essuyer le tambour de la sécheuse avec un linge humide - Whirlpool WED4890XQ | Owners Manual - Page 20
dryer Jeans Very Dry ENERGY PREFERRED OFF Delicate WP_WEGD4900XW Less Dry Cool Down OFF WRINKLE SHIELD Sélectionner le programme souhaité pour la charge.Voir le Guide ENERGY PREFERRED est utilisé comme point de départ dans les programmes ACCUDRY™. Sélectionner ENERGY TO START Tourner - Whirlpool WED4890XQ | Owners Manual - Page 21
la sécheuse. Ceci implique de dégager également les éventuelles piles de linge placées devant la sécheuse. PUSH TO START Appuyer sans relâcher sur le bouton PUSH to START (enfoncer pour mettre en marche) pour démarrer le programme. Retirer rapidement les vêtements une fois le programme terminé pour - Whirlpool WED4890XQ | Owners Manual - Page 22
Nettoyer le filtre à charpie Nettoyage avant chaque charge Le filtre à charpie se trouve dans l'ouverture de la porte de la sécheuse. Un filtre obstrué de charpie peut augmenter la durée de séchage. Nettoyage : 1. Enlever le filtre à charpie en le tirant tout droit vers le haut. Enlever la charpie - Whirlpool WED4890XQ | Owners Manual - Page 23
fixés à la base de la sécheuse. 6. Utiliser du ruban adhésif pour fixer la porte de la sécheuse. Réinstallation de la sécheuse Suivre les "Instructions d'installation" pour choisir l'emplacement, régler l'aplomb de la sécheuse et la raccorder. Changement de la lampe du tambour (sur certain modèles - Whirlpool WED4890XQ | Owners Manual - Page 24
intervention de dépannage... Aux É.-U., http://www.whirlpool.com/help - Au Canada, www.whirlpool.ca Si les phénomènes suivants se Voir les Instructions d'installation. La sécheuse ne fonctionne pas La porte n'est pas bien fermée. L'utilisateur n'a pas appuyé fermement sur le bouton START/ PAUSE - Whirlpool WED4890XQ | Owners Manual - Page 25
et consulter la FAQ (Foire aux questions) pour tenter d'éviter le coût d'une intervention de dépannage... Aux É.-U., http://www.whirlpool.com/help - Au Canada, www.whirlpool.ca Si les phénomènes suivants se produisent Causes possibles Solution Sons inhabituels suite Les vêtements sont-ils emm - Whirlpool WED4890XQ | Owners Manual - Page 26
aux instructions jointes à ou fournies avec le produit, Whirlpool Corporation ou Whirlpool Canada LP (ci-après désignées "Whirlpool") Whirlpool autorisé pour déterminer si une autre garantie s'applique. Si vous avez besoin d'un service de réparation, voir d'abord la section "Dépannage" du Guide - Whirlpool WED4890XQ | Owners Manual - Page 27
NOTES 27 - Whirlpool WED4890XQ | Owners Manual - Page 28
please check "Troubleshooting" or visit www.whirlpool.com/help. It may save you the cost of a service call. If you still need help, follow the instructions below. When calling, please know the purchase date and the complete model and serial number of your appliance. This information will help us to
-
 1
1 -
 2
2 -
 3
3 -
 4
4 -
 5
5 -
 6
6 -
 7
7 -
8
-
9
-
10
-
11
-
12
-
13
-
14
-
15
-
16
-
17
-
18
-
19
-
20
-
21
-
22
-
23
-
24
-
25
-
26
-
27
-
28
 |
 |

W10096986A
W10097005A - SP
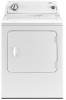
ELECTRIC or GAS DRYER
USE AND CARE GUIDE
Table of Contents
Table des matières
DRYER SAFETY
............................................................
2
CHECK YOUR VENT SYSTEM
FOR GOOD AIR FLOW
.................................................
4
USE ACCUDRY™/AUTOMATIC DRY CYCLES FOR
BETTER FABRIC CARE AND ENERGY SAVINGS
......
4
CONTROL PANEL & FEATURES
..................................
5
CYCLE GUIDE
...............................................................
6
USING YOUR DRYER
...................................................
7
DRYER CARE
................................................................
9
TROUBLESHOOTING
.................................................
11
WARRANTY
.................................................................
13
ASSISTANCE OR SERVICE
....................
BACK COVER
SÉCURITÉ DE LA SÉCHEUSE
...................................
14
VÉRIFICATION D’UNE CIRCULATION D’AIR
ADÉQUATE POUR LE SYSTÈME D’ÉVACUATION ..16
UTILISATION DES PROGRAMMES AUTOMATIQUES
POUR UN MEILLEUR SOIN DU TISSU
ET DAVANTAGE D’ÉCONOMIES D’ÉNERGIE
...........
16
TABLEAU DE COMMANDE
ET CARACTÉRISTIQUES
...........................................
17
GUIDE DE PROGRAMMES
........................................
18
UTILISATION DE LA SÉCHEUSE
...............................
19
ENTRETIEN DE LA SÉCHEUSE
.................................
21
DÉPANNAGE.
..............................................................
24
GARANTIE.
..................................................................
26
ASSISTANCE OU SERVICE. .COUVERTURE ARRIÈRE
SÉCHEUSE
ÉLECTRIQUE ou À GAZ
GUIDE D’UTILISATION
ET D’ENTRETIEN
Para una versión de estas instrucciones en español, visite www.whirlpool.com