Whirlpool WED560LHW Door Reversal Guide
Whirlpool WED560LHW Manual
 |
View all Whirlpool WED560LHW manuals
Add to My Manuals
Save this manual to your list of manuals |
Whirlpool WED560LHW manual content summary:
- Whirlpool WED560LHW | Door Reversal Guide - Page 1
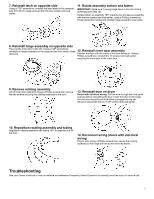
securing the door strike to the door frame of the dryer. Rotate the strike 180° and attach to the opposite side of dryer door frame with the two screws removed earlier, as shown. Electrical Shock Hazard Disconnect power before servicing. Replace all parts and panels before operating. Failure to do - Whirlpool WED560LHW | Door Reversal Guide - Page 2
securing the rotating assembly to the door. 13. Reinstall door on dryer Doors with electrical wiring: Pull the wire through the front panel opening to the hinge with the screw removed earlier. Troubleshooting See your Owner's Manual or visit our website and reference Frequently Asked Questions - Whirlpool WED560LHW | Door Reversal Guide - Page 3
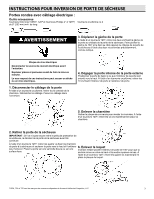
la source de courant électrique avant l'entretien. Replacer pièces et panneaux avant de faire la mise en marche. Le non-respect de ces instructions peut causer un décès ou un choc électrique. 1. Déconnecter le câblage de la porte À l'aide d'un tournevis cruciforme, retirer la vis centrale de la - Whirlpool WED560LHW | Door Reversal Guide - Page 4
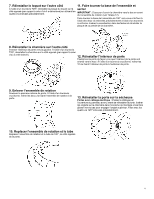
7. Réinstaller le loquet sur l'autre côté 11. Faire tourner la base de l'ensemble et À l'aide d'un tournevis T25®, réinstaller la plaque du loquet sur le serrer côté opposé (par rapport à celui d'où il a été enlevé) en utilisant les quatre vis enlevées précédemment. IMPORTANT : S'assurer d' - Whirlpool WED560LHW | Door Reversal Guide - Page 5
14. Rebrancher le câblage (portes avec câblage électrique) Brancher le câblage. À l'aide d'un tournevis cruciforme, fixer l'ensemble de rotation à la charnière en utilisant la vis enlevée précédemment. Dépannage Voir le manuel d'utilisation ou consulter notre site Web et la Foire aux questions pour - Whirlpool WED560LHW | Door Reversal Guide - Page 6
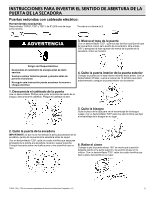
INSTRUCCIONES PARA INVERTIR EL SENTIDO DE ABERTURA DE LA PUERTA DE LA SECADORA Puertas redondas con cableado eléctrico: Herramientas necesarias Destornillador TORX®, T20® y T25® † de 8" (203 mm) de largo como mínimo Tournevis cruciforme no 2 ADVERTENCIA 3. Mueva el tope de la puerta Con un - Whirlpool WED560LHW | Door Reversal Guide - Page 7
7. Vuelva a instalar el cierre en el lado opuesto Con un destornillador T25®, vuelva a instalar la placa del pestillo en el lado opuesto desde el cual se retiró con los cuatro tornillos retirados anteriormente. 11. Gire la parte inferior del conjunto y asegúrelo en su lugar IMPORTANTE: Asegúrese de - Whirlpool WED560LHW | Door Reversal Guide - Page 8
el cable. Con un destornillador Phillips, fije el ensamblaje a la bisagra con el tornillo retirado anteriormente. Solución de problemas Consulte el Manual del usuario o visite nuestro sitio web y consulte la sección de "Preguntas frecuentes", para evitar posiblemente el costo de una visita de
-
 1
1 -
 2
2 -
 3
3 -
 4
4 -
 5
5 -
 6
6 -
 7
7 -
8
 |
 |
1
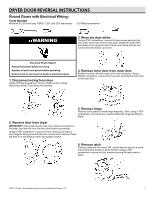
DRYER DOOR REVERSAL INSTRUCTIONS
Round Doors with Electrical Wiring:
Tools Needed
Minimum 8" (203 mm) long TORX
®
, T20
®
, and T25
®
star drivers
#2 Phillips screwdriver
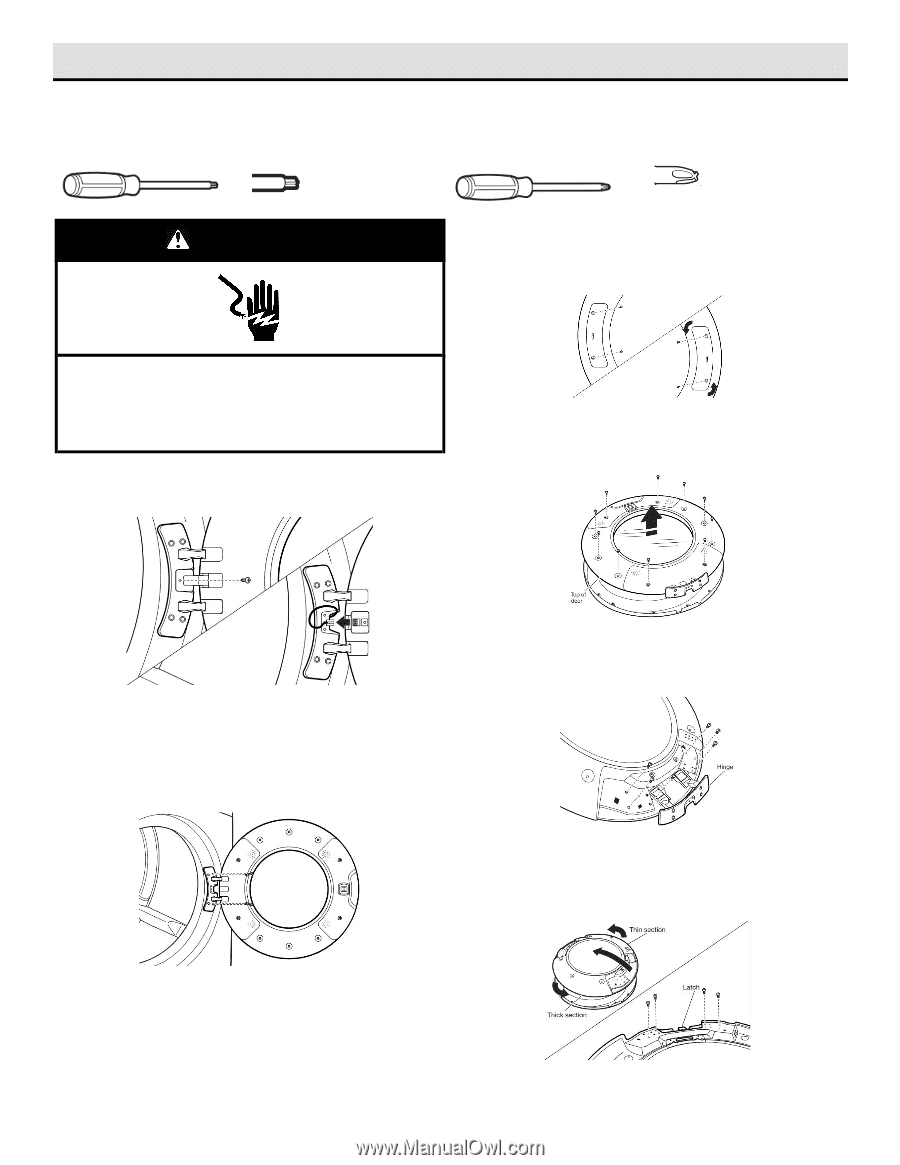
WARNING
Electrical Shock Hazard
Disconnect power before servicing.
Replace all parts and panels before operating.
Failure to do so can result in death or electrical shock.
1. Disconnect wiring from door
Using a Phillips screwdriver, remove middle screw in hinge.
Disconnect wiring. Tuck wiring into opening.
2. Remove door from dryer
IMPORTANT:
If the protective film has not yet been removed from
the dryer, peel the film from the dryer door before proceeding.
Using a T25
®
screwdriver, remove the four screws securing the
door hinge to the dryer and lift the door up and out to remove. Place
the door on a soft towel or other non-scratch surface.
3. Move the door strike
Using a T25
®
screwdriver, remove the two screws securing the
door strike to the door frame of the dryer. Rotate the strike 180°
and attach to the opposite side of dryer door frame with the two
screws removed earlier, as shown.
4. Remove inner door from outer door
Position the door with the inside of the door facing up. Using a
Phillips screwdriver, remove the 10 screws securing the inner door
to the outer door.
5. Remove hinge
Remove cover plate to reveal hinge assembly. Then, using a T20
®
screwdriver, remove the six screws holding the hinge assembly in
place.
6. Remove latch
Flip and rotate the inner door 180° so that the thin section is at the
top and the thick section is at the bottom. Using a T25
®
screwdriver, remove the four screws securing the latch plate in
place.
TORX, T20 and T25 are trademarks of Acument Intellectual Property, LLC.