Whirlpool WED6600VU Use and Care Manual
Whirlpool WED6600VU - 29-in Electric Dryer Manual
 |
UPC - 883049141251
View all Whirlpool WED6600VU manuals
Add to My Manuals
Save this manual to your list of manuals |
Whirlpool WED6600VU manual content summary:
- Whirlpool WED6600VU | Use and Care Manual - Page 1
FABRICCARESYSTEM ELECTRICDRYER For questions about features, operation/performance, parts, accessories or service call: 1-800-253-130t In Canada, call: 1-800-807-6777 or visit our website at www.whirlpool.com or www.whirlpool.ca # SECHEUSE ELECTRIQUE CABRIO TMAVEC SYSTEMEDESOINDES TISSUS Au - Whirlpool WED6600VU | Use and Care Manual - Page 2
the Dryer Interior 26 Removing Accumulated Lint 26 Water Inlet Hoses 26 Vacation, Storage and Moving Care 26 Changing the Drum Light 26 TROUBLESHOOTING 27 ASSISTANCE OR SERVICE 29 ACCESSORIES 29 WARRANTY 30 TABLEDES MATIERES S¢:CURITI_ DE LA S¢:CHEUSE 32 INSTRUCTIONS D'INSTALLATION - Whirlpool WED6600VU | Use and Care Manual - Page 3
We have provided many important safety messages in this manual and on your appliance. Always read and obey all safety messages. This replace any part of the dryer or attempt any servicing unless specifically recommended in this Use and Care Guide or in published user-repair instructions that you - Whirlpool WED6600VU | Use and Care Manual - Page 4
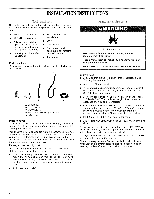
side of the dryer. See "Electrical Requirements." • A sturdy floor to support the total weight (dryer and load) of 200 Ibs (90.7 kg). The combined weight of a companion appliance should also be considered. Cold water faucets located within 4 ft (1.2 m) of the water fill valves, and water pressure of - Whirlpool WED6600VU | Use and Care Manual - Page 5
only electrical supply (or 3 or 4 wire, 120/208 volt electrical supply, if specified on the serial/rating plate) Electrical Connection To properly install your dryer, you must determine the type of electrical connection you will be using and follow the instructions provided for it here. • This dryer - Whirlpool WED6600VU | Use and Care Manual - Page 6
not use aluminum). [] At least 5 ft (1.52 m) long. GROUNDING INSTRUCTIONS 4-wire receptacle (!4-30R) Then choose a 4-wire power supply cord with ring of electric shock. Check with a qualified electrician or service representative or personnel if you are in doubt as to whether the dryer is properly - Whirlpool WED6600VU | Use and Care Manual - Page 7
phase, 120/240 volt, 60 Hz., AC only electrical supply on a separate 30-amp circuit, fused on Part Number 3394208. For further information, please reference the service numbers located in the "Assistance or Service" section. GROUNDING INSTRUCTIONS [] For a grounded, cord-connected dryer: This dryer - Whirlpool WED6600VU | Use and Care Manual - Page 8
Cord Direct Wire Fire Hazard Use a new UL listed 30 amp power supply cord. Use a UL listed strain relief. Disconnect power before making electrical connections. Connect neutral wire (white or center wire) to center terminal (silver). Ground wire (green or bare wire) must be connected to green - Whirlpool WED6600VU | Use and Care Manual - Page 9
strain relief. The strain relief should have a tight fit with the dryer cabinet and be in a horizontal position. Do not further tighten strain relief G.Ring terminals 4. Now complete installation following instructions for your type of electrical connection: 4-wire (recommended) 3-wire (if 4-wire - Whirlpool WED6600VU | Use and Care Manual - Page 10
screw. A 5. Tighten strain relief screws. 6. Insert tab of terminal block cover into slot of dryer rear panel. Secure cover with hold-down screw. 7. You have completed your electrical connection. Now go to "Venting Requirements." 4-wire connection: Direct Wire IMPORTANT: A 4-wire connection is - Whirlpool WED6600VU | Use and Care Manual - Page 11
to neutral wire. 4. Tighten strain relief screws. 5. Insert tab of terminal block cover into slot of dryer rear panel. Secure cover with hold-down screw. 6. You have completed your electrical connection. Now go to "Venting Requirements." 3-wire connection: Direct Wire Use where local codes permit - Whirlpool WED6600VU | Use and Care Manual - Page 12
. !! !! 4. Tighten strain relief screw. 5. Insert tab of terminal block cover into slot of dryer rear panel. Secure cover with hold-down screw. 6. You have completed your electrical connection. Now go to "Venting Requirements." A. External ground conductor screw B. Neutral ground wire C. Center - Whirlpool WED6600VU | Use and Care Manual - Page 13
instructions can result in death or fire. Flexible metal vent • Flexible metal vents are acceptable only if accessible for cleaning. • Flexible metal vent must be fully extended and supported when the dryer Review Whirlpool Parts and Accessories. For more information, see the "Assistance or Service - Whirlpool WED6600VU | Use and Care Manual - Page 14
manufacturer's instructions. Improper Housecleaning problems and health problems. dryer from the rear of the dryer. "Assistance or Service" section to order. • Over-the-Top Installation: Part Number 4396028 B • Periscope Installation (For use with dryer vent to wall vent J mismatch): / Part - Whirlpool WED6600VU | Use and Care Manual - Page 15
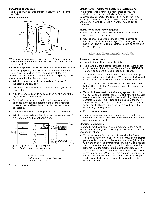
clamp. 2. Move dryer into its final location. Do not crush or kink vent. 3. (On gas models) Check that dryer. The dryer must be connected to the cold water faucet using the new inlet hoses. Do not use old hoses. 1. Turn cold water faucet off and remove washer inlet hose. 2. Remove old rubber washer - Whirlpool WED6600VU | Use and Care Manual - Page 16
on connector. 6. Attach straight end of long hose to "Y" connector. 7. Attach washer cold inlet hose to other end of "Y" connector. Screw on coupling by hand the levelness of the dryer by first placing a level on the top of the dryer near the console. A. Inlet to cold water NOTE: Do not overtighten - Whirlpool WED6600VU | Use and Care Manual - Page 17
door opening from where they were removed, NOTE: Door strike and plugs must be on the same side of the dryer door opening. Reinstall the door 1. Remove the 4 screws and 2 hinges from the dryer door. 2. Replace the 4 screws in the same holes, 3. Remove the 4 screws from the opposite side of the door - Whirlpool WED6600VU | Use and Care Manual - Page 18
first cycle. If you receive an "L2" code, there may be a problem with your home power supply keeping the dryer's heater from turning on. See "Troubleshooting." If you receive an "AF" code, your dryer vent may be crushed or blocked. See "Troubleshooting." NOTE: You may notice a burning odor when the - Whirlpool WED6600VU | Use and Care Manual - Page 19
electric shock, or injury to persons, read the IMPORTANT SAFETY INSTRUCTIONS before operating this appliance. This manual covers several different models. Your dryer may not have all of the cycles and features the final drying time. Fire Hazard No washer can completely remove oil. Do not dry - Whirlpool WED6600VU | Use and Care Manual - Page 20
until the desired temperature illuminates. To use a Steam Cycle (Quick Refresh and Enhanced Touch Up) desired temperature illuminates. T£MP NOTE: The Temp feature can be used only with the Timed Dry display shows the estimated cycle time when your dryer is automatically sensing the dryness level of - Whirlpool WED6600VU | Use and Care Manual - Page 21
instructions. • To reduce wrinkling, remove the load from the dryer " section) for a guide to drying various loads. the cool down part of the cycle Steam Cycles, the Wet light comes on after the water has been sprayed into the drum, 5-6 minutes into the cycle. The Wet light illuminates until the dryer - Whirlpool WED6600VU | Use and Care Manual - Page 22
of water is sprayed into the dryer drum after several minutes of tumbling with heat. The dryer will continue to tumble with heat followed by a brief cool down. The dry time and temperature can be adjusted for this cycle. NOTE: Overloading the dryer may not yield the same results. Steam Preset - Whirlpool WED6600VU | Use and Care Manual - Page 23
Automatic Cycles. You can customize your cycles by selecting options. DRUMLIGHT D WRINKLESHIELD DAMPDRY SIGNAL OPTIONS Drum Light On some models, select Drum Light to turn on the light inside the dryer drum. During a cycle, if Drum Light is selected, the drum light turns on and will remain on until - Whirlpool WED6600VU | Use and Care Manual - Page 24
may be able to purchase one for your model. To find out whether your model allows drying rack usage and for information on ordering, please refer to the front page of the manual or contact the dealer from whom you purchased your dryer. NOTE: The drying rack must be removed for normal tumbling. Do - Whirlpool WED6600VU | Use and Care Manual - Page 25
edge of the drying rack. i 4. Close the dryer during removal, check the exhaust hood and remove the lint. 2. Push the lint screen firmly back into place. As needed cleaning 1. Roll lint off screen with your fingers. 2. Wet both sides of lint screen with hot water. 3. Wet a nylon brush with hot water - Whirlpool WED6600VU | Use and Care Manual - Page 26
. Cleaning should be done by a qualified person. From the Exhaust Vent Lint should be removed every 2 years, or more often, depending on dryer usage. Electrical Shock Hazard Disconnect power before servicing. Replace all parts and panels before operating. Failure to do so can result in death or - Whirlpool WED6600VU | Use and Care Manual - Page 27
TROUBLESHOOTING First try the solutions suggested here or visit our website and reference FAQs (Frequently Asked Questions) to possibly avoid the cost of a service call... In U.S.A. www.whirlpool.com/help - In Canada www.whirlpool.ca Dryer will not run Has a household fuse blown, or has a circuit - Whirlpool WED6600VU | Use and Care Manual - Page 28
use a metal foil vent. Failure to follow these instructions can result in death or fire. Is the dryer located in a closet? Closet doors must have ventilation tumble the load with water and heat to help smooth out wrinkles from a load left in the dryer. Was the dryer overloaded? Dry smaller loads - Whirlpool WED6600VU | Use and Care Manual - Page 29
calling for assistance or service, please check "Troubleshooting." It may save you the cost of a service call. If you still need help, follow the instructions below. When calling, please know the purchase date and the complete model and serial number of your appliance. This information will help - Whirlpool WED6600VU | Use and Care Manual - Page 30
installation of your major appliance, to instruct you on how to use your major appliance, to replace or repair house fuses, or to correct house wiring or plumbing. 2. Service calls to repair or replace appliance light bulbs, air filters or water filters. Consumable parts are excluded from warranty - Whirlpool WED6600VU | Use and Care Manual - Page 31
31 - Whirlpool WED6600VU | Use and Care Manual - Page 32
la secheuse est utilis&e pros d'eux. [] Avant d'enlever la secheuse du service ou la jeter, enlever la porte du compartiment de sechage. [] Ne pas mettre d'une recommandation specifique darts le guide d'utilisation et d'entretien, ou publiee darts les instructions de reparation par I'utilisateur que - Whirlpool WED6600VU | Use and Care Manual - Page 33
a la section "Assistance ou service". Vous pouvez egalement contacter le un garage. Le non-respect de ces instructions peut causer un d_ces, une explosion ou secheuse. Voir "Specifications electriques". • Un plancher robuste capable de supporter un poids total (secheuse et charge) de 200 Ib (90 - Whirlpool WED6600VU | Use and Care Manual - Page 34
decharge de la secheuse. _,_ 6 _ , , Risque de choc electrique Brancher sur une prise a 4 alveoles reliee a la terre. Le non-respect de cette instruction peut causer un deces ou un choc electrique. C'est & rutilisateur qu'incombe la responsabilit_ de • Communiquer avec un electricien qualifi - Whirlpool WED6600VU | Use and Care Manual - Page 35
le cordon d'alimentation de rechange numero de piece 3394208. Pour plus d'information, veuillez consulter les num@os de service qui se trouvent a la section "Assistance ou service". INSTRUCTIONS DE LIAISON A LA TERRE [] Pour une secheuse reliee & la terre et connectee par un cordon : Cette secheuse - Whirlpool WED6600VU | Use and Care Manual - Page 36
en telephonant au service Pieces et accessoires de Whirlpool. Pour plus de renseignements, voir la section "Assistance ou service". Conduit m_tallique rigide boiseries, meubles, peinture, papier-peint, tapis, etc. [] Problemes de nettoyage dans la maison et problemes de sant& Bride de serrage 36 - Whirlpool WED6600VU | Use and Care Manual - Page 37
a I'installation. Deux installations degagement reduit sont illustrees. Voir les instructions du fabricant. z A B A. Installation au-dessus de la d_gagement est reduit. Veuillez consulter la section "Assistance ou service" pour commander. D_terminer I'itin_raire d'acheminement du conduit • - Whirlpool WED6600VU | Use and Care Manual - Page 38
pour d_placer et installer la e_cheuee. Le non-respect de cette instruction peut causer une blessure au dos ou d'autre bleeeure. 1. Pour emplacement final. Ne pas ecraser ni deformer le conduit d'evacuation. 3. (Sur les modeles & gaz) Verifier que le tuyau de gaz flexible n'est pas deforme ou ecrase - Whirlpool WED6600VU | Use and Care Manual - Page 39
La secheuse doit _tre connectee au robinet d'eau froide & I'aide des nouveaux tuyaux d'alimentation. Ne pas utiliser de tuyaux usages. 1. Arr_ter le robinet d'eau froide et retirer le tuyau d'alimentation de la laveuse. 2. Retirer I'ancienne rondelle de caoutchouc du tuyau d'alimentation et la - Whirlpool WED6600VU | Use and Care Manual - Page 40
Le sens d'ouverture de la porte peut @re change du c6te droit au c6te gauche, si desire. 1. Placer une serviette ou un linge doux sur le dessus de la secheuse ou du plan de travail pour proteger la surface. D_pose de la porte 1. Ouvrir la porte de la secheuse. 2. Retirer la vis inferieure de chacune - Whirlpool WED6600VU | Use and Care Manual - Page 41
de protection ou tout ruban adhesif reste sur la secheuse. REMARQUE : Les modeles avec une porte en verre comportent un film de protection sur la vitre qui , Si vous lisez un code "L2", il peut y avoir un probleme au niveau de I'alimentation _lectrique du domicile emp_chant I'el_ment chauffant de la - Whirlpool WED6600VU | Use and Care Manual - Page 42
risque d'incendie, de choc electrique ou de blessures corporelles, Ire les INSTRUCTIONS IMPORTANTES DE SECURITE avant de fake fonctionner cet apparel. Ce manuel couvre plusieurs modeles differents. Votre modele peut ne pas comporter I'ensemble des programmes ou caracteristiques decrits. Suivre ces - Whirlpool WED6600VU | Use and Care Manual - Page 43
• Selectionner DRYNESS (degre de sechage) pour regler le degre de sechage desir& Au cours du programme, la commande detecte le degre de sechage de la charge et r_gle la duree automatiquement selon le degre de sechage selectionn& Le reglage de sechage par defaut est Normal Iorsqu'on selectionne un - Whirlpool WED6600VU | Use and Care Manual - Page 44
Si desir6, ajouter une feuille d'assouplissant de tissu. Suivre les instructions figurant sur I'emballage. • Pour reduire le froissement, enlever la des programmes automatiques ou minutes (a la section "Programmes") pour un guide de sechage de charges diverses. • La temperature de sechage et le - Whirlpool WED6600VU | Use and Care Manual - Page 45
regle automatiquement la duree pour un sechage optimal. Heavy Duty (service intense) Utiliser ce programme pour le sechage a temperature elevee des qui sont restes trop Iongtemps dans la secheuse. Lorsqu'un programme Steam est selectionne, I'afficheur de duree restante estimee indique la duree - Whirlpool WED6600VU | Use and Care Manual - Page 46
Programmes Minutes Utiliser les programmes minutes pour selectionner une duree de sechage precise et une temperature de s_chage. Lorsqu'un programme minute est selectionne, I'afficheur de la duree residuelle estimee indique la duree reelle restante pour le programme en cours. II est possible de - Whirlpool WED6600VU | Use and Care Manual - Page 47
. REMARQUE : Le signal de sechage humide est disponible uniquement avec les programmes automatiques. OPTIONS Drum Light (lampe du tambour) Sur certains modeles, selectionner Drum Light (lampe du tambour) pour allumer la lampe a I'interieur du tambour de la secheuse. Pendant un programme, si la - Whirlpool WED6600VU | Use and Care Manual - Page 48
et oreillers. Le tambour tourne, mais la grille de sechage ne bouge pas. Si votre modele ne dispose pas d'une grille de sechage, vous pouvez en acheter une. Pour savoir si votre modele permet I'utilisation d'une grille de sechage et pour obtenir des renseignements pour commander, veuillez consulter - Whirlpool WED6600VU | Use and Care Manual - Page 49
s_cheuse. Placer la s_cheuse au moins 46 cm (18 po) au-dessue du plancher pour une installation darts un garage. Le non-respect de ces instructions peut causer un d_ces, une explosion ou un incendie. Nettoyer le filtre a charpie avant chaque charge. Un filtre obstrue de charpie peut augmenter la - Whirlpool WED6600VU | Use and Care Manual - Page 50
de la secheuse. 5. Utiliser du ruban adhesif de masquage pour fixer la porte de la secheuse. R_installer la s_cheuse Suivre les "Instructions d'instalation" pour choisir I'emplacement, regler I'aplomb de la secheuse et la raccorder. La lumiere de la secheuse s'allume automatiquement a I'interieur du - Whirlpool WED6600VU | Use and Care Manual - Page 51
_ventuellement _viter le coQt d'une visite de service...www.whirlpool.ca Le s_cheuse ne fonctionne pas Un n'est pas correctement installee. Voir les instructions d'installation. Les v6tements sont-ils emm61_s ou residuelle estimee. Essayer de resoudre le probleme de la fagon suivante: Observer si - Whirlpool WED6600VU | Use and Care Manual - Page 52
s_cheuse. Placer la secheuse au moins 46 cm (18 po) au-dessus du plancher pour une installation darts un garage. Le non=respect de ces instructions peut causer un deces, une explosion ou un incendie. • La s_cheuse se trouve-t-elle dans une piece ok la temperature ambiante est inf_rieure a 45 - Whirlpool WED6600VU | Use and Care Manual - Page 53
personnes pour d_placer et installer la s_cheuse. Le non-respect de cette instruction peut causer une blessure au dos ou d'autre blessure. • Le coton/polyester, tricots, synthetiques. Charge toujours froiss_e apr_s un programme Steam (vapeur)? S'assurer que I'alimentation en eau est connectee a - Whirlpool WED6600VU | Use and Care Manual - Page 54
produits et fournir un service apres la garantie, partout au Canada. Pour plus d'assistance Si vous avez besoin de plus d'assistance, vous pouvez ecrire & Whirlpool Canada LP en soumettant toute question ou tout probleme au : Centre d'interaction avec la clientele Whirlpool Canada LP 1901 Minnesota - Whirlpool WED6600VU | Use and Care Manual - Page 55
service d'entretien Whirlpool autorise n'est pas disponible. 10. La d_pose et la r_installation de votre gros appareil si celui-ci est installe dans un endroit inaccessible ou n'est pas installe conformement aux instructions ou service en cas de besoin. Vous devrez connaftre le num@o de modele et - Whirlpool WED6600VU | Use and Care Manual - Page 56
. All rights reserved. ® Registered Trademark/TM Trademark of Whirlpool, U.S.A., Whirlpool Canada LP Licensee in Canada Tous droits r_serv_s. ® Marque d6pos_e/TM Marque de commerce de Whirlpool, U.S.A., emploi sous licence par Whirlpool Canada LP au Canada 11/07 Printed in U.S.A. Imprime
-
 1
1 -
 2
2 -
 3
3 -
 4
4 -
 5
5 -
 6
6 -
 7
7 -
8
-
9
-
10
-
11
-
12
-
13
-
14
-
15
-
16
-
17
-
18
-
19
-
20
-
21
-
22
-
23
-
24
-
25
-
26
-
27
-
28
-
29
-
30
-
31
-
32
-
33
-
34
-
35
-
36
-
37
-
38
-
39
-
40
-
41
-
42
-
43
-
44
-
45
-
46
-
47
-
48
-
49
-
50
-
51
-
52
-
53
-
54
-
55
-
56
 |
 |

cQbrlo
FABRIC
CARE
SYSTEM
SYSTEME
DE SOIN
DES
TISSUS
CABRIOTM
STEAM
FABRICCARESYSTEM
ELECTRICDRYER
For questions
about features,
operation/performance,
parts,
accessories
or service
call:
1-800-253-130t
In Canada,
call: 1-800-807-6777
or visit our website
at
www.whirlpool.com
or www.whirlpool.ca
#
SECHEUSE
ELECTRIQUE
CABRIOTMAVEC
SYSTEMEDESOINDES
TISSUS
Au Canada,
pour assistance,
installation
ou service,
composez
le :
f -800-807-6777
ou visitez
notre site internet
A
www.whirlpool.ca
Table of Contents/Table
des matieres
.................
2
Para obtener
acceso al manual de uso y cuidado
en
espadol,
o para obtener
informaci6n
adicional
acerca
de su producto,
visite: www.whirlpool.com.
Tenga listo su n0mero
de modelo complete.
Puede
encontrar
el n0mero de modelo y de serie dentro de la
cavidad
superior
de la puerta.
W10164159A