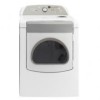
Whirlpool WED6600VW Use and Care Guide
Whirlpool WED6600VW - 29" Electric Dryer Manual
 |
UPC - 883049141213
View all Whirlpool WED6600VW manuals
Add to My Manuals
Save this manual to your list of manuals |
Whirlpool WED6600VW manual content summary:
- Whirlpool WED6600VW | Use and Care Guide - Page 1
Cleaning the Dryer Location 10 Cleaning the Lint Screen 10 Cleaning the Dryer Interior 10 Removing Accumulated Lint 10 Vacation, Storage, and Moving Care 11 Special Instructions for Steam Models 11 Changing the Drum Light 11 TROUBLESHOOTING 12 WARRANTY 15 ASSISTANCE AND SERVICE BACK COVER - Whirlpool WED6600VW | Use and Care Guide - Page 2
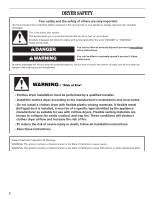
DRYER SAFETY Your safety and the safety of others are very important. We have provided many important safety messages in this manual and don't immediately follow instructions. WARNING You can be killed or seriously injured if you don't follow instructions. All safety messages will tell you what - Whirlpool WED6600VW | Use and Care Guide - Page 3
Fuel Gas Code, ANSI Z223.1/NFPA 54. The dryer must be electrically grounded in accordance with local codes, or in the absence of local codes, with the National Electrical Code, ANSI/NFPA 70. WARNING: For your safety, the information in this manual must be followed to minimize the risk of fire - Whirlpool WED6600VW | Use and Care Guide - Page 4
including cooking oils). Items containing foam, rubber, or plastic must be dried on a clothesline or by using an Air Cycle. Failure to follow these instructions can result in death or fire. For a summary of how to use your dryer following installation, see the QUICK START GUIDE on the next page. 4 - Whirlpool WED6600VW | Use and Care Guide - Page 5
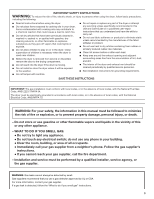
risk of fire, electric shock, or injury to persons, read the IMPORTANT SAFETY INSTRUCTIONS before operating this appliance. The following is a guide to using your dryer. Please refer to specific sections of this manual for more detailed information. START 1. Clean the lint screen before each load - Whirlpool WED6600VW | Use and Care Guide - Page 6
-polyester blend, common knits and synthetic garments. In this cycle a small amount of water is sprayed into the dryer drum after several minutes of tumbling with heat. The dryer will continue to tumble with heat followed by a brief cool down. The heat level and cycle time are not adjustable. 6 - Whirlpool WED6600VW | Use and Care Guide - Page 7
automatically adjusts the dryness level at which the dryer will shut off. Once a dryness level is set, it cannot be changed without stopping the cycle. NOTE: Dryness Level selections cannot be used with the Timed Cycles. Timed Cycle Modifiers Use the Temperature Modifier to select temperatures - Whirlpool WED6600VW | Use and Care Guide - Page 8
Light Option On some models, select Drum Light to turn on the light inside the dryer drum. During a cycle, if Drum Light is selected, the drum light turns on and will remain on until DRUM LIGHT is pressed again, the door is opened and closed, or the door is left open for 5 minutes. When the dryer - Whirlpool WED6600VW | Use and Care Guide - Page 9
START to save the drying setting. 5. The drying setting you selected will become your new preset drying setting for all Auto Dry cycles. Drying Rack Option Use the Drying Rack to dry items such as sweaters and pillows without tumbling. The drum turns, but the drying rack does not move. If your model - Whirlpool WED6600VW | Use and Care Guide - Page 10
90 (no heat) *(Minutes) Reset time to complete drying, if needed. DRYER CARE Cleaning the Dryer Location Keep dryer area clear and free from items that would obstruct the flow of combustion and ventilation air. Cleaning the Lint Screen Clean the lint screen before each load. A screen blocked by - Whirlpool WED6600VW | Use and Care Guide - Page 11
the drum light 1. Unplug dryer or disconnect power. 2. Open the dryer door. Locate the light bulb cover on the back wall of the dryer. Remove the screw located in the lower right corner of the cover. Remove the cover. Electrical Shock Hazard Disconnect power before servicing. Replace all parts and - Whirlpool WED6600VW | Use and Care Guide - Page 12
: Was the drying cycle interrupted by a power failure? Press and hold START to restart the dryer. ■ "F" Variable (F1, F2, F20, etc.) service codes: Call for service. ■ "L2" Diagnostic Code (low or no line voltage condition): The drum will turn, but there may be a problem with your home power - Whirlpool WED6600VW | Use and Care Guide - Page 13
may not be contacting the sensor strips. Level the dryer. Change the dryness level setting on Automatic Cycles. Increasing or decreasing the dryness level will change the amount of drying time in a cycle. Lint on load ■ Is the lint screen clogged? Clean lint screen. Check for air movement. ■ Is the - Whirlpool WED6600VW | Use and Care Guide - Page 14
time? The new electric heating element may have an odor. The odor will be gone after the first cycle. ■ Is water connected to the dryer for Steam models? Check that water inlet hose is connected to both the faucet and dryer's water inlet valve. Check that the water supply is turned on. ■ To remove - Whirlpool WED6600VW | Use and Care Guide - Page 15
This limited warranty does not cover: 1. Replacement parts or repair labor if this major appliance is used for other than normal, single-family household use or when it is used in a manner that is inconsistent to published user or operator instructions and/or installation instructions. 2. Service - Whirlpool WED6600VW | Use and Care Guide - Page 16
le danger potentiel et vous disent comment réduire le risque de blessure et ce qui peut se produire en cas de non-respect des instructions. Avertissements de la proposition 65 de l'État de Californie : AVERTISSEMENT : Ce produit contient un produit chimique connu par l'État de Californie pour être - Whirlpool WED6600VW | Use and Care Guide - Page 17
la sécheuse est utilisée près d'eux. ■ Avant d'enlever la sécheuse du service ou la jeter, enlever la porte du compartiment de séchage. ■ Ne pas mettre d'une recommandation spécifique dans le guide d'utlilisation et d'entretien, ou publiée dans les instructions de réparation par l'utilisateur que - Whirlpool WED6600VW | Use and Care Guide - Page 18
information, contacter le fournisseur de gaz local. En cas de détection d'une fuite de gaz, exécuter les instructions "Que faire dans le cas d'une odeur de gaz". GUIDE DE DÉMARRAGE RAPIDE/UTILISATION DE LA SÉCHEUSE AVERTISSEMENT AVERTISSEMENT Risque d'explosion Garder les matières et les vapeurs - Whirlpool WED6600VW | Use and Care Guide - Page 19
: Pour réduire le risque d'incendie, de choc électrique ou de blessures corporelles, lire les INSTRUCTIONS IMPORTANTES DE SÉCURITÉ avant de faire fonctionner cet appareil. Ce qui suit constitue un guide d'utilisation de votre sécheuse. Consulter les sections spécifiques de ce manuel pour des - Whirlpool WED6600VW | Use and Care Guide - Page 20
une feuille d'assouplissant de tissu. Suivre les instructions figurant sur l'emballage. ■ Pour réduire automatiques ou minutés (à la section "Programmes") pour un guide de séchage de charges diverses. ■ La température de (service intense) Charges mixtes lourdes, articles en coton, jeans High (élev - Whirlpool WED6600VW | Use and Care Guide - Page 21
durée minimale de séchage de 15 minutes et une durée maximale de 40 minutes. Seuls les réglages de température Medium (moyenne) et High (élevée) peuvent être utilisés pour le programme de retouche améliorée. Programmes minutés Utiliser les programmes minutés pour sélectionner une durée de séchage - Whirlpool WED6600VW | Use and Care Guide - Page 22
ferme la porte ou qu'on appuie à nouveau sur la touche DRUM LIGHT. Appuyer sur DRUM LIGHT à tout moment pour ALLUMER ou ÉTEINDRE la lampe du tambour. tements à la fin du programme réduit le froissement. Appuyer sur END OF CYCLE SIGNAL (signal de fin de programme) jusqu'à la sélection du volume désir - Whirlpool WED6600VW | Use and Care Guide - Page 23
témoins lumineux du degré de séchage. Sensing (détection) ■ Au cours d'un programme automatique, le témoin Sensing est allumé jusqu'à ce qu'un article automatiquement. Changement des modificateurs et options après avoir appuyé sur Start Il est possible de changer une option ou un modificateur en - Whirlpool WED6600VW | Use and Care Guide - Page 24
bas). Régler de nouveau la durée au besoin pour compléter le séchage. Se référer au tableau suivant. 8. Appuyer sans relâcher sur le bouton START (pendant environ 1 seconde). Ce tableau montre des exemples d'articles qui peuvent être séchés sur une grille et indique le programme, le réglage de temp - Whirlpool WED6600VW | Use and Care Guide - Page 25
. Placer la sécheuse au moins 46 cm (18 po) au-dessus du plancher pour une installation dans un garage. Le non-respect de ces instructions peut causer un décès, une explosion ou un incendie. Nettoyage du filtre à charpie Nettoyer le filtre à charpie avant chaque charge. Un filtre obstrué de charpie - Whirlpool WED6600VW | Use and Care Guide - Page 26
direct : AVERTISSEMENT Risque de choc électrique Déconnecter la source de courant électrique avant l'entretien. Replacer pièces et panneaux avant de faire la remise en marche. Le non-respect de ces instructions peut causer un décès ou un choc électrique. Réutilisation de la sécheuse 1. Vidanger les - Whirlpool WED6600VW | Use and Care Guide - Page 27
le coût d'une visite de service...www.whirlpool.ca Fonctionnement de la sécheuse La est pas correctement installée. Voir les instructions d'installation. ■ Les vêtements sont START pour remettre la sécheuse en marche. ■ Code de service "F" et variantes (F1, F2, F20, etc.) : Faire un appel de service - Whirlpool WED6600VW | Use and Care Guide - Page 28
sécheuse. Placer la sécheuse au moins 46 cm (18 po) au-dessus du plancher pour une installation dans un garage. Le non-respect de ces instructions peut causer un décès, une explosion ou un incendie. ■ La sécheuse se trouve-t-elle dans une pièce où la température ambiante est inférieure à 45 - Whirlpool WED6600VW | Use and Care Guide - Page 29
trop court AVERTISSEMENT Risque du poids excessif Utiliser deux ou plus de personnes pour déplacer et installer la sécheuse. Le non-respect de cette instruction peut causer une blessure au dos ou d'autre blessure. ■ Le programme automatique se termine-t-il trop tôt? La charge n'est peut-être pas en - Whirlpool WED6600VW | Use and Care Guide - Page 30
DES APPAREILS DE BUANDERIE DE WHIRLPOOL CORPORATION GARANTIE LIMITÉE Pendant un an à compter de la date d'achat, lorsque ce gros appareil ménager est utilisé et entretenu conformément aux instructions jointes à ou fournies avec le produit, Whirlpool Corporation ou Whirlpool Canada LP (ci-apr - Whirlpool WED6600VW | Use and Care Guide - Page 31
Notes 31 - Whirlpool WED6600VW | Use and Care Guide - Page 32
please check "Troubleshooting" or visit www.whirlpool.com/help. It may save you the cost of a service call. If you still need help, follow the instructions below. When calling, please know the purchase date and the complete model and serial number of your appliance. This information will help us to
-
 1
1 -
 2
2 -
 3
3 -
 4
4 -
 5
5 -
 6
6 -
 7
7 -
8
-
9
-
10
-
11
-
12
-
13
-
14
-
15
-
16
-
17
-
18
-
19
-
20
-
21
-
22
-
23
-
24
-
25
-
26
-
27
-
28
-
29
-
30
-
31
-
32
 |
 |
www.whirlpool.com
www.whirlpool.ca
Q
UICK
S
TART
G
UIDE
/
D
RYER
U
SE
............
PG
. 4
www.whirlpool.ca
G
UIDE
DE
DÉMARRAGE
RAPIDE
/
U
TILISATION
DE
LA
SÉCHEUSE
....
PG
. 18
®
®
TABLE OF CONTENTS
Page
DRYER SAFETY
...........................................................................................
2
QUICK START GUIDE/DRYER USE
..........................................................
4
Drying and Cycle Tips
...............................................................................
6
Cycles
.......................................................................................................
6
Additional Features
...................................................................................
7
Status Lights
.............................................................................................
8
Changing Cycles, Modifiers, and Options
................................................
9
Drying Rack Option
...................................................................................
9
DRYER CARE
.............................................................................................
10
Cleaning the Dryer Location
...................................................................
10
Cleaning the Lint Screen
.........................................................................
10
Cleaning the Dryer Interior
......................................................................
10
Removing Accumulated Lint
..................................................................
10
Vacation, Storage, and Moving Care
.....................................................
11
Special Instructions for Steam Models
..................................................
11
Changing the Drum Light
........................................................................
11
TROUBLESHOOTING
...............................................................................
12
WARRANTY
...............................................................................................
15
ASSISTANCE AND SERVICE
................................................
BACK COVER
TABLE DES MATIÈRES
Page
SÉCURITÉ DE LA SÉCHEUSE
.................................................................
16
GUIDE DE DÉMARRAGE RAPIDE/UTILISATION DE LA SÉCHEUSE.. 18
Conseils pour le séchage et les programmes
........................................
20
Programmes
...........................................................................................
20
Caractéristiques supplémentaires
..........................................................
22
Témoins lumineux
...................................................................................
23
Changement des programmes, modificateurs et options
.....................
23
Option de grille de séchage
....................................................................
24
ENTRETIEN DE LA SÉCHEUSE
...............................................................
25
Nettoyage de l'emplacement de la sécheuse
........................................
25
Nettoyage du filtre à charpie
..................................................................
25
Nettoyage de l'intérieur de la sécheuse
.................................................
25
Retrait de la charpie accumulée
.............................................................
25
Précautions à prendre avant les vacances,
un entreposage ou un déménagement
..................................................
25
Instructions spécifiques pour les modèles vapeur
................................
26
Changement de l'ampoule d'éclairage du tambour
..............................
26
DÉPANNAGE
.............................................................................................
27
GARANTIE
..................................................................................................
30
W10260038A
W10267629A -
SP
ASSISTANCE OU SERVICE
...............................
COUVERTURE ARRIÈRE
ELECTRONIC DRYER
Use & Care Guide
For questions about features, operation/performance, parts, accessories, or
service, call:
1-800-253-1301
or visit our website at...
In Canada, call:
1-800-807-6777
or visit our website at...
SÉCHEUSE ÉLECTRONIQUE
Guide d'utilisation et d'entretien
Pour assistance, installation, ou service, composez le :
1-800-807-6777
ou visitez notre site internet à..