Whirlpool WED7500VW Owners Manual - Page 15
Controls, Drying, Cycle and Temperature Tips, Cycles - lowes
 |
UPC - 883049138251
View all Whirlpool WED7500VW manuals
Add to My Manuals
Save this manual to your list of manuals |
Page 15 highlights
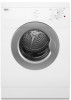
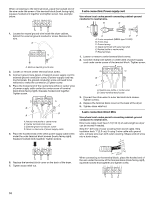
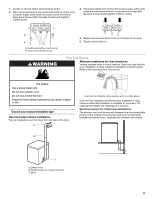
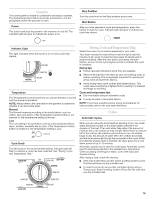
Controls The control panel is simple to understand and easy to operate. The illustrations below define the knobs and buttons, and the paragraphs define the purpose of each. Power This button switches the power to the machine on and off. The indicator light will glow to indicate the power is on. Stop Position Turn the cycle knob to the Stop position at any time. Start Button After you have selected a cycle and temperature, press this button to start the cycle. Indicator light will glow to indicate the cycle has started. Indicator Light This light indicates when the power is on or that a cycle has started. Temperature The Temperature Control button lets you choose between a normal and low drying temperature. NOTE: Always refer to the care label on the garment to determine whether it can be tumble dried. Normal The Normal temperature setting is for sturdy fabrics, such as cotton, linen and denim. If the Temperature Control button is not pressed in, the temperature setting is Normal. Low The Low setting is for synthetics, such as cotton/polyester blend, rayon, acetate, washable silk or nylon. If the Temperature Control button is pressed in, the temperature setting is Low. Cycle Knob Turn this knob to the recommended setting. Indicator light will flash to indicate a cycle has been selected. See "Drying, Cycle and Temperature Tips." Drying, Cycle and Temperature Tips Select the correct cycle and temperature for your load. Your dryer tumbles the load without heat during the last few minutes of all cycles to make the load easier to handle and to reduce wrinkling. After the cool-down cycle ends, the light flashes, and an end-of-cycle signal sounds to indicate the cycle is complete. Drying tips Follow care label directions when they are available. Remove the load from the dryer as soon as tumbling stops to reduce wrinkling. This is especially important for permanent press, knits and synthetic fabrics. Avoid drying heavy work clothes with lighter fabrics. This could cause overdrying of lighter fabrics, leading to increased shrinkage or wrinkling. Cycle and temperature tips Dry most loads using an automatic cycle. Line dry bonded or laminated fabrics. NOTE: If you have questions about drying temperatures for various loads, refer to the care label directions. Cycles Automatic Cycles When you are using the Auto Moisture Sensing Cycle, two metal strips (sensors) located on the dryer baffles determine the dryness of the load. The metal strips help detect the amount of moisture left in the clothes as they tumble. When there is moisture left in the clothes, the machine will continue to run. As clothes begin to dry, the amount of water left in the clothes decreases, and the timer advances through the remainder of the cycle. When the selected dryness level is reached, the dryer goes into a cool down period of up to 15 minutes. Automatic cycles may be used for most loads. Automatic cycles give the best drying results in the shortest time. Drying time varies according to the type of fabric, size of the load, and dryness setting. After drying a load, check the dryness. If the load is drier than you like, select a setting closer to Less Dry the next time you dry a similar load. If a load is not as dry as you like, complete drying using a Timed cycle. Select a setting closer to Extra Dry the next time you dry a similar load. 15
-
 1
1 -
2
-
3
-
4
-
5
-
6
-
7
-
8
-
9
-
 10
10 -
 11
11 -
 12
12 -
 13
13 -
 14
14 -
 15
15 -
 16
16 -
 17
17 -
 18
18 -
 19
19 -
 20
20
 |
 |