Whirlpool WED9300VU Use and Care Guide
Whirlpool WED9300VU - Diamond Dust WhirlpoolR DuetR Electric Dryer Manual
 |
UPC - 883049141428
View all Whirlpool WED9300VU manuals
Add to My Manuals
Save this manual to your list of manuals |
Whirlpool WED9300VU manual content summary:
- Whirlpool WED9300VU | Use and Care Guide - Page 1
® ® ELECTRONIC ELECTRIC DRYER Use & Care Guide For questions about features, operation/performance, parts, accessories or service, call: 1-800-253-1301 or visit our website at... www.whirlpool.com Table of Contents 2 W10182361A - Whirlpool WED9300VU | Use and Care Guide - Page 2
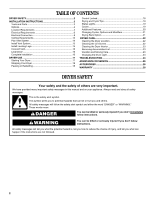
and Moving Care 23 Changing the Drum Light 23 TROUBLESHOOTING 24 ASSISTANCE OR SERVICE 26 ACCESSORIES 26 WARRANTY 28 DRYER SAFETY Your safety and the safety of others are very important. We have provided many important safety messages in this manual and on your appliance. Always read and - Whirlpool WED9300VU | Use and Care Guide - Page 3
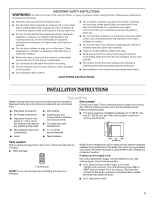
to the weather. ■ Do not tamper with controls. ■ Do not repair or replace any part of the dryer or attempt any servicing unless specifically recommended in this Use and Care Guide or in published user-repair instructions that you understand and have the skills to carry out. ■ Do not use fabric - Whirlpool WED9300VU | Use and Care Guide - Page 4
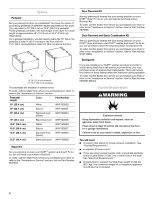
the dealer from whom you purchased your dryer or refer to the "Assistance or Service" section. Pedestal Height Color Part Number 10" (25.4 cm) dryer or refer to the "Assistance or Service" section. Ask for Part Number W10110889. Backguard If you are installing your DUET® washer and dryer and - Whirlpool WED9300VU | Use and Care Guide - Page 5
cm), install Extended Dryer Feet Kit, Part Number 279810. Clothes may not tumble properly and automatic sensor cycles may not operate correctly if dryer is not level. ■ For a garage installation, you will need to place the dryer at least 18" (46 cm) above the floor. If using a pedestal, you will - Whirlpool WED9300VU | Use and Care Guide - Page 6
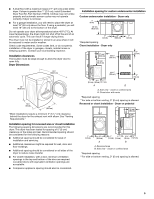
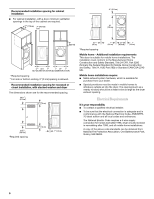
allowed. Recommended installation spacing for recessed or closet installation, with stacked washer and dryer The dimensions shown are for the recommended spacing. 48 in.2 * (310 24 CFR, Part 3280 (formerly the Federal Standard for Mobile Home Construction and Safety, Title 24, HUD Part 280) or - Whirlpool WED9300VU | Use and Care Guide - Page 7
120/208 volt electrical supply, if specified on the serial/rating plate) on a separate 30-amp circuit, fused on both m) long. GROUNDING INSTRUCTIONS ■ For a grounded, cord-connected dryer: This dryer must be grounded. service representative or personnel if you are in doubt as to whether the dryer is - Whirlpool WED9300VU | Use and Care Guide - Page 8
. Be sure that the wire insulation on the power supply cord is inside the strain relief. The strain relief should have a tight fit with the dryer cabinet and be in a horizontal position. Do not further tighten strain relief screws at this point. 8 - Whirlpool WED9300VU | Use and Care Guide - Page 9
Type 14-30R) A UL listed, 120/240-volt minimum, 30-amp, dryer power supply cord* 4-wire connection: Power supply cord 4-wire direct 5" (12 of 3-wire connections. B F A 4. Now complete installation following instructions for your type of electrical connection: 4-wire (recommended) 3-wire ( - Whirlpool WED9300VU | Use and Care Guide - Page 10
of 3-wire connections. Direct wire cable must have 5 ft (1.52 m) of extra length so dryer can be moved if needed. Strip 5" (12.7 cm) of outer covering from end of relief screws. 6. Insert tab of terminal block cover into slot of dryer rear panel. Secure cover with hold-down screw. 7. You have - Whirlpool WED9300VU | Use and Care Guide - Page 11
wire Use where local codes permit connecting cabinet-ground conductor to neutral wire. Direct wire cable must have 5 ft (1.52 m) of extra length so dryer can be moved if needed. Strip 3¹⁄₂" (8.9 cm) of outer covering from end of cable. Strip insulation back 1" (2.5 cm). If using 3-wire cable with - Whirlpool WED9300VU | Use and Care Guide - Page 12
other wires to outer terminal block screws. Tighten screws. 4. Tighten strain relief screw. 5. Insert tab of terminal block cover into slot of dryer rear panel. Secure cover with hold-down screw. 6. You have completed your electrical connection. Now go to "Venting Requirements." 4. Tighten strain - Whirlpool WED9300VU | Use and Care Guide - Page 13
fully extended and supported when the dryer is in its instructions can result in death or fire. WARNING: To reduce the risk of fire, this dryer flexible heavy metal vent. ■ Review Vent system chart. Modify existing Whirlpool Parts and Accessories. For more information, see the "Assistance or Service - Whirlpool WED9300VU | Use and Care Guide - Page 14
(not an option with pedestal installations) Alternate installations for close clearances Venting systems come in many varieties. Select the type best for your installation. Two close-clearance installations are shown. Refer to the manufacturer's instructions. A B A. Over-the-top installation - Whirlpool WED9300VU | Use and Care Guide - Page 15
Number 4396028 ■ Periscope Installation (For use with dryer vent to wall vent mismatch): Part Number 4396037 - 0" (0 cm) to 18" (45.72 cm) mismatch Part Number 4396011 - 18" (45.72 cm) to 29" (73.66 cm) mismatch Part Number 4396014 - 29" (73.66 cm) to 50" (127 cm) mismatch Special provisions for - Whirlpool WED9300VU | Use and Care Guide - Page 16
runs an installation diagnostic routine at the start of its first cycle. If you receive an L2 code, there may be a problem with your home power supply keeping the dryer's heater from turning on. See "Troubleshooting." If you receive an AF code, your dryer vent may be crushed or blocked. See - Whirlpool WED9300VU | Use and Care Guide - Page 17
INSTRUCTIONS before operating this appliance. This manual covers several different models. Your dryer may not have all of the cycles and features described. The following is a guide to starting your dryer. Please refer to specific sections of this manual is selectable. The light will not glow when - Whirlpool WED9300VU | Use and Care Guide - Page 18
hold START button until dryer starts (about 1 second). NOTE: Dryness Level is not adjustable for Manual Cycles is heard and the Control Locked status light is on. ■ When the dryer is off, it is not necessary to sheet. Follow package instructions. ■ Remove the load from the dryer as soon as tumbling - Whirlpool WED9300VU | Use and Care Guide - Page 19
the Automatic or Manual Preset Cycle Settings chart (in the "Cycles" section) for a guide to drying various light is not used with manual cycles. Cool Down The Cool Down light glows during the cool down part and pillows. Rearrange the load halfway through the dryer cycle. This will aid in the drying - Whirlpool WED9300VU | Use and Care Guide - Page 20
woolens Extra Low 25 DAMP DRY Low 20 Clothes to come out suitable for ironing *Estimated Time with Dryness Level (Normal) setting. Time will vary depending on load type and load size. Manual Cycles Use Manual Cycles to select a specific amount of drying time and a drying temperature. When - Whirlpool WED9300VU | Use and Care Guide - Page 21
. Changing Cycles after pressing Start 1. Press PAUSE/CANCEL twice. This ends the current cycle. 2. Select the desired cycle and options. 3. Press and hold START. The dryer starts at the beginning of the please refer to the front page of the manual or contact the dealer from whom you purchased your - Whirlpool WED9300VU | Use and Care Guide - Page 22
needed to complete drying. Refer to the following table. 7. Press and hold START button (about 1 second). NOTE: Check the lint screen and remove any lint screen is located in the door opening of the dryer. The control panel has an indicator light to remind you to clean the lint screen before each - Whirlpool WED9300VU | Use and Care Guide - Page 23
before servicing. Replace all parts and panels before operating. Failure to do so can result in death or electrical shock. 1. Disconnect power. 2. Disconnect wiring. 3. Make sure leveling legs are secure in dryer base. 4. Use masking tape to secure dryer door. Changing the Drum Light The dryer light - Whirlpool WED9300VU | Use and Care Guide - Page 24
TROUBLESHOOTING First try the solutions suggested here or visit our website and reference FAQs (Frequently Asked Questions) to possibly avoid the cost of a service call... In U.S.A. www.whirlpool.com/help - In Canada www.whirlpool.ca Dryer Operation Dryer will not run Dryer displaying code - Whirlpool WED9300VU | Use and Care Guide - Page 25
at the top and bottom of the door. The front of the dryer requires a minimum of 1" (2.5 cm) of airspace, and, for most installations, the rear of the dryer requires 5" (12.7 cm). See the Installation Instructions. WARNING ■ Has the Air Only temperature setting been selected? Select the right - Whirlpool WED9300VU | Use and Care Guide - Page 26
parts in your area, call our Customer eXperience Center telephone number or your nearest designated service center. For assistance and service Call the Whirlpool Customer eXperience Center toll free: 1-800-253-1301. Our consultants provide assistance with: ■ Features and specifications on - Whirlpool WED9300VU | Use and Care Guide - Page 27
Notes 27 - Whirlpool WED9300VU | Use and Care Guide - Page 28
PROVINCE. If outside the 50 United States and Canada, contact your authorized Whirlpool dealer to determine if another warranty applies. If you need service, first see the "Troubleshooting" section of the Use & Care Guide. After checking "Troubleshooting," you may find additional help by checking
-
 1
1 -
 2
2 -
 3
3 -
 4
4 -
 5
5 -
 6
6 -
 7
7 -
8
-
9
-
10
-
11
-
12
-
13
-
14
-
15
-
16
-
17
-
18
-
19
-
20
-
21
-
22
-
23
-
24
-
25
-
26
-
27
-
28
 |
 |
ELECTRONIC
ELECTRIC DRYER
Use & Care Guide
For questions about features, operation/performance, parts,
accessories or service, call:
1-800-253-1301
or visit our website at...
www.whirlpool.com
Table of Contents
................................................
2
W10182361A
®
®